Page 130 of 416

130 Controls in detailControl system
Control systemThe control system is activated as soon as
the SmartKey in the starter switch is
turned to position1. The control system
enables you to:�
call up information about your vehicle
�
change vehicle settings
For example, you can use the control sys-
tem to find out when your vehicle is next
due for service, to set the language for
messages in the instrument cluster dis-
play, and much more.
The control system relays information to
the multifunction display.
Multifunction display
1Trip odometer
2Main odometer
iThe displays for the audio systems (ra-
dio, CD player) will appear in English,
regardless of the language selected.
Warning!
G
A driver’s attention to the road and traffic
conditions must always be his /her primary
focus when driving.
For your safety and the safety of others, se-
lecting features through the multifunction
steering wheel should only be done by the
driver when traffic and road conditions per-
mit it to be done safely.
Bear in mind that at a speed of just 30 mph
(approximately 50 km/h), your vehicle is
covering a distance of 44 feet (approximate-
ly 13.5 m) every second.
Page 144 of 416

144 Controls in detailControl system
Fuel consumption since last reset�
Press button
ÿ
or
è
repeatedly
until you see the first function of the
trip computer menu.
�
Press button
j
or
k
repeatedly
until you see this message in the dis-
play:
AFTER RESET
.
1Distance driven since last reset
2Time elapsed since last reset
3Average fuel consumption since last re-
set
4Average speed since last resetResetting fuel consumption statistics
�
Press button
ÿ
or
è
repeatedly
until you see the first function of the
Trip computer menu.
�
Press button
j
or
k
repeatedly
until you see the reading that you want
to reset in the display.
�
Press and hold the reset button
J
in
the instrument cluster (
�page 22) un-
til the value is reset to
0.
iThe
AFTER START
display will flash until
a distance of approximately 1 mile (1.6
km) has been covered or two minutes
have elapsed since the engine was re-
started. During this period, you can in-
corporate the values for the previous
journey by pressing
J
in the instru-
ment cluster.
If button
J
is not pressed, the AFTER
START values are set to 0.
Page 147 of 416
147 Controls in detail
Control system
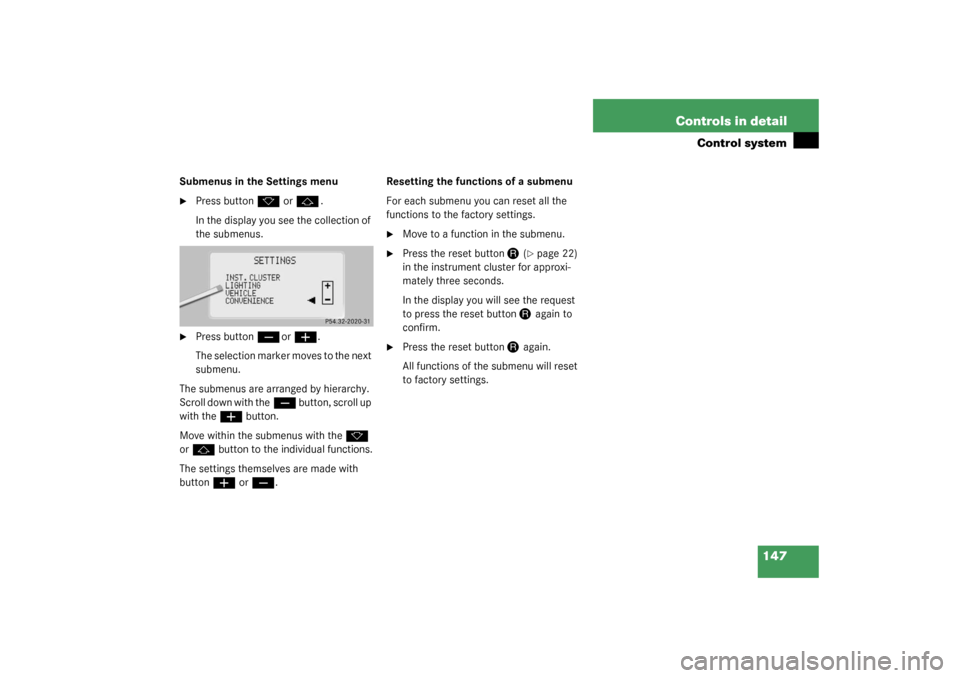
Submenus in the Settings menu�
Press button
k
or
j
.
In the display you see the collection of
the submenus.
�
Press button
ç
or
æ
.
The selection marker moves to the next
submenu.
The submenus are arranged by hierarchy.
Scroll down with the
ç
button, scroll up
with the
æ
button.
Move within the submenus with the
k
or
j
button to the individual functions.
The settings themselves are made with
buttonæ
or
ç
.Resetting the functions of a submenu
For each submenu you can reset all the
functions to the factory settings.
�
Move to a function in the submenu.
�
Press the reset button
J
(�page 22)
in the instrument cluster for approxi-
mately three seconds.
In the display you will see the request
to press the reset button
J
again to
confirm.
�
Press the reset button
J
again.
All functions of the submenu will reset
to factory settings.
Page 148 of 416
148 Controls in detailControl systemThe table below shows what settings can
be changed within the various menus. De-
tailed instructions on making individual
settings can be found on the following pag-
es.INSTRUMENT CLUSTER
LIGHTING
VEHICLE
CONVENIENCE
Select temperature display
mode
Set daytime running lamp mode
(USA only)
Set station selection mode (ra-
dio)
Set key dependency
Select multifunction display
mode
Set locator lighting
Set automatic locking
Activate easy-entry/exit feature
Select language
Exterior lamps delayed shut-off
Set parking position for exterior
rear view mirror
Interior lighting delayed shut-off
Set fold-in function for exterior
rear view mirrors
Page 149 of 416

149 Controls in detail
Control system
Instrument cluster submenu
Access the
INST. CLUSTER
submenu via
the
SETTINGS
menu. Use the
INST. CLUS-
TER
submenu to change the instrument
cluster display settings. The following
functions are available:Selecting temperature display mode
�
Move the selection marker with
the
æ
or
ç
button to the
INST.
CLUSTER
submenu.
�
Press button
j
or
k
repeatedly
until you see this message in the dis-
play:
TEMP. INDICATOR
.
The selection marker is on the current
setting.
�
Press
æ
or
ç
to set the temper-
ature unit to degrees Celsius (°C) or
degrees Fahrenheit (°F).Selecting multifunction display mode
�
Move the selection marker with
the
æ
or
ç
button to the
INST.
CLUSTER
submenu.
�
Press button
j
or
k
repeatedly
until you see this message in the dis-
play:
DISPLAY VALUES IN
.
The selection marker is on the current
setting.
�
Press
æ
or
ç
to set speedome-
ter unit to
MILES
or
KM.
Function
Page
Select temperature display
mode
150
Select multifunction display
mode
149
Select language
150
Page 170 of 416

170 Controls in detailGood visibilityElectrically folding exterior rear view mirrors
Folding the exterior mirrors in and out
automatically
When the corresponding function in the
control system is activated (
�page 158):
�
The exterior rear view mirrors automat-
ically fold in as soon as the vehicle is
locked from the outside.
�
The exterior rear view mirrors automat-
ically fold out as soon as the vehicle is
unlocked and the driver’s or front pas-
senger door are subsequently opened.Folding the exterior mirrors in and out
manually
The exterior rear view mirrors can vibrate if
they are not completely folded out.
The buttons are located on the door.
1Folds the exterior mirrors out
2Folds the exterior mirrors in
�
Make sure that the ignition is switched
on.All the lamps in the instrument cluster
light up.
Folding in
�
Press button2 briefly.
Both mirrors fold in.
Folding out
�
Press button1 briefly.
Both mirrors fold out.
!Before you drive the vehicle through an
automatic car wash, fold the exterior
mirrors in, otherwise they may get
damaged.
iIf you are driving at more than 9 mph
(15 km/h) you will not be able to fold
the exterior mirrors in.
!If an exterior rear view mirror housing
is forcibly pushed forward (hit from the
rear), reposition it manually by applying
firm pressure until it snaps back into
place.
If an exterior rear view mirror housing
is forcibly pushed rearward (hit from
the front), press button2 to fold mir-
rors in, then press button1 to fold mir-
rors out. Do not force mirrors by hand
as this may damage the adjustment
mechanism.
Page 201 of 416
201 Controls in detail
Driving systems
Distronic displays in the speedometer
dialSet speedIf Distronic is activated, one or two seg-
ments light up around the set speed.
SegmentsIf Distronic detects a vehicle directly
ahead, the segments (representing the
difference) between the speed of the
vehicle ahead and the set speed light up.
If Distronic calculates that there is a dan-
ger of collision (
�page 207):
�
The red Distronic warning lamp
l
in
the instrument cluster lights up.
�
An intermittent warning sounds.
�
Immediately brake the vehicle to avoid
a collision.Under no circumstances should the
driver await the intermittent warning
sound before braking.
The intermittent warning sound ceases
and the red Distronic warning
lamp
l
goes out when the neces-
sary distance to the vehicle ahead is
again established.
iThe vehicle speed displayed on the
speedometer can briefly vary from the
speed setting on the Distronic system.
Page 207 of 416

207 Controls in detail
Driving systems
1Distance warning function on/off
switch
2Thumbwheel for setting distanceIncreasing distance
Increasing the distance setting causes Dis-
tronic to maintain a greater following dis-
tance to the vehicle ahead.
�
Turn thumbwheel 2 towards
¯
.
Decreasing distance
Decreasing the distance setting causes
Distronic to maintain a shorter following
distance to the vehicle ahead.
�
Turn thumbwheel2 towards
®
.Distance warning function
When Distronic is deactivated, this func-
tion will continue to warn you when recog-
nizing a stationary obstacle or a slower
vehicle moving in the vehicle’s path and
the danger of a collision exists:
�
The distance warning lamp
l
in the
instrument cluster lights up.
�
An intermittent warning sounds.
If these warnings are issued, you must
brake manually to maintain a safe distance
and avoid a collision with the vehicle
ahead.
When pressing the brake pedal, the warn-
ing sound stops. The warning sound also
stops when the distance to the vehicle
ahead is sufficient again without applying
the brake pedal. In this case the distance
warning lamp also extinguishes.
Warning!
G
I t is up t o t he d ri ver to exer c is e di s cr et io n to
select the appropriate setting given road
conditions, traffic, driver’s preferred driving
style and applicable laws and driving recom-
mendations for safe following distance.