Page 35 of 416

35 Getting started
Adjusting
Seat adjustment
The seat adjustment switches are located
on the front doors.
1Head restraint height
2Seat height
3Seat cushion tilt
4Seat cushion depth
5Seat fore and aft adjustment
6Seat backrest tilt
Warning!
G
Children 12 years old and under must never
ride in the front seat, except in a
Mercedes-Benz authorized BabySmart
TM
compatible child seat, which operates with
the BabySmart
TM system installed in the ve-
hicle to deactivate the front passenger air-
bag when it is properly installed. Otherwise
they will be struck by the airbag when it in-
flates in a crash. If this happens, serious or
fatal injury will result.
According to accident statistics, children
are safer when properly restrained in the
rear seating positions than in the front seat-
ing positions. Infants and small children
must ride in back seats and be seated in an
appropriate infant or child restraint system,
which is properly secured with the vehicle's
seat belt and top tether strap, or secured via
lower anchors and top tether strap, fully in
accordance with the child seat manufactur-
er’s instructions.
A child’s risk of serious or fatal injuries is
significantly increased if the child restraints
are not properly secured in the vehicle and
the child is not properly secured in the child
restraint.
Page 36 of 416

36 Getting startedAdjusting�
Turn the SmartKey in the starter switch
to position1or2.
or
�
Press the KEYLESS GO* start/stop
button once or twice.
or
�
Open the respective driver’s or passen-
ger door.
Seat height
�
Press the switch up or down in the di-
rection of arrow2.
Seat cushion tilt
�
Press the switch up or down in the di-
rection of arrow3 until your upper legs
are lightly supported.Seat cushion depth
�
Press the switch forward or backward
in the direction of arrow4 until your
legs are supported comfortably.
Seat fore and aft adjustment
�
Press the switch forward or backward
in the direction of arrow5.
Adjust to a comfortable seating posi-
tion that still allows you to reach the
accelerator / brake pedal safely. The
position should be as far to the rear as
possible, consistent with ability to
properly operate controls.Seat backrest tilt
�
Press the switch forward or backward
in the direction of arrow6 until your
arms are slightly angled when holding
the steering wheel.
iWhen moving the seat, be sure that
there are no items in the footwell or be-
hind the seats. Otherwise you could
damage the seats.
Page 37 of 416

37 Getting started
Adjusting
Head restraint height�
Press the switch up or down in the di-
rection of arrow1.
Head restraint tilt
�
Manually adjust the angle of the head
restraint. Push or pull on the lower
edge of the head restraint cushion.
For more information, see “Front seat head
restraints” (
�page 105).
Steering wheel
Warning!
G
For your protection, drive only with properly
positioned head restraints.
Adjust head restraint to support the back of
the head approximately at ear level.
Do not drive the vehicle without the seat
head restraints. Head restraints are intend-
ed to help reduce injuries during an acci-
dent.
iThe front passenger seat head restraint
automatically lowers after a few sec-
onds when the front passenger seat is
not occupied. This improves the driv-
er’s outward view as well as the for-
ward view from the rear passenger
compartment.
When the front passenger seat is occu-
pied again, the front passenger seat
head restraint returns to the last set
position within a few seconds.
If the front passenger seat was moved
fore or aft while not being occupied,
the front passenger seat head restraint
returns to a position that corresponds
best with the seat’s axial position when
the seat is occupied again.
Warning!
G
Do not adjust the steering wheel while driv-
ing. Adjusting the steering wheel while driv-
ing could cause the driver to lose control of
the vehicle.
When leaving the vehicle, always remove the
SmartKey from the starter switch, and take
the KEYLESS-GO
* card (if so equipped) with
you.
The steering wheel adjustment feature can
also be operated with the driver’s door
open. Do not leave children unattended in
the vehicle, or with access to an unlocked
vehicle. Unsupervised use of vehicle equip-
ment may cause an accident and/or serious
personal injury.
Page 38 of 416
.
1Steering column, lengthen or shorten
2Steering column, height�
Turn the SmartKey in the")
38 Getting startedAdjustingSteering wheel adjustment
The stalk is located on the steering column
(lower left).
1Steering column, lengthen or shorten
2Steering column, height�
Turn the SmartKey in the starter switch
to position1or2.
or
�
Press the KEYLESS GO* start/stop
button once or twice.
or
�
Open the driver’s or passenger door.Steering column, lengthen or shorten
�
Move stalk forward or backward in the
direction of arrows1 until a comfort-
able steering wheel position is reached
with your arms slightly bent at the el-
bow.
Steering column, height
�
Move the stalk up or down in the direc-
tion of arrows2. Make sure that your
legs can move freely and that all of the
displays (including malfunction and in-
dicator lamps) on the instrument clus-
ter are clearly visible.
Mirrors
Adjust the inside and exterior rear view
mirrors before driving so that you have a
good view of the road and traffic condi-
tions.
Inside rear view mirror�
Manually adjust the inside rear view
mirror.Warning!
G
In the case of an accident liquid electrolyte
may escape the mirror housing if the mirror
glass breaks.
Electrolyte has an irritating effect. Do not al-
low the liquid to come into contact with
eyes, skin, clothing, or respiratory system.
In case it does, immediately flush affected
area with water, and seek medical help if
necessary.
Page 114 of 416
114 Controls in detailSeatsSeat bench fore and aft adjustment�
Press the switch forward or backward
in direction of arrow1.
Head restraint folding
�
Press the switch up or down in direc-
tion of arrow2.
The head restraint is folded or placed
upright.
Information on switching on seat heating*
and seat ventilation* can be found on
(
�page 110) and (
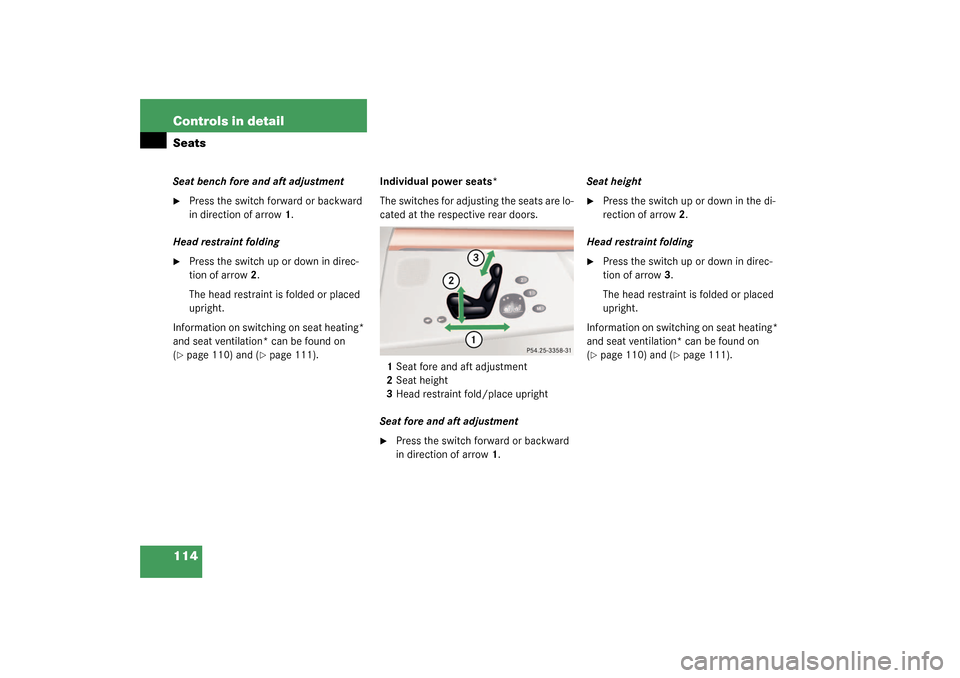
�page 111).Individual power seats*
The switches for adjusting the seats are lo-
cated at the respective rear doors.
1Seat fore and aft adjustment
2Seat height
3Head restraint fold/place upright
Seat fore and aft adjustment
�
Press the switch forward or backward
in direction of arrow1.Seat height
�
Press the switch up or down in the di-
rection of arrow2.
Head restraint folding
�
Press the switch up or down in direc-
tion of arrow3.
The head restraint is folded or placed
upright.
Information on switching on seat heating*
and seat ventilation* can be found on
(
�page 110) and (
�page 111).
Page 115 of 416

115 Controls in detailSeats
Power seat, setting passenger seat po-
sition from rear*
This function lets you adjust the position of
the passenger seat from the rear.The switch is located on the right rear pas-
senger door.
1Front passenger seat adjustment
2Rear seat adjustment
3Seat height
4Head restraint height
5Backrest tilt
6Seat fore and aft adjustment
�
Make sure the ignition is switched on.
or
�
Open the right rear passenger door.
�
Press button1 to adjust the front
passenger seat.
Warning!
G
When adjusting the passenger seat, make
sure that the seat, if occupied, is as far from
the front passenger airbag as possible.
Otherwise, the passenger could be seriously
or even fatally injured in the event of an ac-
cident or braking maneuver.
Make sure that no one is caught or injured
while the seat is being adjusted.
The power seats can also be operated with
the driver's or passenger door open. Do not
leave children unattended in the vehicle, or
with access to an unlocked vehicle. Unsu-
pervised use of vehicle equipment may
cause an accident and/or serious personal
injury
iAdjusting the passenger seat position
from the rear is not possible if you de-
activate the operation of the rear door
windows (
�page 74).
!Do not move the front passenger seat
completely forward if objects are
stored in the parcel net in the front pas-
senger-side footwell. Items in the net
may be damaged
Page 116 of 416
116 Controls in detailSeatsPassenger seat fore and aft adjustment�
Press the switch forward or backward
in direction of arrow6.
Passenger seat backrest tilt
�
Press the switch forward or backward
in direction of arrow5.
Passenger seat height
�
Press the switch up or down in the
direction of arrow3.
Passenger seat head restraint height
�
Press the switch up or down in
direction of arrow4.
Press button2 to adjust the rear seat
(
�page 114).
Page 212 of 416

212 Controls in detailDriving systemsVehicle level control with AIRMATIC
Your vehicle automatically adjusts its ride
height to:�
reduce fuel consumption
�
increase vehicle safety
The vehicle chassis ride height is raised or
lowered according to the selected level
setting and to the vehicle speed:
�
With increasing speed, ride height is re-
duced by up to approximately
3/4inch
(20 mm).
�
With decreasing speed, the ride height
is again raised to the selected vehicle
level.The following vehicle level settings can be
selected when the vehicle is stationary:
Select the "Raised" level setting only when
required by current driving conditions.
Otherwise:
�
Fuel consumption may increase
�
Handling may be impairedThe switch with the indicator lamps is lo-
cated in the upper part of the center con-
sole.
1Indicator lamp
2Vehicle level control switch
iThese height adjustments are so small
that you may not notice any change.
LevelNormal
For driving on normal roads.
The indicator lamp is off.
Raised
For driving on rough roads or
with snow chains.The indica-
tor lamp is on.
Warning!
G
To help avoid personal injury, keep hands
and feet away from wheel housing area, and
stay away from under the vehicle when low-
ering the vehicle chassis.