Page 148 of 416
148 Controls in detailControl systemThe table below shows what settings can
be changed within the various menus. De-
tailed instructions on making individual
settings can be found on the following pag-
es.INSTRUMENT CLUSTER
LIGHTING
VEHICLE
CONVENIENCE
Select temperature display
mode
Set daytime running lamp mode
(USA only)
Set station selection mode (ra-
dio)
Set key dependency
Select multifunction display
mode
Set locator lighting
Set automatic locking
Activate easy-entry/exit feature
Select language
Exterior lamps delayed shut-off
Set parking position for exterior
rear view mirror
Interior lighting delayed shut-off
Set fold-in function for exterior
rear view mirrors
Page 149 of 416

149 Controls in detail
Control system
Instrument cluster submenu
Access the
INST. CLUSTER
submenu via
the
SETTINGS
menu. Use the
INST. CLUS-
TER
submenu to change the instrument
cluster display settings. The following
functions are available:Selecting temperature display mode
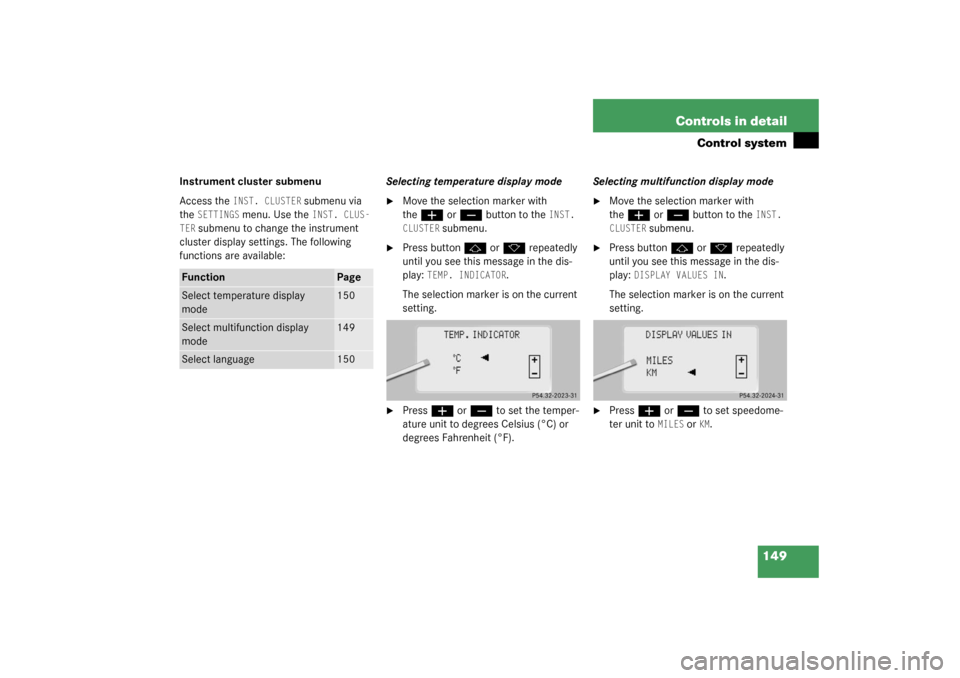
�
Move the selection marker with
the
æ
or
ç
button to the
INST.
CLUSTER
submenu.
�
Press button
j
or
k
repeatedly
until you see this message in the dis-
play:
TEMP. INDICATOR
.
The selection marker is on the current
setting.
�
Press
æ
or
ç
to set the temper-
ature unit to degrees Celsius (°C) or
degrees Fahrenheit (°F).Selecting multifunction display mode
�
Move the selection marker with
the
æ
or
ç
button to the
INST.
CLUSTER
submenu.
�
Press button
j
or
k
repeatedly
until you see this message in the dis-
play:
DISPLAY VALUES IN
.
The selection marker is on the current
setting.
�
Press
æ
or
ç
to set speedome-
ter unit to
MILES
or
KM.
Function
Page
Select temperature display
mode
150
Select multifunction display
mode
149
Select language
150
Page 170 of 416

170 Controls in detailGood visibilityElectrically folding exterior rear view mirrors
Folding the exterior mirrors in and out
automatically
When the corresponding function in the
control system is activated (
�page 158):
�
The exterior rear view mirrors automat-
ically fold in as soon as the vehicle is
locked from the outside.
�
The exterior rear view mirrors automat-
ically fold out as soon as the vehicle is
unlocked and the driver’s or front pas-
senger door are subsequently opened.Folding the exterior mirrors in and out
manually
The exterior rear view mirrors can vibrate if
they are not completely folded out.
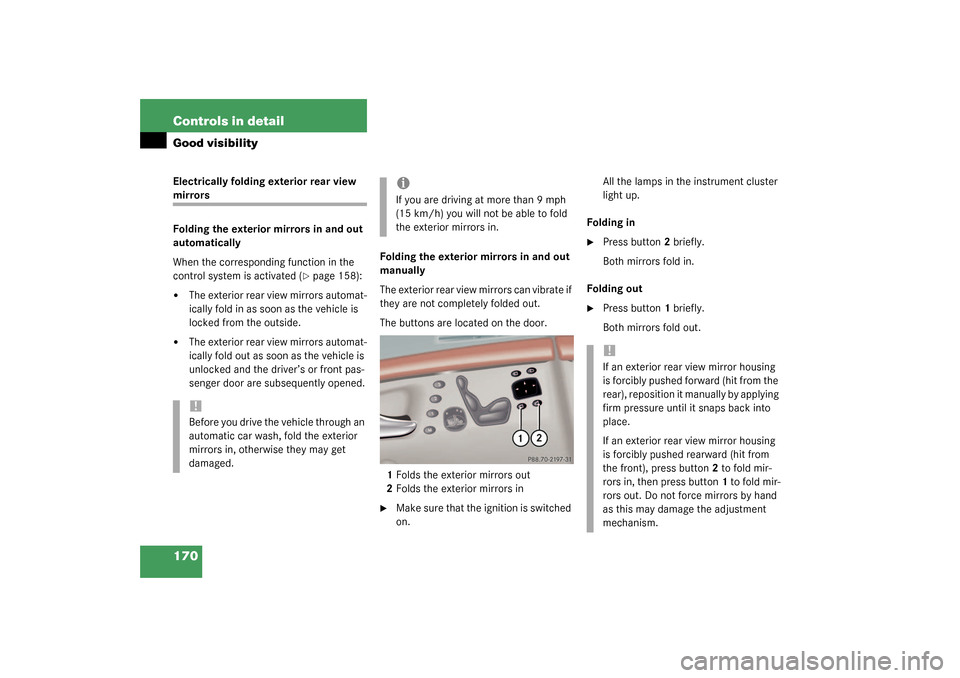
The buttons are located on the door.
1Folds the exterior mirrors out
2Folds the exterior mirrors in
�
Make sure that the ignition is switched
on.All the lamps in the instrument cluster
light up.
Folding in
�
Press button2 briefly.
Both mirrors fold in.
Folding out
�
Press button1 briefly.
Both mirrors fold out.
!Before you drive the vehicle through an
automatic car wash, fold the exterior
mirrors in, otherwise they may get
damaged.
iIf you are driving at more than 9 mph
(15 km/h) you will not be able to fold
the exterior mirrors in.
!If an exterior rear view mirror housing
is forcibly pushed forward (hit from the
rear), reposition it manually by applying
firm pressure until it snaps back into
place.
If an exterior rear view mirror housing
is forcibly pushed rearward (hit from
the front), press button2 to fold mir-
rors in, then press button1 to fold mir-
rors out. Do not force mirrors by hand
as this may damage the adjustment
mechanism.
Page 201 of 416
201 Controls in detail
Driving systems
Distronic displays in the speedometer
dialSet speedIf Distronic is activated, one or two seg-
ments light up around the set speed.
SegmentsIf Distronic detects a vehicle directly
ahead, the segments (representing the
difference) between the speed of the
vehicle ahead and the set speed light up.
If Distronic calculates that there is a dan-
ger of collision (
�page 207):
�
The red Distronic warning lamp
l
in
the instrument cluster lights up.
�
An intermittent warning sounds.
�
Immediately brake the vehicle to avoid
a collision.Under no circumstances should the
driver await the intermittent warning
sound before braking.
The intermittent warning sound ceases
and the red Distronic warning
lamp
l
goes out when the neces-
sary distance to the vehicle ahead is
again established.
iThe vehicle speed displayed on the
speedometer can briefly vary from the
speed setting on the Distronic system.
Page 207 of 416

207 Controls in detail
Driving systems
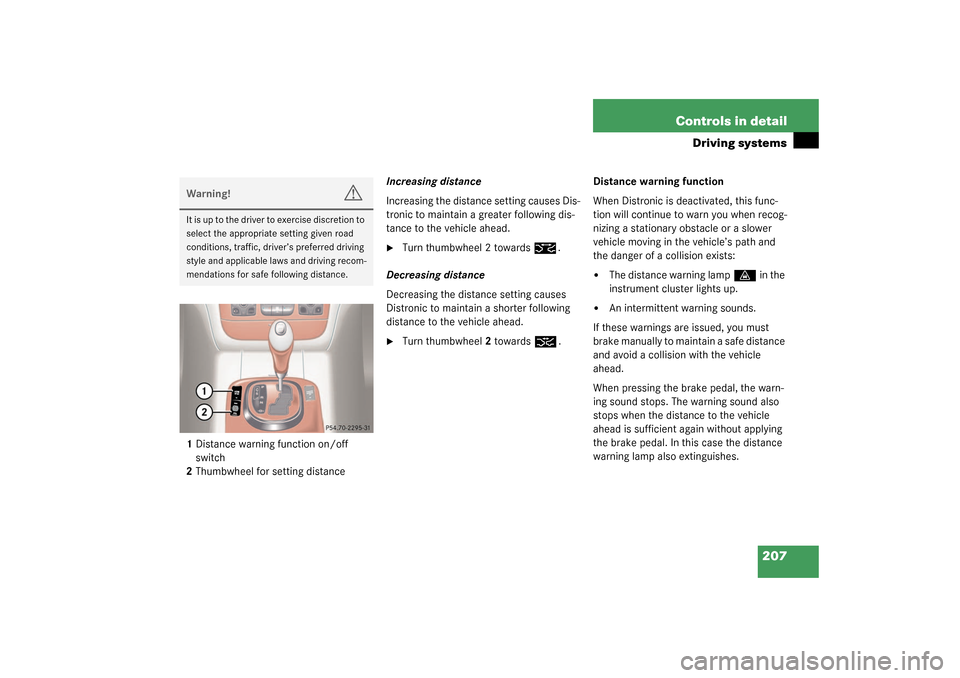
1Distance warning function on/off
switch
2Thumbwheel for setting distanceIncreasing distance
Increasing the distance setting causes Dis-
tronic to maintain a greater following dis-
tance to the vehicle ahead.
�
Turn thumbwheel 2 towards
¯
.
Decreasing distance
Decreasing the distance setting causes
Distronic to maintain a shorter following
distance to the vehicle ahead.
�
Turn thumbwheel2 towards
®
.Distance warning function
When Distronic is deactivated, this func-
tion will continue to warn you when recog-
nizing a stationary obstacle or a slower
vehicle moving in the vehicle’s path and
the danger of a collision exists:
�
The distance warning lamp
l
in the
instrument cluster lights up.
�
An intermittent warning sounds.
If these warnings are issued, you must
brake manually to maintain a safe distance
and avoid a collision with the vehicle
ahead.
When pressing the brake pedal, the warn-
ing sound stops. The warning sound also
stops when the distance to the vehicle
ahead is sufficient again without applying
the brake pedal. In this case the distance
warning lamp also extinguishes.
Warning!
G
I t is up t o t he d ri ver to exer c is e di s cr et io n to
select the appropriate setting given road
conditions, traffic, driver’s preferred driving
style and applicable laws and driving recom-
mendations for safe following distance.
Page 235 of 416
235 Controls in detail
Useful features
Heated steering wheel*
The steering wheel heating warms up the
leather area of the steering wheel.
The lever is on the lower left-hand side of
the steering wheel.
1Switching on
2Indicator lamp
3Switching offSwitching on
�
Make sure that the ignition is switched
on.
All the lamps in the instrument cluster
should light up.
�
Turn lever in the direction of arrow1.
The steering wheel is heated. Indicator
lamp2 lights up.Switching off
�
Turn the lever in direction of arrow3.
The steering wheel heating is turned
off. Indicator lamp2 goes out.iThe steering wheel heating does not
turn off automatically.
Page 243 of 416

243 Controls in detail
Useful features
Upgrade Signals
The Tele Aid system processes calls using
the following priority:�
Automatic emergency – First priority
�
Manual emergency – Second priority
�
Roadside Assistance – Third priority
�
Information – Fourth priority
Should a higher priority call be initiated
while you are connected, an upgrade (al-
ternating) tone will be heard, and the ap-
propriate indicator lamp will flash. If
certain information such as vehicle identi-
fication number or customer information is
not available, the operator may need to re-
transmit.
During this time you will hear a beep and
voice contact will be interrupted. Voice
contact will resume once the retransmis-
sion is completed. Once a call is conclud-
ed, a beep will be heard and the
appropriate indicator lamp will stop flash-
ing. The COMAND system operation will
resume.
!If the indicator lamp continues to flash
or the system does not reset, contact
the Response Center at
1-800-756-9018 (in the USA) or
1-888-923-8367 (in Canada), or
Mercedes-Benz Customer Assistance
at 1-800-FOR-MERCedes
(1-800-367-6372) in the USA or Cus-
tomer Service at 1-800-387-0100 in
Canada.iThe indicator lamp in the respective
button flashes until the call is conclud-
ed. Calls can only be terminated by a
Response Center or Customer Assis-
tance Center representative except
Roadside Assistance and Information
calls, which can also be terminated by
pressing button
ì
on the multifunc-
tion steering wheel.
iWhen a Tele Aid call has been initiated,
the audio system or the COMAND sys-
tem audio is muted and the selected
mode (radio, tape or CD) pauses. The
optional cellular phone (if installed)
switches off. If you must use this
phone, the vehicle must be parked. Dis-
connect the coiled cord and place the
call. The COMAND navigation system
(if engaged) will continue to run. The
display in the instrument cluster is
available for use and spoken com-
mands are only available by pressing
the RPT button on the COMAND unit. A
pop-up window will appear in the CO-
MAND display to indicate that a
Tele Aid call is in progress.
Page 252 of 416

252 OperationDriving instructionsBrakesTo help prevent brake disk corrosion after
driving on wet road surfaces (particularly
salted roads), it is advisable to brake the
vehicle with considerable force prior to
parking. The heat generated serves to dry
the brakes.
If your brake system is normally only sub-
jected to moderate loads, you should occa-
sionally test the effectiveness of the
brakes by applying above-normal braking
pressure at higher speeds. This will also
enhance the grip of the brake pads.If the parking brake is released and the
brake warning lamp in the instrument clus-
ter stays on, the brake fluid level in the res-
ervoir is too low.
Brake pad wear or a leak in the system may
be the reason for low brake fluid in the res-
ervoir.
Have the brake system inspected at an au-
thorized Mercedes-Benz Center immedi-
ately.
All checks and service work on the brake
system should be carried out by an autho-
rized Mercedes-Benz Center.
Install only brake pads and brake fluid rec-
ommended by Mercedes-Benz.Warning!
G
After driving in heavy rain for some time
without applying the brakes or through wa-
ter deep enough to wet brake components,
the first braking action may be somewhat
reduced and increased pedal pressure may
be necessary to obtain expected braking ef-
fect. Maintain a safe distance from vehicles
in front.
Resting your foot on the brake pedal will
cause excessive and premature wear of the
brake pads.
It can also result in the brakes overheating,
thereby significantly reducing their effec-
tiveness. It may not be possible to stop the
vehicle in sufficient time to avoid an acci-
dent.
!Be very careful not to endanger other
road users when you apply the brakes.
Refer to the description of the Brake
Assist System (BAS) (
�page 78).