Page 104 of 416
104 Controls in detailSeats
SeatsInformation on seat adjustment can be
found in the “Getting started” section,
(�page 34).
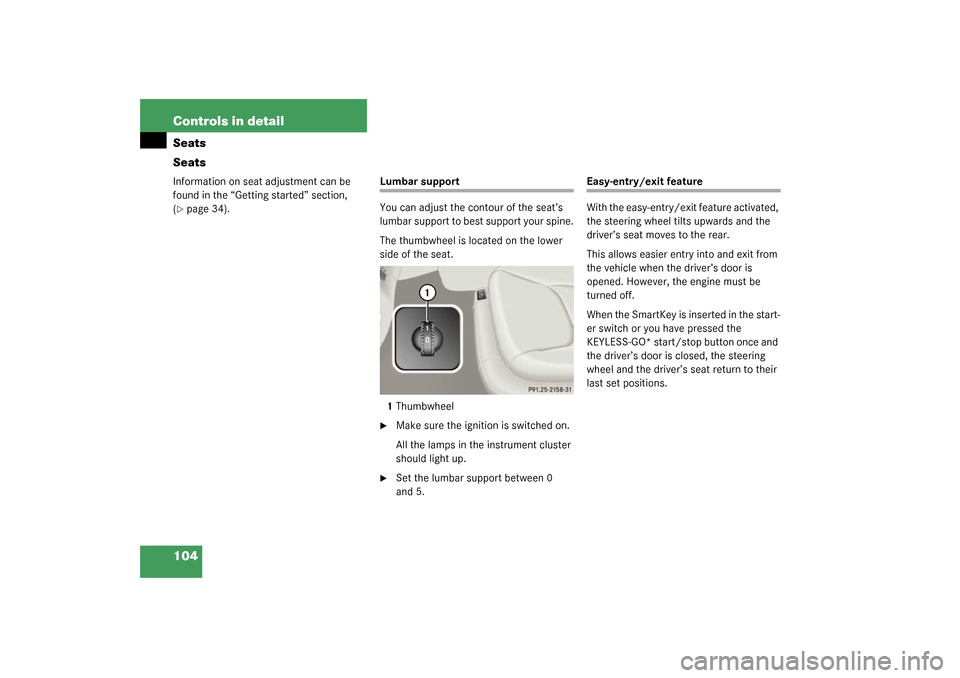
Lumbar support
You can adjust the contour of the seat’s
lumbar support to best support your spine.
The thumbwheel is located on the lower
side of the seat.
1Thumbwheel�
Make sure the ignition is switched on.
All the lamps in the instrument cluster
should light up.
�
Set the lumbar support between 0
and 5.
Easy-entry/exit feature
With the easy-entry/exit feature activated,
the steering wheel tilts upwards and the
driver’s seat moves to the rear.
This allows easier entry into and exit from
the vehicle when the driver’s door is
opened. However, the engine must be
turned off.
When the SmartKey is inserted in the start-
er switch or you have pressed the
KEYLESS-GO* start/stop button once and
the driver’s door is closed, the steering
wheel and the driver’s seat return to their
last set positions.
Page 106 of 416

106 Controls in detailSeatsInstalling front head restraints:�
Press switch1 upwards and hold for
about five seconds.
�
Push the head restraint down until it
engages.
�
Adjust head restraint to desired posi-
tion (
�page 35).
Rear seat head restraintsFolding rear head restraints back
�
Make sure the ignition is switched on.
All the lamps in the instrument cluster
should light up.
�
Press switch1.
The rear head restraints will fold back-
ward.Placing rear head restraints upright
�
Pull the rear head restraint forward un-
til it locks into position.
Rear head restraint tilt
The read head restraint angle can be ad-
justed manually.
Warning!
G
For safety reasons, always drive with the
rear head restraints in the upright position
when the rear seats are occupied.
Keep the area around head restraints clear
of articles (e.g. clothing) to not obstruct the
folding operation of the head restraints.iYou can adjust the angle manually by
pulling or pushing the head restraints
by hand.
!Make sure that the head restraints en-
gage when adjusting them manually.
Otherwise, their protective function
cannot be ensured.
Page 107 of 416

107 Controls in detailSeats
Power head restraints, rear*
You can fold the rear head restraints back-
ward or forward using head restraint fold-
ing switch. The switches are located�
on the front center console
(�page 106):
�
Make sure the ignition is switched
on.
All the lamps in the instrument clus-
ter should light up
�
Press switch1 briefly.
The rear head restraints will fold
backward.
�
Press switch1 and hold.
The rear head restraints will fold up-
right.
�
on the rear section of the door for ad-
justing the respective head restraint:�
Make sure the ignition is switched
on.
All the lamps in the instrument clus-
ter should light up
�
Press switch1 up.
The rear head restraints will fold up-
right.
�
Press switch1 down.
The rear head restraints will fold
backward.
Multicontour seat*
The multicontour seat has a movable seat
cushion and inflatable air cushions built
into the seat backrest to provide additional
lumbar and side support.
The seat cushion movement and the seat
backrest cushion height and curvature can
be continuously varied with regulators on
the right side of the seat after turning the
SmartKey in the starter switch to
position2 or pressing the KEYLESS-GO*
start/stop button twice.
Page 108 of 416
108 Controls in detailSeats1Shoulder region support
2Side bolster adjustment
3Massage function (PULSE)
4Lumbar region support
Adjusting the multicontour seat in the or-
der listed above is recommended.�
Make sure that the ignition is switched
on.
All lamps in the instrument cluster light
up.Shoulder region support
�
Press
æ
or
ç
on switch1.
The air cushion inflates or deflates.
Lumbar region support
�
Press
k
or
j
on rocker
switch4.
This selects the air cushion you wish to
adjust.
�
Press
æ
or
ç
on rocker
switch4.
The air cushion inflates or deflates.Side bolsters adjustment
�
Adjust the side bolsters so that they
provide good lateral support using
switch 2.iWhen the engine is turned off, the last
cushion setting is retained in memory
and the cushion is automatically ad-
justed to this setting when the engine
is restarted.
Page 110 of 416
 or by the su")
110 Controls in detailSeatsSeat ventilation*
The switch is located on the door. Seat
ventilation can be activated manually with
the SmartKey in starter switch position1
or2 (
�page 31) or by the summer open-
ing feature (
�page 190).
The blue indicator lamps on the switch
show the ventilation level selected:
1Seat ventilation switch
�
Make sure the ignition is switched on.
All lamps in the instrument cluster light
up.
Switching on seat ventilation
�
Press switch1.
Three blue indicator lamps above the
switch light up.
Continue pressing switch until the de-
sired seat ventilation level is reached.Switching off seat ventilation
�
Press switch1 repeatedly until all indi-
cator lamps go out.
Level3
Three indicator lamps lit
2
Two indicator lamps lit
1
One indicator lamp lit
off
No indicator lamp lit
iThe seat ventilation is automatically set
to the highest level if activated via sum-
mer opening feature (
�page 190).
!If one or all of the lamps blink on the
seat ventilation switch, there is insuffi-
cient voltage since too many electrical
consumers are switched on. The seat
ventilation switches off automatically.
The seat ventilation will switch back on
again automatically as soon as suffi-
cient voltage is available.
Page 111 of 416
111 Controls in detailSeats
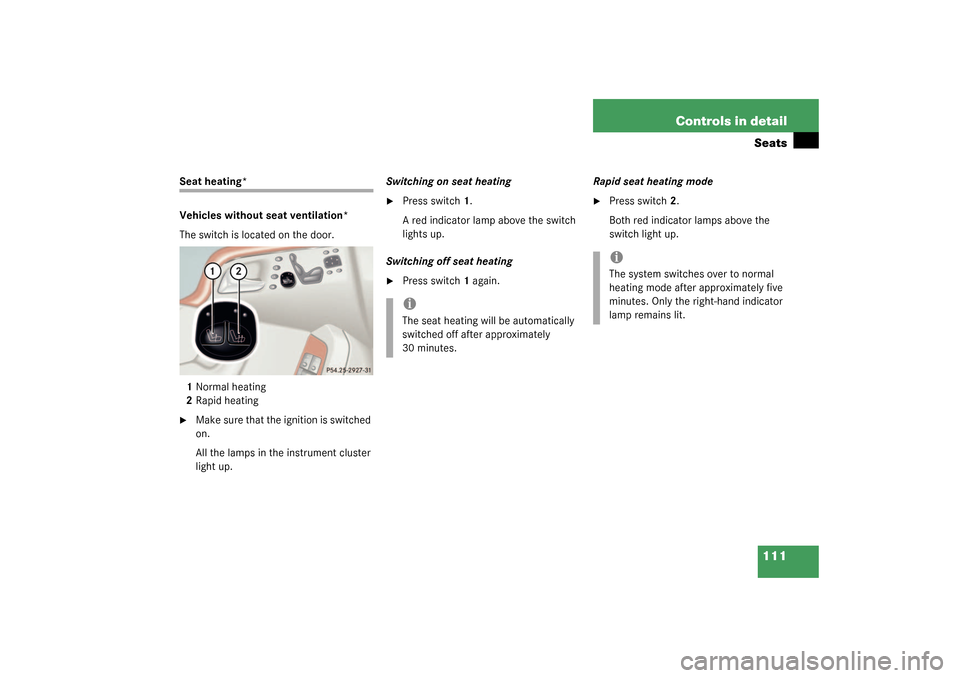
Seat heating*
Vehicles without seat ventilation*
The switch is located on the door.
1Normal heating
2Rapid heating�
Make sure that the ignition is switched
on.
All the lamps in the instrument cluster
light up.Switching on seat heating
�
Press switch1.
A red indicator lamp above the switch
lights up.
Switching off seat heating
�
Press switch1 again. Rapid seat heating mode
�
Press switch2.
Both red indicator lamps above the
switch light up.
iThe seat heating will be automatically
switched off after approximately
30 minutes.
iThe system switches over to normal
heating mode after approximately five
minutes. Only the right-hand indicator
lamp remains lit.
Page 112 of 416
112 Controls in detailSeatsSwitching off rapid seat heating mode�
Press switch2 again. Vehicles with seat ventilation*
The switch is located on the door. The red
indicator lamps on the switch show the
heating level selected:
1Seat heating switch
�
Make sure the ignition is switched on.
All the lamps in the instrument cluster
light up.
Switching on seat heating
�
Press switch1 twice.
A red indicator lamp above the switch
lights up.
Switching off seat heating
�
Press switch1 again.
!If one or both of the lamps on the seat
heating switch are blinking, there is in-
sufficient voltage available since too
many electrical consumers are turned
on. The seat heating switches off auto-
matically.
The seat heating will switch back on
again automatically as soon as suffi-
cient voltage is available.
Level2
Two indicator lamps lit
1
One indicator lamp lit
off
No indicator lamp lit
iThe seat heating will be automatically
switched off after approximately
30 minutes.
Page 120 of 416
.
Exterior lamp switch
The exterior lam")
120 Controls in detailLighting
LightingFor notes on how to switch on the head-
lamps and use the turn signals, see the
“Getting started” section (
�page 46).
Exterior lamp switch
The exterior lamp switch is located on the
dashboard to the left of the steering wheel.
M
Off
U
Automatic headlamp mode
C
Parking lamps (also side marker
lamps, tail lamps, license plate
lamps, instrument panel lamps)
Canada only: When engine is run-
ning, the low beam is also switched
on.
B
Parking lamps plus low beam or
high beam headlamps (combination
switch pushed forward).
ˆ
Standing lamps, right (turn left one
stop)
‚
Standing lamps, left (turn left two
stops)
iIf you remove the SmartKey and open
the driver’s door while the parking
lamps or low beam headlamps are
switched on, then: �
A warning sounds.
�
$
appears in the multifunction
display.
�
The message
TURN OFF LIGHTS!
ap-
pears in the multifunction display.
iWith the daytime running lamp mode
activated and the engine running, the
low beam headlamps cannot be
switched off manually.

4Lumbar region support
Adjusting the multicontour seat in the or-
der listed above is recommended")