Page 109 of 416

You can reduce muscle tension during long
trips by periodically using the massage
function. �
Press button3.
The indicator lamp on button3 lights")
109 Controls in detailSeats
Massage function (PULSE)
You can reduce muscle tension during long
trips by periodically using the massage
function. �
Press button3.
The indicator lamp on button3 lights
up. The air cushions in the lumbar re-
gion inflate and deflate (pulse).
Drive-dynamic seat*
The drive-dynamic seat automatically ad-
justs the lateral support provided by the
seat backrest to your driving style.
1Activate drive-dynamic function
The drive-dynamic seat electronically con-
trols the air pressure in the air chambers of
the seat backrest side bolsters. This func-
tion improves driving comfort and plea-
sure.Activating
�
Press button1.
The indicator lamp in the button lights
up.
Deactivating
�
Press button1 again.
The indicator lamp in the button goes
out.
iThe massage function switches off au-
tomatically after approximately eight
minutes. The indicator lamp extinguish-
es.
iYou can adjust the characteristics of
the drive-dynamic seat using the con-
trol system (
�page 159).
Page 111 of 416
111 Controls in detailSeats
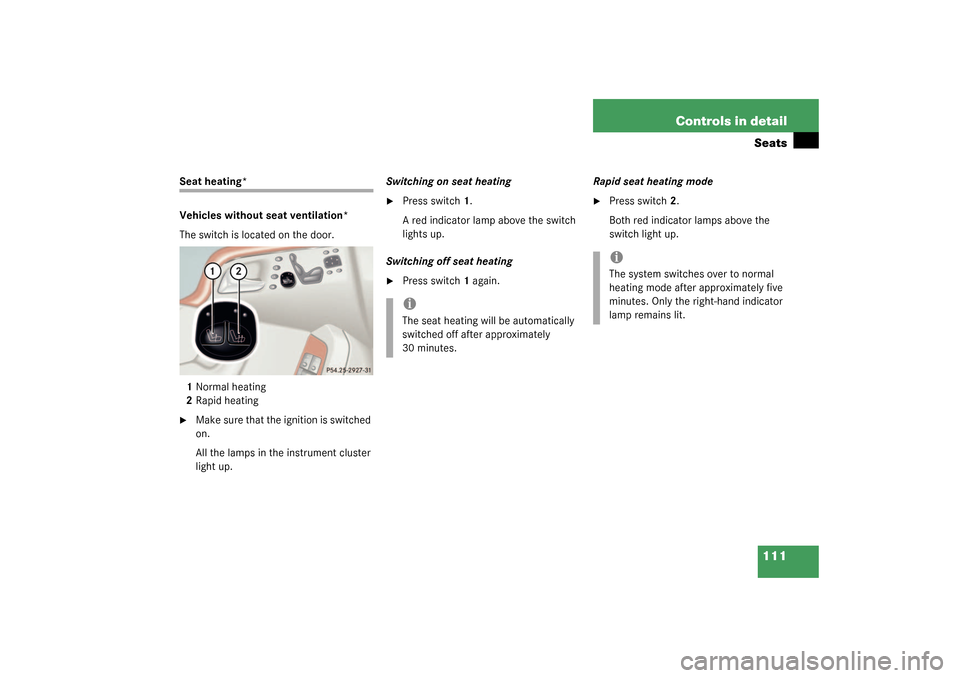
Seat heating*
Vehicles without seat ventilation*
The switch is located on the door.
1Normal heating
2Rapid heating�
Make sure that the ignition is switched
on.
All the lamps in the instrument cluster
light up.Switching on seat heating
�
Press switch1.
A red indicator lamp above the switch
lights up.
Switching off seat heating
�
Press switch1 again. Rapid seat heating mode
�
Press switch2.
Both red indicator lamps above the
switch light up.
iThe seat heating will be automatically
switched off after approximately
30 minutes.
iThe system switches over to normal
heating mode after approximately five
minutes. Only the right-hand indicator
lamp remains lit.
Page 112 of 416
112 Controls in detailSeatsSwitching off rapid seat heating mode�
Press switch2 again. Vehicles with seat ventilation*
The switch is located on the door. The red
indicator lamps on the switch show the
heating level selected:
1Seat heating switch
�
Make sure the ignition is switched on.
All the lamps in the instrument cluster
light up.
Switching on seat heating
�
Press switch1 twice.
A red indicator lamp above the switch
lights up.
Switching off seat heating
�
Press switch1 again.
!If one or both of the lamps on the seat
heating switch are blinking, there is in-
sufficient voltage available since too
many electrical consumers are turned
on. The seat heating switches off auto-
matically.
The seat heating will switch back on
again automatically as soon as suffi-
cient voltage is available.
Level2
Two indicator lamps lit
1
One indicator lamp lit
off
No indicator lamp lit
iThe seat heating will be automatically
switched off after approximately
30 minutes.
Page 120 of 416
.
Exterior lamp switch
The exterior lam")
120 Controls in detailLighting
LightingFor notes on how to switch on the head-
lamps and use the turn signals, see the
“Getting started” section (
�page 46).
Exterior lamp switch
The exterior lamp switch is located on the
dashboard to the left of the steering wheel.
M
Off
U
Automatic headlamp mode
C
Parking lamps (also side marker
lamps, tail lamps, license plate
lamps, instrument panel lamps)
Canada only: When engine is run-
ning, the low beam is also switched
on.
B
Parking lamps plus low beam or
high beam headlamps (combination
switch pushed forward).
ˆ
Standing lamps, right (turn left one
stop)
‚
Standing lamps, left (turn left two
stops)
iIf you remove the SmartKey and open
the driver’s door while the parking
lamps or low beam headlamps are
switched on, then: �
A warning sounds.
�
$
appears in the multifunction
display.
�
The message
TURN OFF LIGHTS!
ap-
pears in the multifunction display.
iWith the daytime running lamp mode
activated and the engine running, the
low beam headlamps cannot be
switched off manually.
Page 121 of 416
.
A")
121 Controls in detail
Lighting
Manual headlamp mode
The low beam headlamps and parking
lamps can be switched on and off with the
exterior lamp switch. For exterior lamp
switch, see (
�page 120).
Automatic headlamp mode
The parking lamps, low beam headlamps
and license plate lamps switch on and off
automatically depending on the brightness
of the ambient light.
�
Turn the exterior lamp switch to
U
.
iWith the daytime running lamp mode
activated, the low beam headlamps will
not switch off automatically.
iFront fog lamps and rear fog lamp can
not be switched on manually with exte-
rior lamp switch in position
U
. To
activate the fog lamps, turn exterior
lamp switch to position
B
and pull
the exterior lamp switch to first or
second stop (
�page 122).
Warning!
G
In automatic headlamp mode, the head-
lamps will not be automatically switched on
under foggy conditions. To minimize risk to
you and to others, activate headlamps by
turning exterior lamp switch to
B
.
The driver is responsible for the operation of
the vehicle’s lights at all times. The automat-
ic headlamp feature is only an aid to the driv-
er. Switch on the vehicle lights manually
when driving or when traffic conditions re-
quire you to do so.
iIf you drive in countries where vehicles
drive on the other side of the road than
the country where the vehicle is regis-
tered, you must have the headlamps
modified for symmetrical low beams.
Relevant information can be obtained
at your authorized Mercedes-Benz Cen-
ter.
Page 122 of 416

122 Controls in detailLightingDaytime running lamp mode�
Turn exterior lamp switch to
position
M
or
U
.
When the engine is running, the low beam
headlamps are automatically switched on.
In low ambient light conditions the parking
lamps will also switch on.
Canada only
When you shift from a driving position to
positionN orP, the low beam switches off
(with a three-minute delay).
For nighttime driving you should turn the
exterior lamp switch to position
B
to
permit activation of the high beam head-
lamps.USA only
The high beam headlamps can also be ac-
tivated when driving with the daytime run-
ning lamp mode activated and exterior
lamp switch in position
M
.
To activate the daytime running lamp
mode, see “Setting daytime running lamp
mode (USA only)” (
�page 151).Locator lighting and night security illu-
mination
For information on locator lighting and
night security illumination, see
(
�page 151) and (
�page 152).
Switching on front fog lamps
�
Make sure that the low beam head-
lamps are switched on.
�
Pull out exterior lamp switch to first
stop.
The green indicator lamp
‡
in the
lamp switch lights up.
iSee notes on the exterior lamp switch
(�page 120).
iFog lamps will operate with the parking
lamps and/or the low beam headlamps
on. Fog lamps should only be used in
conjunction with low beam headlamps.
Consult your State or Province Motor
Vehicle Regulations regarding allow-
able lamp operation.
Page 123 of 416
123 Controls in detail
Lighting
Switching on rear fog lamp�
Make sure that the low beam head-
lamps are switched on.
�
Pull out exterior lamp switch to second
stop.
The yellow indicator lamp
†
in the
lamp switch lights up.
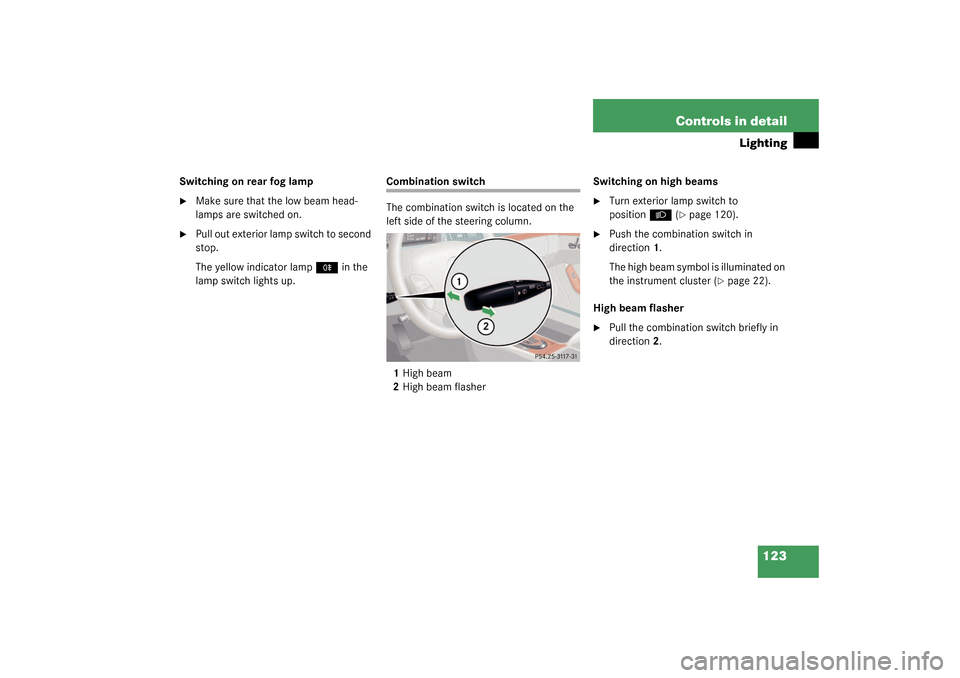
Combination switch
The combination switch is located on the
left side of the steering column.
1High beam
2High beam flasherSwitching on high beams
�
Turn exterior lamp switch to
position
B
(�page 120).
�
Push the combination switch in
direction1.
The high beam symbol is illuminated on
the instrument cluster (
�page 22).
High beam flasher
�
Pull the combination switch briefly in
direction2.
Page 124 of 416
124 Controls in detailLightingHazard warning flasher
The hazard warning flasher can be activat-
ed with the starter switched on or off. It is
activated automatically when an airbag is
deployed.
The switch is located on the center con-
sole.
1Hazard warning flasher switchSwitching on the hazard warning
flasher
�
Press the hazard warning flasher
switch.
All turn signals will blink.
Switching off the hazard warning
flasher
�
Press hazard warning flasher switch
again.
Interior lighting
The controls are located in the overhead
control panel.
1Left front reading lamp
2Rear interior lights
3Right front reading lamp
4Rocker switch for automatic control
system
iWith the hazard warning flasher acti-
vated and the combination switch set
for either left or right turn, only the re-
spective left or right turn signals will
operate when the SmartKey in the
starter switch is in position1 or2.iIf the hazard warning flasher was acti-
vated automatically, press switch1
twice.