Page 80 of 416

80 Safety and SecurityDriving safety systemsSwitching off the ESP
To improve the vehicle's traction, turn off
the ESP in driving situations where it would
be advantageous to have the drive wheels
spin and thus cut into surfaces for better
grip such as:�
starting out on slippery surfaces and in
deep snow in conjunction with snow
chains
�
sand or gravelThe switch is located on the center con-
sole.
1ESP off / on
�
Press ESP switch1 until the ESP warn-
ing lamp
v
in the speedometer
lights up.
ESP is deactivated.
If one or more wheels are spinning, the
ESP warning lampv
in the speedome-
ter flashes, regardless of the speed.
Traction control brakes a spinning wheel
even when ESP is deactivated.
ESP always operates when you are brak-
ing, even when it has been deactivated.Switching on ESP
�
Press switch1.
The ESP warning lamp
v
in the in-
strument cluster goes out. You are now
again in normal driving mode.
Warning!
G
The ESP should not be switched off during
normal driving other than in the circum-
stances described below. Disabling of the
system will reduce vehicle stability in stan-
dard driving maneuvers.iDistronic* cannot be activated when
ESP has been deactivated.
!Avoid spinning of a drive wheel for an
extended period with the ESP switched
off. This may cause serious damage to
the drivetrain which is not covered by
the Mercedes-Benz Limited Warranty.Warning!
G
When the ESP warning lamp
v
is
illuminated continuously, the ESP is
switched off.
Adapt your speed and driving to the prevail-
ing road conditions and to the non-operating
status of the ESP.
Page 81 of 416
 with the ESP
Models with all-wheel drive only:
The 4MATIC improves the vehicle’s ability
to use availabl")
81 Safety and Security
Driving safety systems
Four wheel electronic traction system (4MATIC) with the ESP
Models with all-wheel drive only:
The 4MATIC improves the vehicle’s ability
to use available traction, e.g. during winter
operation in mountains under snowy con-
ditions, by applying power to all four
wheels.
Warning!
G
If you see the ESP warning lamp
v
flash-
ing in the speedometer dial, proceed as fol-
lows:
�
While driving off, apply as little throttle
as possible
�
While driving, ease up on the accelera-
tor
�
Adapt your speed and driving style to
the prevailing road conditions
Failure to observe these guidelines could
cause the vehicle to skid.
The ESP cannot prevent accidents resulting
from excessive speed.!Do not tow with one axle raised.
Otherwise the transfer case can be
damaged, which is not covered by the
Mercedes-Benz Limited Warranty.
!Performance testing must only be con-
ducted on a 2-axle dynamometer.
Otherwise the transfer case can be
damaged, which is not covered by the
Mercedes-Benz Limited Warranty.!Because of the ESP’s automatic opera-
tion, the engine must be shut off
(SmartKey in starter switch position0
or1) when the parking brake is being
tested on a brake test dynamometer.
Active braking action through the ESP
may otherwise seriously damage the
front or rear axle brake system.
Operational tests with the engine run-
ning can only be conducted on a 2-axle
dynamometer.
Page 102 of 416

102 Controls in detailLocking and unlockingPower closing assist for doors and trunk lid
Power closing assist for doors�
Press the doors gently past the initial
engage position into the lock.
The doors close automatically.
Power closing assist for trunk lid
�
Press the trunk lid gently into its lock.
The trunk closes automatically.
Automatic central locking
The doors and the trunk automatically lock
when the ignition is switched on and the
wheels are turning at vehicle speeds of ap-
proximately 9 mph (15 km/h) or more.
You can open a locked door from the in-
side. Open door only when conditions are
safe to do so.You can deactivate the automatic locking
using the control system (
�page 155).
iIt is not necessary to slam the door or
trunk lid closed. A pneumatic pow-
er-assisted mechanism draws doors
and trunk lid closed quietly and auto-
matically once door and trunk lid has
been latched. When the pneumatic
power-assisted mechanism has
stopped, doors and/or trunk can be
re-opened.
Warning!
G
To prevent possible personal injury, always
keep hands and fingers away from the door
or trunk opening when closing a door or the
trunk lid. Be especially careful when small
children are around.
The pneumatic power closing assist mecha-
nism cannot be interrupted once it has been
engaged.
To prevent personal injury, never actuate
the closing assist mechanism by tampering
with the door or trunk lid latch.
iThe doors unlock automatically after an
accident if the force of the impact ex-
ceeds a preset threshold.
The vehicle automatically locks when
the ignition is switched on and the
wheels are turning at vehicle speeds of
approximately 9 mph (15 km/h) or
more. You could therefore lock yourself
out when the vehicle�
is pushed
�
is on a test stand
Page 104 of 416
104 Controls in detailSeats
SeatsInformation on seat adjustment can be
found in the “Getting started” section,
(�page 34).
Lumbar support
You can adjust the contour of the seat’s
lumbar support to best support your spine.
The thumbwheel is located on the lower
side of the seat.
1Thumbwheel�
Make sure the ignition is switched on.
All the lamps in the instrument cluster
should light up.
�
Set the lumbar support between 0
and 5.
Easy-entry/exit feature
With the easy-entry/exit feature activated,
the steering wheel tilts upwards and the
driver’s seat moves to the rear.
This allows easier entry into and exit from
the vehicle when the driver’s door is
opened. However, the engine must be
turned off.
When the SmartKey is inserted in the start-
er switch or you have pressed the
KEYLESS-GO* start/stop button once and
the driver’s door is closed, the steering
wheel and the driver’s seat return to their
last set positions.
Page 105 of 416

105 Controls in detailSeats
You can activate the following functions:�
Steering column
Only the steering column is adjusted.
�
Steering column and seat
Both the steering column and the seat
are adjusted.
The easy-entry/exit feature can be
switched on or off in the Settings menu of
the Control System (
�page 156).
Head restraints
Information on head restraint adjustment
can be found in the “Getting started” sec-
tion (
�page 37).Front seat head restraints
Removing front head restraints
�
Press switch1 upwards and hold until
the head restraint is fully extended.
�
Pull out head restraint.
Warning!
G
You must ensure that no one can become
trapped or injured by the moving steering
wheel and driver’s seat when the
easy-entry / exit feature is activated, the
driver’s door is being opened, and the en-
gine is turned off or the SmartKey removed
from the starter switch. Do not leave chil-
dren unattended in the vehicle, or with ac-
cess to an unlocked vehicle. Unsupervised
use of vehicle equipment may cause an
accident and/or serious personal injury.
Warning!
G
For your protection, drive only with properly
positioned head restraints.
Adjust head restraint to support the back of
the head approximately at ear level.
Do not drive the vehicle without the seat
head restraints. Head restraints are intend-
ed to help reduce injuries during an acci-
dent.iTilt the seat backrest to the rear for
easier removal and installation of the
head restraints.
Page 117 of 416

117 Controls in detail
Memory function
Memory function
The memory button and stored position
switch are located on the door.
You can store up to three different settings
per SmartKey or KEYLESS-GO* card.
The following settings are saved for each
stored position:�
Seat and backrest position
�
Settings for the multi-contour seat*
�
Steering wheel position
�
Inside rear view mirror position
�
Exterior rear view mirror position
�
Automatic climate control
These key dependent memory settings can
be deactivated if desired (
�page 156).
1 Stored position buttons
2Memory button
�
Make sure that the ignition is switched
on or the relevant door is open and the
SmartKey is inserted in the starter
switch.
!Prior to operating the vehicle, the driv-
er should check and adjust the seat
height, seat position fore and aft, and
seat backrest angle if necessary, to en-
sure adequate control, reach, and com-
fort. The head restraint should also be
adjusted for proper height. Also see
“Airbags” (
�page 57) section for prop-
er seat positioning.
In addition, adjust the steering wheel to
ensure adequate control, reach, opera-
tion and comfort. Both the inside and
outside rear view mirrors should be ad-
justed for adequate rear vision.
Fasten seat belts. Infants and small
children should be seated in a properly
secured restraint system that complies
with U.S. Federal Motor Vehicle Safety
Standards 213 and 225 and Canadian
Motor Vehicle Safety Standards 213
and 210.2.
Warning!
G
Do not activate the memory function while
driving. Activating the memory function
while driving could cause the driver to lose
control of the vehicle.
Page 118 of 416
.
�
Press memory button2.
�
Release mem")
118 Controls in detailMemory functionStoring positions into memory�
Adjust the seats, steering wheel and
rear view mirrors to the desired posi-
tion (
�page 34).
�
Press memory button2.
�
Release memory button and push one
of the position buttons1 within three
seconds.
All the settings are stored with the se-
lected position.
Recalling positions from memory�
Press and hold one of the position
buttons1 until the seat, steering wheel
and rear view mirrors have fully moved
to the stored positions.Storing exterior rear view mirror park-
ing position
For easier parking you can adjust the pas-
senger-side exterior rear view mirror so
that you can see the right rear wheel as
soon as you engage reverse gearR.
For information on activating the parking
position, see “Setting parking position for
exterior rear view mirror” (
�page 158).
iReleasing the button immediately
stops movement to the stored posi-
tions.Warning!
G
Do not operate the power seats using the
memory button if the seat backrest is in an
excessively reclined position. Doing so
could cause damage to front or rear seats.
First move seat backrest to an upright posi-
tion.
iYou can store a parking position for the
passenger-side exterior rear view mir-
ror for each SmartKey or KEYLESS-GO*
card.
Page 119 of 416
119 Controls in detail
Memory function
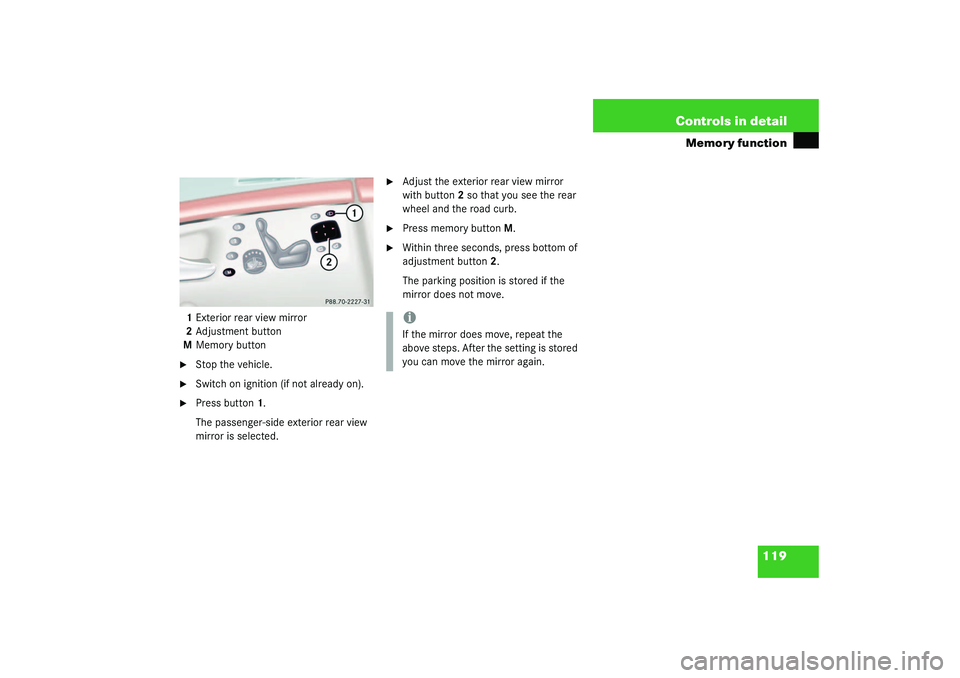
1Exterior rear view mirror
2Adjustment button
MMemory button�
Stop the vehicle.
�
Switch on ignition (if not already on).
�
Press button1.
The passenger-side exterior rear view
mirror is selected.
�
Adjust the exterior rear view mirror
with button2 so that you see the rear
wheel and the road curb.
�
Press memory button M.
�
Within three seconds, press bottom of
adjustment button2.
The parking position is stored if the
mirror does not move.iIf the mirror does move, repeat the
above steps. After the setting is stored
you can move the mirror again.