Page 233 of 321

233 Practical hints
What to do if …
7
The indicator lamp does not light
up with a BabySmart
TM child
seat properly installed on the
front passenger seat.
The system is malfunctioning.
�
Make sure that there is nothing be-
tween seat cushion and child seat and
check installation of the child seat
(�page 63).
�
If the light remains out, have the sys-
tem checked as soon as possible by
an authorized Mercedes-Benz Light
Truck Center.
Do not use the BabySmart
TM restraint
to transport children on the front pas-
senger seat until the system has been
repaired.
The yellow fuel tank reserve
warning lamp lights up while
driving.
The fuel level has gone below the reserve
mark.
�
Refuel at the next gas station
(�page 200).
#
The red charge indicator lamp
lights up when the engine is run-
ning.
The battery is no longer charging.
Possible causes:�
alternator malfunctioning
�
broken poly-V-belt
�
Stop immediately and check the
poly-V-belt.
If it is broken
�
Do not continue to drive, before the
poly-V-belt is replaced.
Notify an authorized Mercedes-Benz
Light Truck Center.
Problem
Possible cause
Suggested solution
Page 234 of 321

234 Practical hintsWhat to do if …<
The red seat belt warning lamp
blinks for a brief period after
starting the engine.
The warning lamp reminds you to fasten seat
belts.
�
Fasten your seat belt (
�page 60).
W
The yellow low washer system
fluid level lamp lights up after
starting the engine or while driv-
ing.
There is approximately 1.3 US qt. (1.25 l) of
washer fluid remaining in the reservoir.
�
Add washer fluid (
�page 208).
The washer fluid may have frozen
�
Move the vehicle to a warmer environ-
ment so that the washer fluid will
thaw.
�
Correct the concentration level after
the washer fluid in the reservoir
thaws.
2
The yellow brake indicator lamp
lights up during braking or after
starting the engine.
The brake pads are worn down.
�
Have the system checked at an autho-
rized Mercedes-Benz Light Truck
Center.
Problem
Possible cause
Suggested solution
!Brake pad thickness must be visually
checked by a qualified technician at the
intervals specified in the Service book-
let.
Page 235 of 321
235 Practical hints
What to do if …
Additional indicators in the speedome-ter displayDisplay
Possible cause
Suggested solution
9
Perform minor service (A) (
�page 215).
�
Visit an authorized Mercedes-Benz
Center to perform service.
´
Perform major service (B) (
�page 215).
�
Visit an authorized Mercedes-Benz
Center to perform service.
Á
î
The
StArt
message lights up in
addition to the
Error
message.
The immobilizer is not operational.
�
Contact an authorized
Mercedes-Benz Center or call
1-800-FOR-MERCedes (in the USA),
or 1-800-387-0100 (in Canada).
Page 239 of 321

Use the spare wheel only temporarily,
while observing the following restrictions:�
Do not exceed vehicle speed of
50 mph (80")
239 Practical hints
Where will I find ...?
Spare wheel (space-saver tire)
Use the spare wheel only temporarily,
while observing the following restrictions:�
Do not exceed vehicle speed of
50 mph (80 km / h).
�
Drive to the nearest repair facility to
have the flat tire repaired or replaced
as appropriate.
�
Do not operate vehicle with more than
one spare wheel mounted.Removing spare wheel (except
ML 55 AMG)
The spare wheel is located behind the rear
bumper.
1Cover
�
Hold left and right side of cover1 and
pull away from bumper.2Screw
3Spare wheel carrier
4Lever
�
Turn screw2 counterclockwise using
the wrench (
�page 237).
Screw2 remains in spare wheel
carrier3.
�
Lift spare wheel carrier slightly and
push lever4 to the right using screw-
driver (
�page 237).
�
Swing spare wheel carrier down and
pull it out from under the bumper.
Warning!
G
The dimensions of the spare wheel are dif-
ferent from those of the road wheels. As a
result, the vehicle handling characteristics
change when driving with a mounted spare
wheel.iPlease comply with the instructions for
“Mounting the spare wheel”
(�page 255).
Warning!
G
Exercise care when removing or installing
spare wheel to prevent personal injury.
Page 241 of 321
241 Practical hints
Where will I find ...?
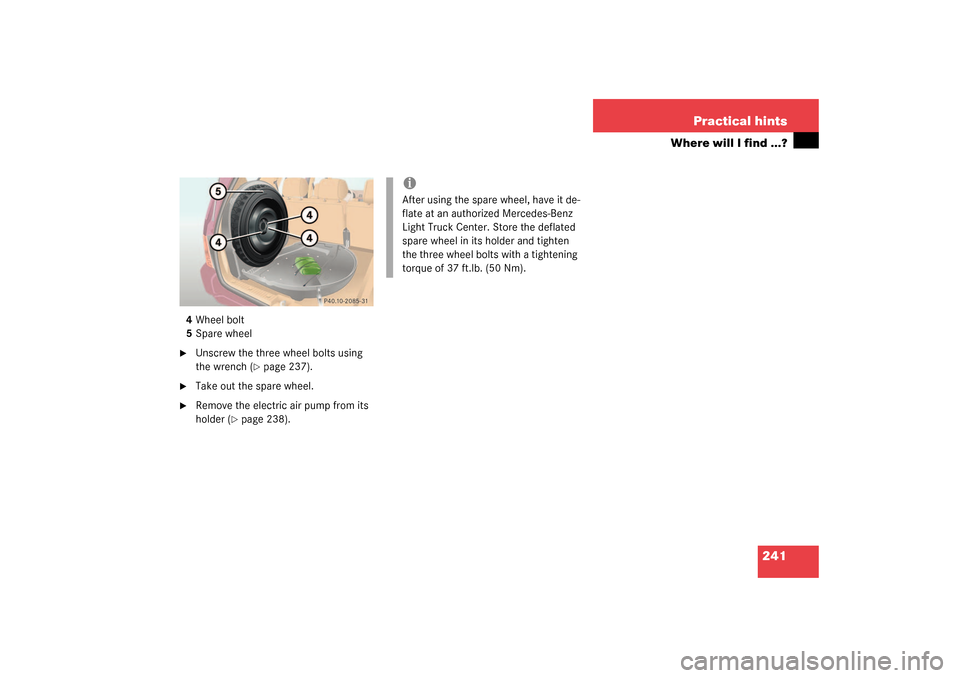
4Wheel bolt
5Spare wheel�
Unscrew the three wheel bolts using
the wrench (
�page 237).
�
Take out the spare wheel.
�
Remove the electric air pump from its
holder (
�page 238).
iAfter using the spare wheel, have it de-
flate at an authorized Mercedes-Benz
Light Truck Center. Store the deflated
spare wheel in its holder and tighten
the three wheel bolts with a tightening
torque of 37 ft.lb. (50 Nm).
Page 243 of 321

243 Practical hints
Unlocking/locking in an emergency
Locking the vehicle
If you are unable to lock the vehicle with
the remote control, lock it with the me-
chanical key as follows:�
Close the passenger doors and the lift-
gate.
�
Press the upper part of the central
locking button in the cockpit
(�page 89).
�
Check to see whether the locking
knobs on the passenger doors are still
visible. If necessary push them down
manually.
�
Lock the liftgate if necessary from in-
side (
�page 87).
�
Lock the driver’s door with the me-
chanical key.
Changing batteries
If the batteries in the remote control are
discharged, the vehicle can no longer be
locked or unlocked. It is recommended to
have the batteries replaced at an autho-
rized Mercedes-Benz Light Truck Center.
Batteries contain materials that can harm
the environment if disposed of improperly.
Recycling of batteries is the preferred
method of disposal. Many states require
sellers of batteries to accept old batteries
for recycling.1Release button
2Battery cover
Replacement batteries: Lithium, type
CR 2025 or equivalent.
�
Unfold the key by pressing release
button1.
Warning!
G
Keep the batteries out of reach of children.
If a battery is swallowed, seek medical help
immediately.
iWhen changing batteries, always re-
place both batteries.
The required replacement batteries are
available at any Mercedes-Benz Light
Truck Center.
��
Page 244 of 321

244 Practical hintsUnlocking/locking in an emergency�
Pull off battery cover2 in direction of
arrow.
�
Remove the batteries.
�
Using a lint-free cloth, insert new bat-
teries under the contact spring with the
plus (+) side facing up.
�
Press battery cover onto housing until
locked in place.
�
Push each button to assure proper op-
eration of the remote control.
If remote control does not function cor-
rectly after replacing the batteries, the
system may have to be resynchronized.Synchronizing remote control
�
Turn key in steering lock to position2,
then to position0 and remove.
�
Within 10 seconds, push and hold
button
‹
while pushing
button
Œ
five times.
�
Release the button, and press
‹
,
Œ
or
Š
once.
The remote control is resynchronized.
�
Recheck all of the remote control func-
tions.
Fuel filler flap
1Cover
2Lock rod�
Open cover1 in cargo area behind the
left trim panel.
�
Turn lock rod2 clockwise (arrow) to
the end stop.
�
Open the fuel filler flap.
iIf it is not possible to resynchronize the
remote control, have the system
checked at your authorized
Mercedes-Benz Light Truck Center.
iML 55 AMG:
First remove the spare wheel from its
holder (
�page 240).
Page 247 of 321
247 Practical hints
Replacing bulbs
Replacing bulbs
Safe vehicle operation depends on proper
exterior lighting and signaling. It is there-
fore essential that all bulbs and lamp as-
semblies are in good working order at all
times.
Correct headlamp adjustment is extremely
important. Have headlamps checked and
readjusted at regular intervals and when a
bulb has been replaced. See your autho-
rized Mercedes-Benz Light Truck Center
for headlamp adjustment.
Bulbs Front lamps
iIf the headlamps are fogged up on the
inside as a result of high humidity, driv-
ing the vehicle a distance should clear
out the fogging.
Lamp
Type
1
Fog lamp
H8 35 W
2
High beam
H7 (55 W)
3
Low beam
H7 (55 W)
Xenon* D2S-35 W
4
Turn signal,
parking, stand-
ing and side
marker lamp
1157 NA
(32/3 cp bulb)
5
Additional turn
signal
LED