Page 90 of 321

90 Controls in detailLocking and unlockingLocking and unlocking from the inside
You can lock or unlock the vehicle from in-
side using the central locking switches.
This can be useful, for example, if you want
to unlock the passenger door from the in-
side or want to lock the vehicle before
starting to drive.Locking
�
Press upper part1 of central locking
button (
�page 89).
If all the doors are closed, the vehicle
locks.
Unlocking
�
Press lower part2 of central locking
button (
�page 89).
The vehicle unlocks, if the vehicle was
not previously centrally locked with the
remote control.
iYou can open a locked door from the
inside. Open door only when conditions
are safe to do so.
If you have locked the vehicle with the
remote control, the central locking
switch does not work.
Warning!
G
When leaving the vehicle, always remove the
key from the steering lock and lock the vehi-
cle. Do not leave children unattended in the
vehicle, or with access to an unlocked vehi-
cle. Unsupervised use of vehicle equipment
may cause an accident and/or serious per-
sonal injury.
Page 92 of 321
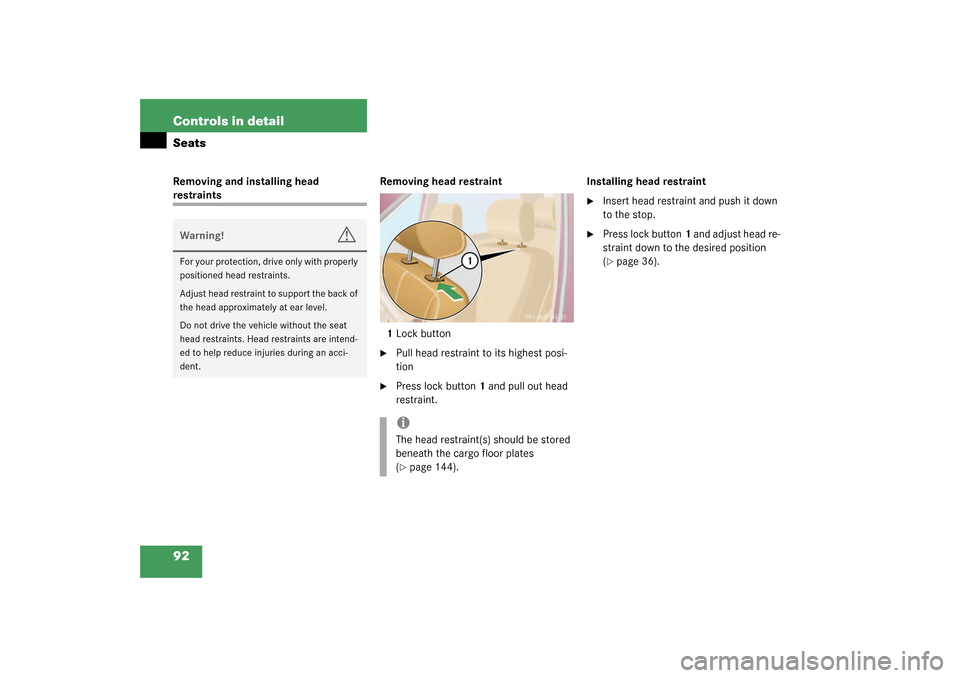
92 Controls in detailSeatsRemoving and installing head restraintsRemoving head restraint
1Lock button
�
Pull head restraint to its highest posi-
tion
�
Press lock button1 and pull out head
restraint.Installing head restraint
�
Insert head restraint and push it down
to the stop.
�
Press lock button1 and adjust head re-
straint down to the desired position
(�page 36).
Warning!
G
For your protection, drive only with properly
positioned head restraints.
Adjust head restraint to support the back of
the head approximately at ear level.
Do not drive the vehicle without the seat
head restraints. Head restraints are intend-
ed to help reduce injuries during an acci-
dent.
iThe head restraint(s) should be stored
beneath the cargo floor plates
(�page 144).
Page 93 of 321

93 Controls in detail
Seats
Rear seats
The rear seats are divided asymetrically.
To enlarge the cargo area you can adjust
the left and right part separately. The fol-
lowing changes are possible:�
moving the seat fore and aft
�
folding down the backrest
�
lowering the seatAdjusting rear seat fore and aft
1Release lever
�
Pull release lever1 in direction of ar-
row.
�
Slide seat to the desired position until
it locks in place.Folding down the backrest
1Lock button
�
Close cup holder in rear center console
(�page 155).
�
Move front seats forward. Manual seat
(�page 35) or power seat (
�page 37).
�
Slide seat forward.
�
Remove head restraint(s) (
�page 92).
�
Pull lock button1 up and fold backrest
forward until it locks in place.
The red backrest lock indicator at lock
button1 is not visible in the locked po-
sition.
Warning!
G
Do not adjust the rear seats while driving.
Always seat in an upright position and the
seat belts are properly positioned on the
body. Your seat must be adjusted so that
you can correctly fasten your seat belt.
Adjust head restraint to support the back of
the head approximately at ear level.
Never place hands under the seat or near
any moving parts while a seat is being ad-
justed.
Warning!
G
Failure to assure that seats are locked into
place could result in an increased chance of
injury in an accident.
Page 94 of 321

94 Controls in detailSeatsFolding up the backrest�
Pull lock button1 up and unfold back-
rest until it locks in place.
Make sure that the seat belt is not
caught in the seat.
�
Check for secure locking by pulling and
pushing on the backrest.
The red backrest lock indicator at lock
button1 is not visible in the locked po-
sition.
�
Install head restraint (
�page 92).
�
Slide seat rearward to desired position
(�page 93).
�
Adjust front seats to desired position.
Manual seats (
�page 35) and power
seats (
�page 37). Lowering the rear seat
1Release button
2Lever
3Release lever
�
Close cup holder in rear center console
(�page 155).
�
Move front seats forward. Manual seat
(�page 35) or power seat (
�page 37).
�
Press and hold release button1 to un-
lock lever2.
�
Pull lever2 in direction of arrow.
�
Pull release lever3 and push down rear
seat until it locks in place.
�
Fold down the backrest (
�page 93).
�
Adjust front seats to desired position.
Manual seats (
�page 35) and power
seats (
�page 37).
Folding up the rear seat
�
Move front seats forward. Manual seat
(�page 35) or power seat (
�page 37).
�
Pull release lever3 and raise rear seat
until it locks in place.Warning!
G
Failure to assure that seats are locked into
place could result in an increased chance of
injury in an accident.
Page 95 of 321
.
Folding rear seat fo")
95 Controls in detail
Seats
Easy entry/exit feature*
The easy entry/exit feature allows access
to the third row seats*. The right cargo
floor plate must be removed (
�page 144).
Folding rear seat forward
1Lever
�
Move right seat forward. Manual seats
(�page 35) and power seats
(�page 37).
�
Move rear seat forward (
�page 93).
�
Push head restraint fully down and tilt
it forward.
�
Fold backrest forward (
�page 93).
�
Pull lever1 up and fold the rear seat
forward.
Resetting rear seat
�
Pull down on seat bench until it locks
into place.
�
Pull lock button1 (
�page 93) up and
unfold backrest until it locks into place.
�
Pull down on seat bench until it locks
into place.
�
Check for secure locking by pulling and
pushing on the backrest.
The red backrest lock indicator at lock
button1 (
�page 93) is not visible in
the locked position.
�
Move the rear and front seats in de-
sired position.
�
Pull up and adjust head restraint
(�page 36).
Warning!
G
Never drive with the second row right seat
folded forward (easy entry/exit feature). It
could open and fold back unintentionally.
Page 96 of 321
.
�
Remove head restraint1 from seat
c")
96 Controls in detailSeatsThird row seats* Folding down single seat
1Head restraint
2Hook
3Tensioner
4Hook and loop strip
�
Remove cargo floor plate
(�page 144).
�
Remove head restraint1 from seat
cushion.
�
Lift tensioner3 upward to a horizontal
position to release tension of the belt.
�
Disengage hook2 while holding onto
the seat firmly with one hand.
�
Attach belt at hook and loop strip4 on
underside of seat.
5Backrest release
6Seat release
�
Fold seat down until it locks securely in
place.
The red marking on the seat release
should6 not be visible.
�
Store cargo floor plates inside the
backrest (
�page 144).
�
Pull backrest release5 and unfold
backrest until it locks securely in place.
�
Install head restraint1 in backrest
(�page 92).
Warning!
G
For your protection, drive only with properly
positioned head restraints.
Adjust head restraint to support the back of
the head approximately at ear level.
Failure to assure that seats are locked into
place could result in an increased chance of
injury in an accident.
Never place hands under seat or near any
moving parts while a seat is being adjusted.
Page 97 of 321
97 Controls in detail
Seats
Storing single seat�
Remove head restraint from backrest
(�page 92).
�
Pull backrest release5 and fold back-
rest forward until it locks securely in
place.
�
Remove cargo floor plates from the
backrest.
�
Pull seat release6 (
�page 96) and
fold seat up.
�
Disengage belt and engage hook2
(�page 96) in ceiling mount.
�
Pull on free end of belt until tight.
�
Install head restraint in openings pro-
vided in seat cushion.
�
Install cargo floor plates (
�page 144).
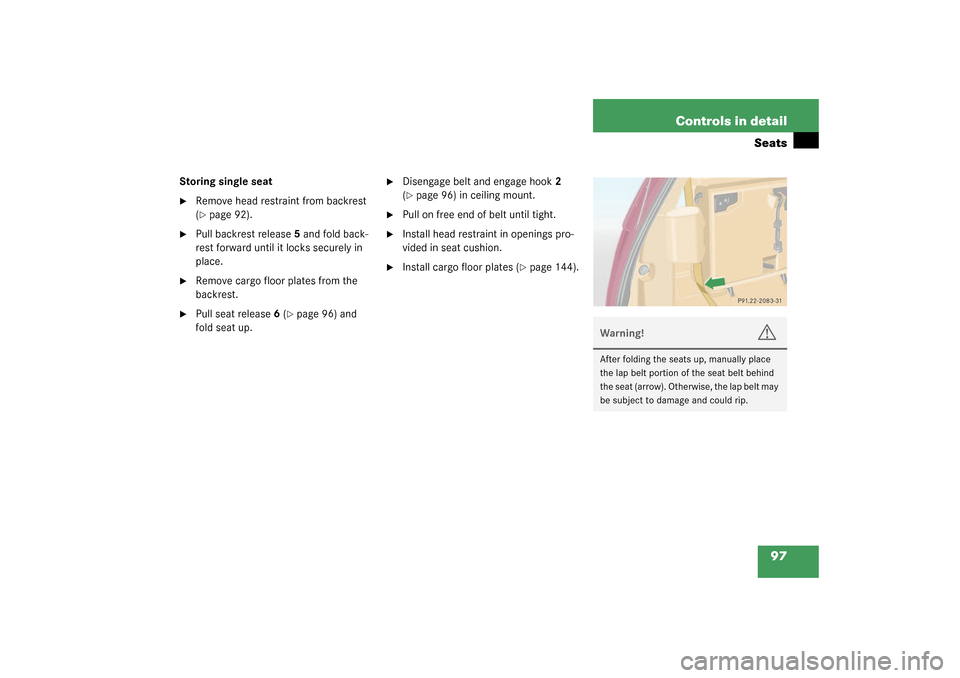
Warning!
G
After folding the seats up, manually place
the lap belt portion of the seat belt behind
the seat (arrow). Otherwise, the lap belt may
be subject to damage and could rip.
Page 104 of 321

104 Controls in detailLightingNight security illumination
When you turn off the engine and the last
door has been closed, the following lamps
will remain lit:�
Parking lamps
�
Tail lamps
�
License plate lamps
�
Front fog lamps
The combination switch must be set to
position
U
(�page 102).Deactivating night security illumination
temporarily
�
Before leaving the vehicle turn the key
in the steering lock to position0 then
turn it to position2 and back to0.
The night security illumination is deac-
tivated. It will reactivate as soon as you
reinsert the key in the steering lock.
Setting illumination time
1Switch for fog lamps
�
Stop the vehicle.
�
Make sure that the ignition is switched
on.
All the lamps in the instrument cluster
light up.
�
Turn combination switch to
position
M
.
�
Press upper part1 of switch until the
clock, located in the instrument clus-
ter, displays the actual illumination
time.
�
Press upper part1 of switch again.
Each time the switch is pressed, the il-
lumination time increases by
15 seconds. You can set the illumina-
tion time between 0 (off) and
60 seconds.
Approximately five seconds after pressing
the switch, the illumination time is set and
the clock is displayed again.
iYou can reactivate this function within
ten minutes by opening a door or the
liftgate.
If you do not open a door or the liftgate
after turning off the engine, the lamps
will automatically switch off after
60 seconds.