Page 79 of 321

79 Safety and Security
Anti-theft systems
Disarming the alarm system
The alarm system is disarmed when you
unlock your vehicle with the remote con-
trol. The turn signal lamps blink once to in-
dicate that the alarm system is
deactivated.
Canceling the alarm
To cancel the alarm:�
Switch on the ignition by turning the
key in the steering lock to position2.
or
�
Press the
Œ
or
‹
button on the
remote control.
The alarm is cancelled.Tow-away alarm, glass breakage
sensor
The tow-away alarm and the glass break-
age sensor are part of the anti-theft alarm
system.
Once the tow-away alarm is armed, a visual
and audible alarm will be triggered when
someone:�
attempts to raise the vehicle
�
breaks a window and reaches into the
passenger compartment
iIf the turn signal lamps do not blink
three times, the tow-away - glass-
breackage sensor is malfunctioning or
one of the following elements may not
be properly closed:�
a door
�
the liftgate
�
the hood
Close the respective element and lock
the vehicle again.
iThe alarm system will rearm automati-
cally again after approximately 40 sec-
onds if one of the doors or the liftgate
is not opened.
iThe tow-away protection alarm is trig-
gered, for example, if the vehicle is lift-
ed on one side.
If the alarm stays on for more than
20 seconds, an emergency call is initi-
ated automatically by the Tele Aid sys-
tem (
�page 159) provided Tele Aid
service was subscribed to and properly
activated.
Page 84 of 321

84 Controls in detailLocking and unlockingIn the “Controls in detail” section you will
find detailed information on how to oper-
ate the equipment installed in your vehicle.
If you are already familiar with the basic
functions of your vehicle, this section will
be of particular interest to you.
To quickly familiarize yourself with the ba-
sic functions of the vehicle, refer to the
“Getting started” section of this manual.
The corresponding page numbers are giv-
en at the beginning of each segment.
Locking and unlockingRemote control with folding key
More information on the remote control
with folding key can be found in the “Get-
ting started” section (
�page 32).
Your vehicle comes supplied with two re-
mote controls with folding key.
The remote control provides an extended
operating range. To prevent theft, howev-
e r , i t i s a d v i s a b l e t o o n l y u n l o ck t he v e h i cl e
when you are in close proximity to it.
The key centrally locks and unlocks:
�
the doors
�
the liftgate
�
the fuel filler flap1
Â
Panic button (
�page 70)
2
Œ
Unlock button
3
‹
Lock button
4Release button for key
5
Š
Unlock button for liftgate
iIf the key is inserted in the steering
lock, the vehicle cannot be locked or
unlocked with the remote control.
!To prevent possible malfunction, avoid
exposing the key to high levels of elec-
tromagnetic radiation.
Page 85 of 321

85 Controls in detail
Locking and unlocking
Unlocking
Unlocking the driver’s door and fuel
filler flap�
Press button
Œ
once.
All turn signal lamps blink once to indi-
cate that the driver’s door and the fuel
filler flap are unlocked.Global unlocking
�
Press button
Œ
twice.
All turn signal lamps blink once to indi-
cate that all doors, fuel filler flap and
liftgate are unlocked.
Unlocking the liftgate
�
Press button
Š
.
Only the liftgate unlocks.
Locking
�
Press button
‹
once
All turn signal lamps blink three times
to indicate that all doors, the liftgate
and the fuel filler flap are unlocked.
iUnlocking the vehicle with the remote
control deactivates the anti-theft
alarm.
The vehicle will lock again automatical-
ly and reactivate the anti-theft system
within approximately 40 seconds of un-
locking if neither door nor liftgate is
opened.
iLocking the vehicle with the remote
control activates the anti-theft alarm.
iIf the turn signal lamps do not blink
three times, one of the following ele-
ments may not be properly closed:�
a door
�
the liftgate
�
the hood
Close the respective element and lock
the vehicle again.
Warning!
G
When leaving the vehicle, always remove the
key from the steering lock, and lock your ve-
hicle. Do not leave children unattended in
the vehicle, or with access to an unlocked
vehicle. Unsupervised use of vehicle equip-
ment may cause an accident and/or serious
personal injury.
Page 88 of 321
88 Controls in detailLocking and unlocking
Closing the liftgate
1Recessed grip
2Grip molding
�
Pull down on recessed grip1.
�
Close liftgate by using grip molding2.
Warning!
G
When leaving the vehicle, always remove the
key from the steering lock and lock the vehi-
cle. Do not leave children unattended in the
vehicle. Children could open the liftgate
from inside, which could result in an acci-
dent and/or serious personal injury.
Warning!
G
When closing the liftgate, use extreme cau-
tion not to catch hands or fingers. Be espe-
cially careful when small children are
around.
Do not close the liftgate from the inside by
pulling on the handle.
Page 103 of 321

103 Controls in detail
Lighting
Automatic headlamp mode
The parking lamps, low beam headlamps
and license plate lamps switch on and off
automatically depending on the brightness
of the ambient light.�
Turn the combination switch to
U
.Daytime running lamp mode
Canada only:
�
Turn combination switch to
position
M
or
U
.
When the engine is running, the low
beam headlamps are automatically
switched on. In low ambient light con-
ditions the parking lamps will also
switch on.
When you shift from a driving position to
positionN orP, the low beam switches off
(3 minutes delay).
For nighttime driving you should turn the
combination switch to position
õ
to
permit activation of the high beam head-
lamps.
Warning!
G
In automatic headlamp mode, the head-
lamps will not be automatically switched on
under foggy conditions. To minimize risk to
you and to others, activate headlamps by
turning combination switch to
õ
.
The driver is responsible for the operation of
the vehicle’s lights at all times. The automat-
ic headlamp feature is only an aid to the driv-
er. Switch on the vehicle lights manually
when driving or when traffic conditions re-
quire you to do so.
iIf the automatic headlamp mode is ac-
tivated, the fog lamps can also be
switched on (
�page 105). The low
beam headlamp and parking lamps are
activated simultaneously.
iIf you drive in countries where vehicles
drive on the other side of the road than
the country where the vehicle is regis-
tered, you must have the headlamps
modified for symmetrical low beams.
Relevant information can be obtained
at your authorized Mercedes-Benz
Light Truck Center.
iThe high beam flasher is always avail-
able.
Page 108 of 321
108 Controls in detailLightingManual control
Switching on front interior lamps�
Press on lamp lens1 or2.
The respective lamp switches on.
Switching off front interior lamps
�
Press on lamp lens1 or2 again.
The respective lamp switches off.
Operating rear interior lighting with
rocker switch
�
Press on upper part5 of rocker switch.
The rear interior lighting goes on.
�
Press on upper part5 of rocker switch
again.
The rear interior lighting goes off.
If the switch is pressed while the rear
interior lighting is on, the function is re-
versed.
Operating rear interior lighting with
lamp lens
Rear interior lighting�
Push on lamp lens (arrow) to switch
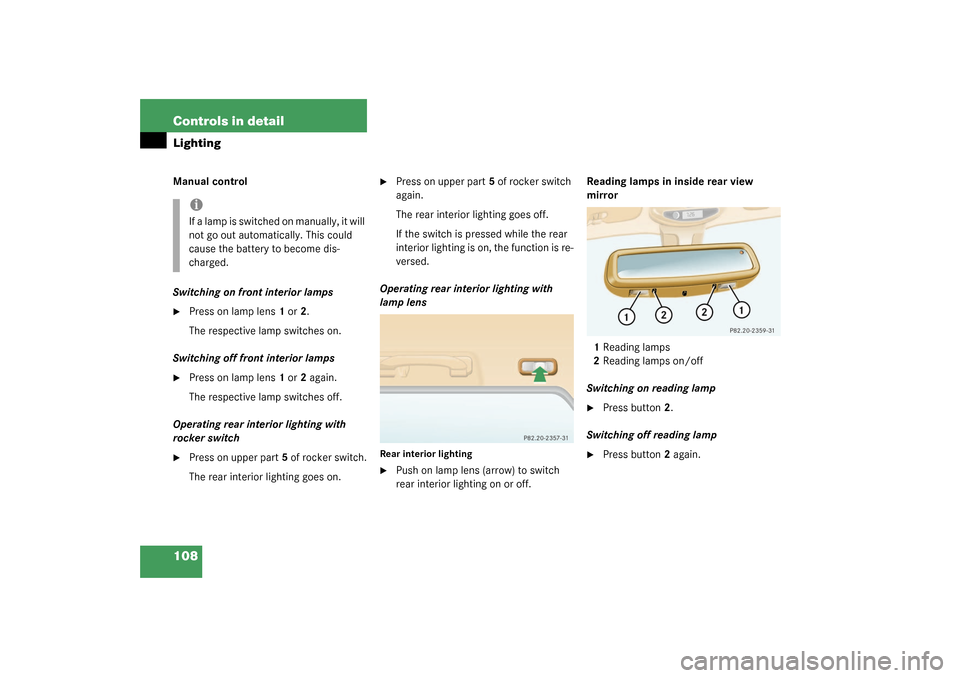
rear interior lighting on or off.Reading lamps in inside rear view
mirror
1Reading lamps
2Reading lamps on/off
Switching on reading lamp
�
Press button2.
Switching off reading lamp
�
Press button2 again.
iIf a lamp is switched on manually, it will
not go out automatically. This could
cause the battery to become dis-
charged.
Page 112 of 321
 re-
peatedly until you see the trip odome-
ter display.
�
Press and hold the left knob1 until the
tr")
112 Controls in detailInstrument clusterResetting trip odometer�
Press the left knob1 (
�page 110) re-
peatedly until you see the trip odome-
ter display.
�
Press and hold the left knob1 until the
trip odometer is reset.
Tachometer
To help protect the engine, the fuel supply
is interrupted if the engine is operated
above its specified limit.
Outside temperature indicator
When moving the vehicle into colder ambi-
ent temperatures (e.g. when leaving your
garage), you will notice a delay before the
lower temperature is displayed.
A delay also occurs when ambient temper-
atures rise. This prevents inaccurate tem-
perature indications caused by heat
radiated from the engine during idling or
slow driving.
Setting the clock
Hour�
Pull out the right knob2 in the instru-
ment cluster (
�page 110) and turn it
counterclockwise.
Minutes
�
Pull out the right knob2 in the instru-
ment cluster (
�page 110) and turn it
clockwise.
Warning!
G
The outside temperature indicator is not de-
signed to serve as an ice-warning device and
is therefore unsuitable for that purpose.
Indicated temperatures just above the freez-
ing point do not guarantee that the road sur-
face is free of ice. The road may still be icy,
especially in wooded areas or on bridges.
iTo set the clock by a single hour or a
few minutes, turn knob2 just a few de-
grees in the direction indicated for
hours or minutes.
Page 116 of 321

116 Controls in detailAutomatic transmission
Effect
N
Neutral
No power is transmitted from the en-
gine to the drive axle. When the
brakes are released, the vehicle can
be moved freely (pushed or towed).
To avoid damage to the transmission,
never engageN while driving.
If the ESP is deactivated or malfunc-
tioning:
Only move selector lever toN if the
vehicle is in danger of skidding (e.g.
on icy roads).
D
The transmission shifts automatical-
ly. All five forward gears are avail-
able.
!Coasting the vehicle, or driving for any
other reason with selector lever inN
can result in transmission damage that
is not covered by the Mercedes-Benz
Limited Warranty.Warning!
G
Getting out of your vehicle with the selector
lever not fully engaged in positionP is dan-
gerous. Also, positionP alone is not intend-
ed to or capable of preventing your vehicle
from moving, possibly hitting people or ob-
jects.
Always set the parking brake in addition to
shifting to positionP (
�page 50).
When parked on an incline, turn the front
wheels towards the road curb.
Warning!
G
When leaving the vehicle always remove the
key from the steering lock and lock the vehi-
cle. Do not leave children unattended in the
vehicle, or with access to an unlocked vehi-
cle. Children could move the selector lever
from positionP, which could result in an ac-
cident and/or serious personal injury.