Page 210 of 321
210 OperationTires and wheels
Life of tire
The service life of a tire is dependent upon
varying factors including but not limited to:�
Driving style
�
Tire pressure
�
Distance driven
Direction of rotation
Unidirectional tires offer added advantag-
es, such as better hydroplaning perfor-
mance. To benefit, however, you must
ensure that the tires rotate in the direction
specified.
An arrow on the sidewall indicates the in-
tended direction of rotation of the tire.
!When the wheels are heavily soiled,
e.g. after driving through mud, clean
the inside of the wheels with a jet of
water.
Warning!
G
Tires and spare tire should be replaced after
six years, regardless of the remaining tread.!Keep unmounted tires in a cool, dry
place with as little exposure to light as
possible. Protect tires from contact
with oil, grease and gasoline.
Page 212 of 321
212 OperationTires and wheelsRotating wheels
The wheels can be rotated every 3000 to
6000 miles (5 000 to 10 000 km) or sooner
if necessary, according to the degree of
tire wear. The same direction of tire rota-
tion must be retained.
Rotate the wheels before the characteris-
tic tire wear pattern becomes visible
(shoulder wear on front wheels and tread
center wear on rear wheels).
Thoroughly clean the inner side of the
wheels after each rotation. Check and en-
sure proper tire inflation pressure.Information on changing a wheel can be
found in the “Practical hints” section
(
�page 255).
Warning!
G
Rotate front and rear wheels only if they are
of the same size,
Warning!
G
Have the tightening torque checked after
changing a wheel. Wheels could become
loose if not tightened with a torque of
110 ft.lb. (150 Nm).
Use only genuine Mercedes-Benz wheel
bolts specified for your vehicle's rims.
Page 237 of 321
237 Practical hints
Where will I find ...?
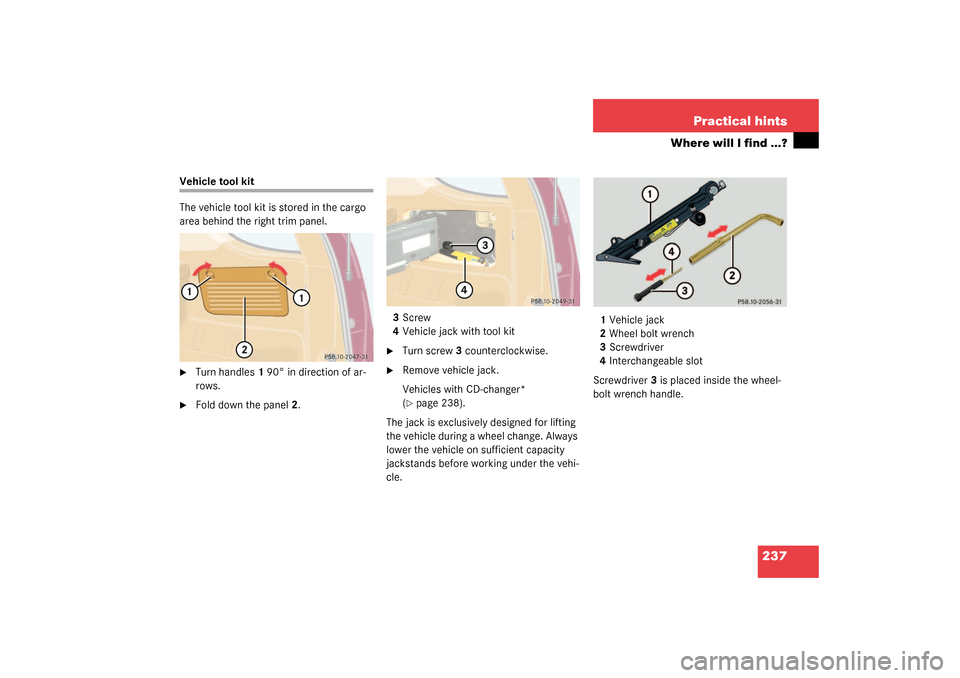
Vehicle tool kit
The vehicle tool kit is stored in the cargo
area behind the right trim panel.�
Turn handles1 90° in direction of ar-
rows.
�
Fold down the panel2.3Screw
4Vehicle jack with tool kit
�
Turn screw3 counterclockwise.
�
Remove vehicle jack.
Vehicles with CD-changer*
(�page 238).
The jack is exclusively designed for lifting
the vehicle during a wheel change. Always
lower the vehicle on sufficient capacity
jackstands before working under the vehi-
cle.1Vehicle jack
2Wheel bolt wrench
3Screwdriver
4Interchangeable slot
Screwdriver3 is placed inside the wheel-
bolt wrench handle.
Page 244 of 321

244 Practical hintsUnlocking/locking in an emergency�
Pull off battery cover2 in direction of
arrow.
�
Remove the batteries.
�
Using a lint-free cloth, insert new bat-
teries under the contact spring with the
plus (+) side facing up.
�
Press battery cover onto housing until
locked in place.
�
Push each button to assure proper op-
eration of the remote control.
If remote control does not function cor-
rectly after replacing the batteries, the
system may have to be resynchronized.Synchronizing remote control
�
Turn key in steering lock to position2,
then to position0 and remove.
�
Within 10 seconds, push and hold
button
‹
while pushing
button
Œ
five times.
�
Release the button, and press
‹
,
Œ
or
Š
once.
The remote control is resynchronized.
�
Recheck all of the remote control func-
tions.
Fuel filler flap
1Cover
2Lock rod�
Open cover1 in cargo area behind the
left trim panel.
�
Turn lock rod2 clockwise (arrow) to
the end stop.
�
Open the fuel filler flap.
iIf it is not possible to resynchronize the
remote control, have the system
checked at your authorized
Mercedes-Benz Light Truck Center.
iML 55 AMG:
First remove the spare wheel from its
holder (
�page 240).
Page 264 of 321

264 Practical hintsJump starting
Jump starting
If the battery is discharged, the engine can
be started with jumper cables and the bat-
tery of another vehicle. Observe the follow-
ing:�
Jump starting should only be performed
when the engine and catalytic convert-
er are cold.
�
Do not start the engine if the battery is
frozen. Let the battery thaw out first.
�
Only jump start from batteries with the
same voltage rating (12V). Jump start-
ing with a more powerful battery could
damage the vehicle's electrical system,
which will not be covered by the Mer-
cedes-Benz Limited Warranty.
�
Use only jumper cables with sufficient-
cross-section, insulated terminal
clamps and polarity reversal protec-
tion.
Warning!
G
Failure to follow these directions will cause
damage to the electronic components, and
can lead to a battery explosion and severe
injury or death.
Never lean over batteries while connecting
or jump starting, you might get injured.
Battery fluid contains sulfuric acid. Do not
allow this fluid to come in contact with eyes,
skin or clothing. In case it does, immediately
flush affected area with water, and seek
medical help if necessary.
A battery will also produce hydrogen gas,
which is flammable and very explosive. Keep
flames or sparks away from battery, avoid
improper connection of jumper cables,
smoking etc.
Attempting to jump start a frozen battery
can result in it exploding, causing personal
injury.
Read all instructions before proceeding.
iJumper cables with polarity reversal
protection are available at any autho-
rized Mercedes-Benz Light Truck
Center.
Page 272 of 321
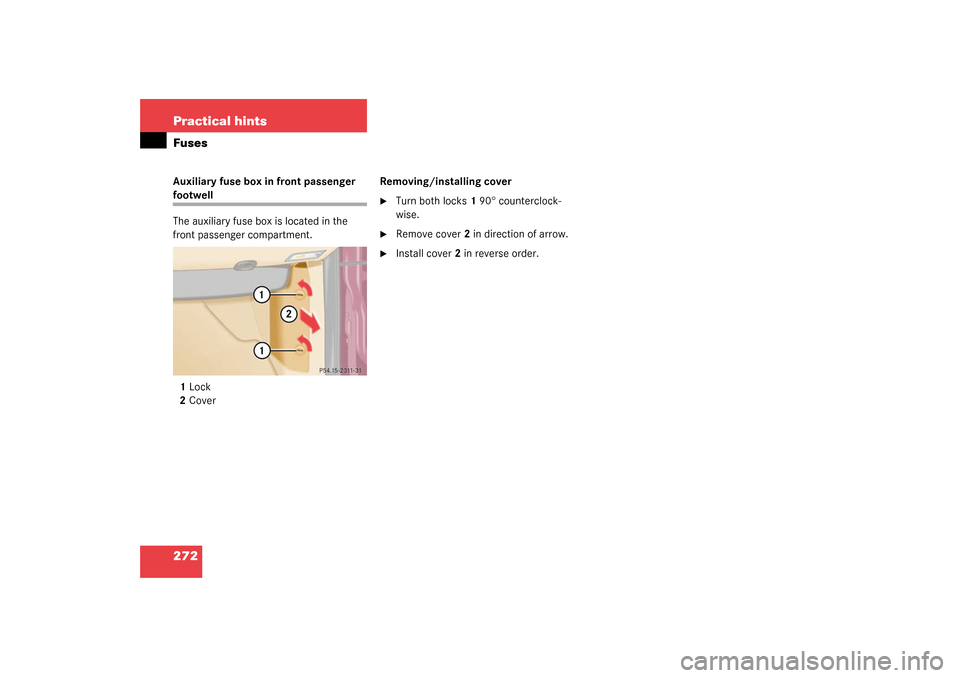
272 Practical hintsFusesAuxiliary fuse box in front passenger footwell
The auxiliary fuse box is located in the
front passenger compartment.
1Lock
2CoverRemoving/installing cover
�
Turn both locks1 90° counterclock-
wise.
�
Remove cover2 in direction of arrow.
�
Install cover2 in reverse order.
Page 303 of 321

303 Index
Compass 173
Calibrating 174
Setting compass zone 174
Compass zone 174
Consumer information 291
Control and operation of radio
transmitters 197
Coolant 206, 287
Adding 206
Anticorrosion/antifreeze quantity 288
Checking level 206
Indicator lamp 230
Temperature 199
Temperature gauge 111
Coolant level
Checking 201, 206
Crossing obstacles 190
Cruise control 146, 293
Canceling 147
Driving downhill 147
Driving uphill 147
Fine adjustment 148
LOW RANGE mode 148
Saving current speed 147
Setting speeds 148Cruise control lever 146
Cup holder 154
Cleaning 221
In front seat armrest 155
In instrument panel 154
In rear centerconsole 155
Customer Assistance Center (CAC) 293
D
Daytime running lamp mode 103
Deactivating
Air conditioning (cooling) 129
Air recirculation mode 129
Alarm 79
Anti-theft alarm system 79
Automatic climate control 125, 127
Cruise control 147
Defrost 128
Engine 51
ESP 76
Front fog lamps, rear fog lamp 105
Hazard warning flasher 106
Headlamps 51
Immobilizer 78
Rear passenger compartment
ventilation and climate control 131Rear window defroster 131
Residual heat 130
Seat heater 91
Tow-away alarm 80
Tow-away alarm (vehicles with trip
computer*) 80
Tow-away alarm (vehicles without trip
computer) 81
Deactivating automatic central locking 89
Deep water see Standing water 185
Defogging
Windshield 128
Defrosting 128
Difficulties
While driving see Problems while
driving 49
With starting 45
Direction of rotation (tires) 210
Discharged battery
Jump starting 264
Disconnecting
Vehicle battery 261
Display
Engine oil level 204
Display in the speedometer 111
Page 317 of 321

317 Index
Tilt
Head restraint 36
Time
Setting hours 112
Setting minutes 112
Tire inflation pressure
Checking 201, 211
Tire speed rating 184, 296
Tire traction 183
Tires 209, 279, 291
Direction of rotation 210
Driving instructions 182
Retreads 209
Rims and tires 279
Rotating 212
Service life 210
Temperature 211
Temperature grades 292
Tread depth 213
Wear pattern 212
Winter 213
Tools 237
Vehicle jack 237
Vehicles with CD-changer* 238
Wheel bolt wrench 237Tow-away alarm 29, 79
Arming 79
Disarming 79
Disarming for transport 79
Towing
Trailer 192
Towing a trailer 194
Automatic transmission 117
Towing eyes
Front 269
Rear 269
Towing the vehicle 267
Stranded vehicle 270
Tracking services
For stolen vehicle 168
Traction 291, 296
Trailer
Attaching 194
Loading 193
Towing 194
Trailer hitches 192
Trailer towing 192
Attaching a trailer 194
Checking weights 193
Electrical connections 192
Hitches 192Loading 193
Parking 196
Weights and ratings 193
Trailer weights and ratings 193
Transfer case 296
Transmission control – LOW RANGE
mode 118
Switching off 118
Switching on 118
Transmission selector lever 245
Unlocking manually 245
Tread depth (tires) 213
Treadwear 291
Trip computer
Average fuel consumption 175
Compass 173
Distance remaining 175
Selecting functions 172
Setting date 172
Stop watch 175
Switching on 172
Trip computer* 29, 172
Country 176
Language 176
Trip odometer
Resetting 112
Page:
< prev 1-8 9-16 17-24
 or sooner
if necessary, according to the degree of
tire wear. The same direction")