Page 96 of 321

96 Controls in detailSeatsThird row seats* Folding down single seat
1Head restraint
2Hook
3Tensioner
4Hook and loop strip
�
Remove cargo floor plate
(�page 144).
�
Remove head restraint1 from seat
cushion.
�
Lift tensioner3 upward to a horizontal
position to release tension of the belt.
�
Disengage hook2 while holding onto
the seat firmly with one hand.
�
Attach belt at hook and loop strip4 on
underside of seat.
5Backrest release
6Seat release
�
Fold seat down until it locks securely in
place.
The red marking on the seat release
should6 not be visible.
�
Store cargo floor plates inside the
backrest (
�page 144).
�
Pull backrest release5 and unfold
backrest until it locks securely in place.
�
Install head restraint1 in backrest
(�page 92).
Warning!
G
For your protection, drive only with properly
positioned head restraints.
Adjust head restraint to support the back of
the head approximately at ear level.
Failure to assure that seats are locked into
place could result in an increased chance of
injury in an accident.
Never place hands under seat or near any
moving parts while a seat is being adjusted.
Page 97 of 321
97 Controls in detail
Seats
Storing single seat�
Remove head restraint from backrest
(�page 92).
�
Pull backrest release5 and fold back-
rest forward until it locks securely in
place.
�
Remove cargo floor plates from the
backrest.
�
Pull seat release6 (
�page 96) and
fold seat up.
�
Disengage belt and engage hook2
(�page 96) in ceiling mount.
�
Pull on free end of belt until tight.
�
Install head restraint in openings pro-
vided in seat cushion.
�
Install cargo floor plates (
�page 144).
Warning!
G
After folding the seats up, manually place
the lap belt portion of the seat belt behind
the seat (arrow). Otherwise, the lap belt may
be subject to damage and could rip.
Page 100 of 321
100 Controls in detailMemory function*Storing positions in memory�
Adjust the seat (
�page 36) and exteri-
or rear view mirrors (�page 38) to the
desired position.
�
Push memory button2.
�
Release memory button and press one
of the position buttons1 within three
seconds.
All the settings are stored at the select-
ed position.
Recalling positions from memory�
Press and hold one of the position
buttons1 until seat and rear view mir-
rors have fully moved to the stored po-
sitions.Exterior rear view mirror parking posi-
tion (passenger side)
For easier parking, you can adjust the pas-
senger exterior rear view mirror so that you
can see the right rear wheel as soon as you
engage reverse gearR.
!Do not operate the power seats using
the memory button if the seat backrest
is in an excessively reclined position.
Doing so could cause damage to front
or rear seats.iReleasing the button immediately
stops movement to the stored posi-
tions.
Page 139 of 321

139 Controls in detail
Loading
Loading
Loading instructions
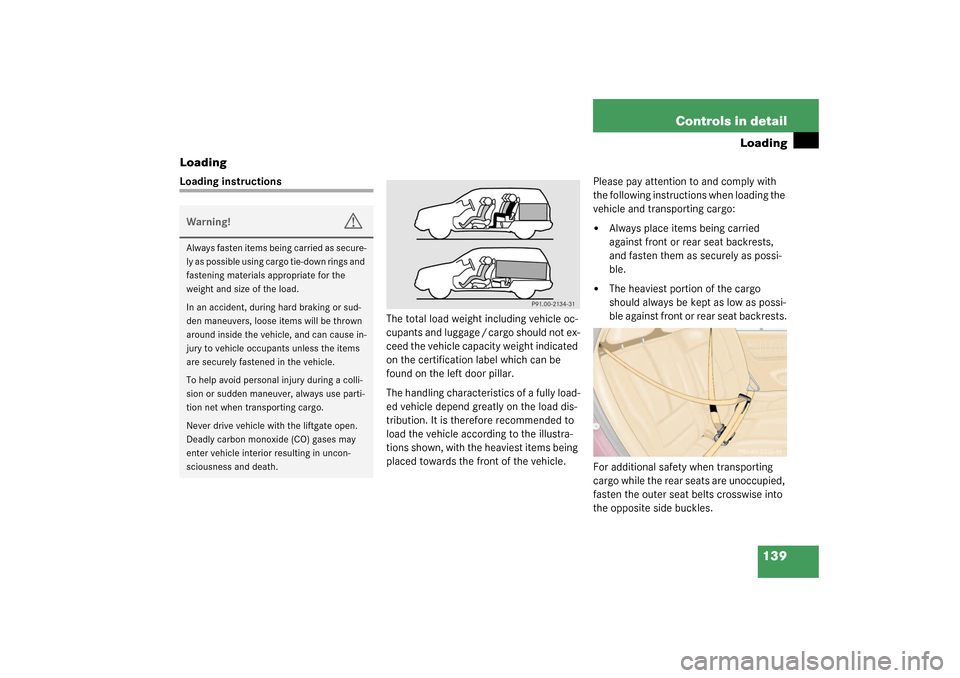
The total load weight including vehicle oc-
cupants and luggage / cargo should not ex-
ceed the vehicle capacity weight indicated
on the certification label which can be
found on the left door pillar.
The handling characteristics of a fully load-
ed vehicle depend greatly on the load dis-
tribution. It is therefore recommended to
load the vehicle according to the illustra-
tions shown, with the heaviest items being
placed towards the front of the vehicle.Please pay attention to and comply with
the following instructions when loading the
vehicle and transporting cargo:
�
Always place items being carried
against front or rear seat backrests,
and fasten them as securely as possi-
ble.
�
The heaviest portion of the cargo
should always be kept as low as possi-
ble against front or rear seat backrests.
For additional safety when transporting
cargo while the rear seats are unoccupied,
fasten the outer seat belts crosswise into
the opposite side buckles.
Warning!
G
Always fasten items being carried as secure-
ly as possible using cargo tie-down rings and
fastening materials appropriate for the
weight and size of the load.
In an accident, during hard braking or sud-
den maneuvers, loose items will be thrown
around inside the vehicle, and can cause in-
jury to vehicle occupants unless the items
are securely fastened in the vehicle.
To help avoid personal injury during a colli-
sion or sudden maneuver, always use parti-
tion net when transporting cargo.
Never drive vehicle with the liftgate open.
Deadly carbon monoxide (CO) gases may
enter vehicle interior resulting in uncon-
sciousness and death.
Page 141 of 321

141 Controls in detail
Loading
Partition net*Use of the partition net is a particularly im-
portant safety factor when the vehicle is
loaded higher than the top of the seat
backrests with smaller objects.
The partition net can be installed behind
the backrests of the front or rear seats.
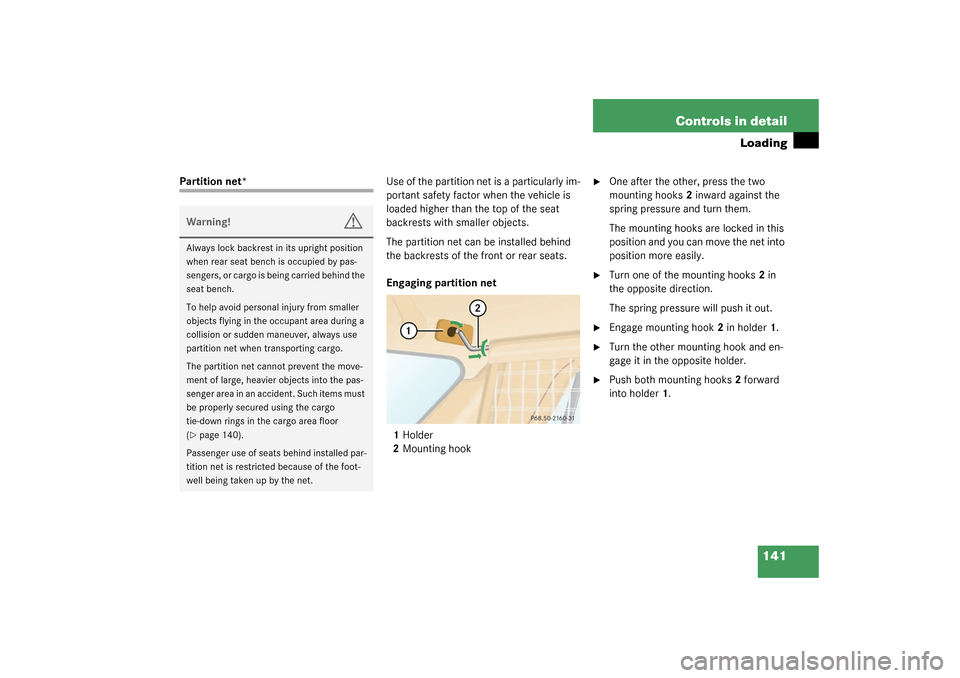
Engaging partition net
1Holder
2Mounting hook
�
One after the other, press the two
mounting hooks2 inward against the
spring pressure and turn them.
The mounting hooks are locked in this
position and you can move the net into
position more easily.
�
Turn one of the mounting hooks2 in
the opposite direction.
The spring pressure will push it out.
�
Engage mounting hook2 in holder1.
�
Turn the other mounting hook and en-
gage it in the opposite holder.
�
Push both mounting hooks2 forward
into holder1.
Warning!
G
Always lock backrest in its upright position
when rear seat bench is occupied by pas-
sengers, or cargo is being carried behind the
seat bench.
To help avoid personal injury from smaller
objects flying in the occupant area during a
collision or sudden maneuver, always use
partition net when transporting cargo.
The partition net cannot prevent the move-
ment of large, heavier objects into the pas-
senger area in an accident. Such items must
be properly secured using the cargo
tie-down rings in the cargo area floor
(�page 140).
Passenger use of seats behind installed par-
tition net is restricted because of the foot-
well being taken up by the net.
Page 144 of 321
144 Controls in detailLoadingCargo floor plates
Removing cargo floor plates�
Lift cargo floor plate at rear edge (ar-
row).
Cargo floor plate unhinges automati-
cally.
�
Remove cargo floor plate by pulling it
rearwards.Storing cargo floor plates
1Hook and loop strip
�
Fold the left cargo floor plate together.
�
Open the hook and loop strip at the
bottom of backrest of the third row
seats* and insert cargo floor plate.
�
Close the hook and loop strip. Installing cargo floor plates
1Opening
2Pins
3Attachment opening
4Latch
�
Grip into opening1 and guide pins2
into attachment opening3.
The center pin must snap into place in
latch4.
iBefore you can remove the cargo floor
plates, it is possible that the third row
seats* (
�page 96) must be removed.
Page 299 of 321

299 Index
A
ABS 25, 71, 293
ABS control 71
LOW RANGE mode 72
Malfunction indicator lamp 225
Warning lamp 225
Accelerator position, automatic
transmission 117
Accident
In case of 49
Activating
Air circulation mode 130
Air recirculation mode 129
Anti-theft alarm system 78
Automatic climate control 125
ESP 77
Exterior headlamps 46
Hazard warning flasher 106
Headlamps 46
High beams 102
Ignition 33
Immobilizer 51, 78
Rear passenger compartment
ventilation and climate control 131
Rear window defroster 131
Rear window wiper 48Residual heat 130
Seat heater 91
Tow-away alarm 80
Warning indicators (Parktronic*) 151
Windshield wipers 48
Activating automatic central locking 89
Adding
Coolant 206
Engine oil 204, 205
Additional turn signals 247
Adjustable steering column
Indicator lamp 229
Adjusting 34
Backrest tilt 36, 37
Exterior rear view mirror 38
Head restraint height 36, 37
Head restraint tilt 36, 37
Headlamp aim 253
Instrument cluster illumination 110
Manual seat 35
Mirrors 38
Power seats 37
Seat cushion tilt 37
Seat fore and aft 35
Seat fore and aft adjustment 37
Seat height 35, 36Seats 34
Steering wheel 37
Adjusting air distribution
Automatic climate control 127
Adjusting air volume
Automatic climate control 127
Air conditioner (cooling)
Turning on 129
Air conditioning
Cooling 129
Air conditioning refrigerant 286
Air outlets
Automatic climate control 132
Air pressure see Tire inflation pressure 211
Air pump 238
Air recirculation mode 128
Activating 129
Deactivating 129
AIRBAG OFF
Warning lamp 232
Airbags 55
BabySmart
TM airbag deactivation
system 293
BabySmartTM deactivation system 65
Children 56
Front 59
Page 301 of 321

301 Index
B
BabySmart
TM
Airbag deactivation system 65
Compatible child seats 65, 293
Self-test 66
BabySmart
TM airbag deactivation
system 293
Backrest tilt 35
Backup lamps 248, 251
Bulbs 248
BAS 73, 293
Malfunction indicator lamp 225, 226
Warning lamp 225, 226
Batteries, remote control
Changing 243
Batteries, vehicle 207
Battery discharged
Jump starting 264
Battery indicator lamp
Indicator lamp 233
Battery, vehicle 207, 261
Charging 262
Disconnecting 261
Reconnecting 262
Reinstalling 262
Removing 262Bi-Xenon headlamps* 293
Block heater 214
Blocking
Rear door window operation 69
Brake assist system (BAS) 293
Brake fluid 286
Brake lamp bulbs 248
Brake lamp, high mounted 248
Brake pad wear
Indicator lamp 234
Brakes 180
Warning lamp 228
Break-in period 178
Bulbs, replacing 247
Additional turn signals 247
Backup lamps 248
Brake lamps 248
Fog lamps 247
Front fog lamp 251
Front lamps 247
High beam 247
High mounted brake lamp 248, 252
License plate lamps 248, 252
Low beam 247
Parking lamps 247, 248, 250
Rear fog lamp 248Rear fog lamps 251
Rear side marker lamp bulbs 251
Side marker lamps 247, 248, 250
Standing lamps 247, 248
Tail lamp assemblies 248, 251
Turn signal lamps 247, 248, 250
C
CAC (Customer Assistance Center) 293
Calibrating compass 174
California
Important notice 11
Calling up
Service indicator 216
CAN system 293
Capacities
Fuels, coolants, lubricants, etc. 284
Cargo area cover blind* 143
Closing 143
Installing 143
Opening 143
Removing 143
Cargo area see Cargo compartment 85
Cargo compartment
Liftgate 85
Lighting 109
Tie-down rings 140