Page 36 of 321

36 Getting startedAdjustingBackrest tilt�
Turn handwheel3 until your hands are
slightly angled when holding the steer-
ing wheel.
Head restraint height
�
Pull up or push down on head restraint
until it is in desired position.Head restraint tilt
�
Manually adjust the angle of the head
restraint. Push or pull on the lower
edge of the head restraint cushion.
Adjusting power seats*
The seat adjustment switch is located on
the entry side of each front seat base.
�
Switch on the ignition by turning the
key in the steering lock to position2
(�page 33).
All the lights in the instrument cluster
light up.1Seat height
2Seat fore and aft adjustment
3Seat cushion tilt
4Backrest tilt
Seat height
�
Press the switch up or down in the di-
rection of arrow1.
Warning!
G
For your protection, drive only with properly
positioned head restraints.
Adjust head restraint to support the back of
the head approximately at ear level.
Do not drive the vehicle without the seat
head restraints. Head restraints are intend-
ed to help reduce injuries during an acci-
dent.
Warning!
G
The power seats can also be operated with
the appropriate door open. Do not leave
children unattended in the vehicle, or with
access to an unlocked vehicle. Unsuper-
vised use of vehicle equipment may cause
an accident and/or serious personal injury.
Page 39 of 321
39 Getting started
Adjusting
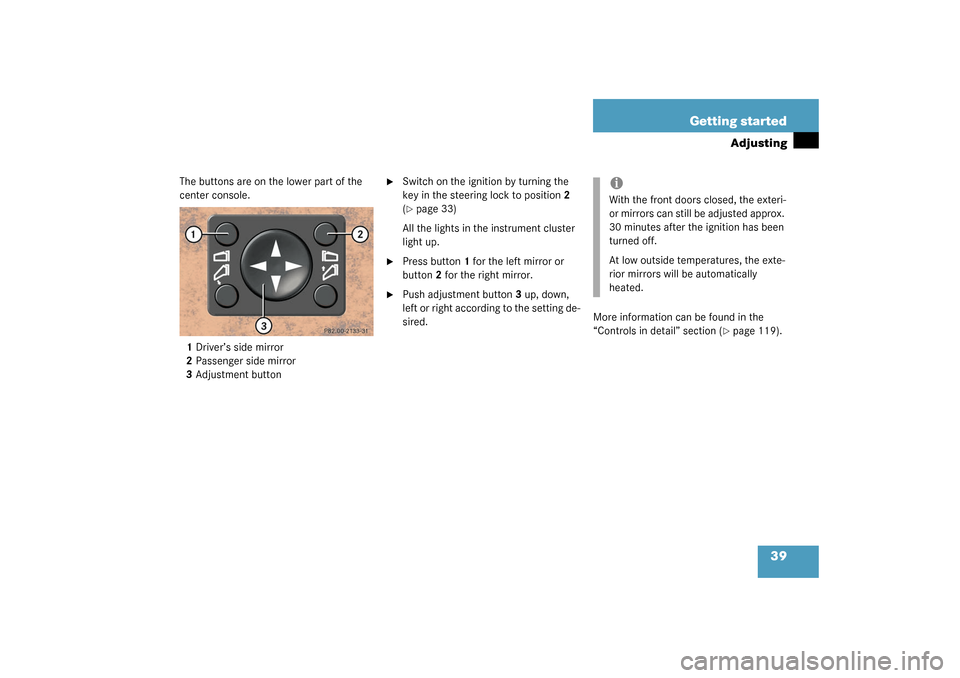
The buttons are on the lower part of the
center console.
1Driver’s side mirror
2Passenger side mirror
3Adjustment button
�
Switch on the ignition by turning the
key in the steering lock to position2
(�page 33)
All the lights in the instrument cluster
light up.
�
Press button1 for the left mirror or
button2 for the right mirror.
�
Push adjustment button3 up, down,
left or right according to the setting de-
sired.More information can be found in the
“Controls in detail” section (
�page 119).
iWith the front doors closed, the exteri-
or mirrors can still be adjusted approx.
30 minutes after the ignition has been
turned off.
At low outside temperatures, the exte-
rior mirrors will be automatically
heated.
Page 45 of 321

45 Getting started
Driving
Starting difficulties
If the engine does not start as described,
carry out the following steps:�
Turn key in starter to position0 and re-
peat starting procedure.
Remember that extended starting at-
tempts can drain the battery.
�
Get a jump start (
�page 264).
If the engine does not start after several
starting attempts, there could be a mal-
function in the engine electronics or in the
fuel supply system.
�
Notify an authorized Mercedes-Benz
Light Truck Center.Parking brake
1Parking brake pedal
2Release handle
�
Release the parking brake by pulling on
handle2.
The indicator lamp
É
in the instru-
ment cluster goes out.
Driving
�
Place the gear selector lever in
positionD orR.
�
Release the brake pedal.
�
Carefully depress the accelerator
pedal.
!Ensure that the brake pedal is de-
pressed when starting the engine.
Warning!
G
When leaving the vehicle always remove the
key from the steering lock and lock the vehi-
cle. Do not leave children unattended in the
vehicle, or with access to an unlocked vehi-
cle. Children could release the parking
brake, which could result in an accident
and/or serious personal injury.
iWait for the gear selection process to
complete before setting the vehicle in
motion.
Page 47 of 321
47 Getting started
Driving
High beam�
Push the exterior lamp switch forward.
The high beam symbol
A
in the
instrument cluster lights up.
More information can be found in the
“Controls in detail” section (
�page 102)
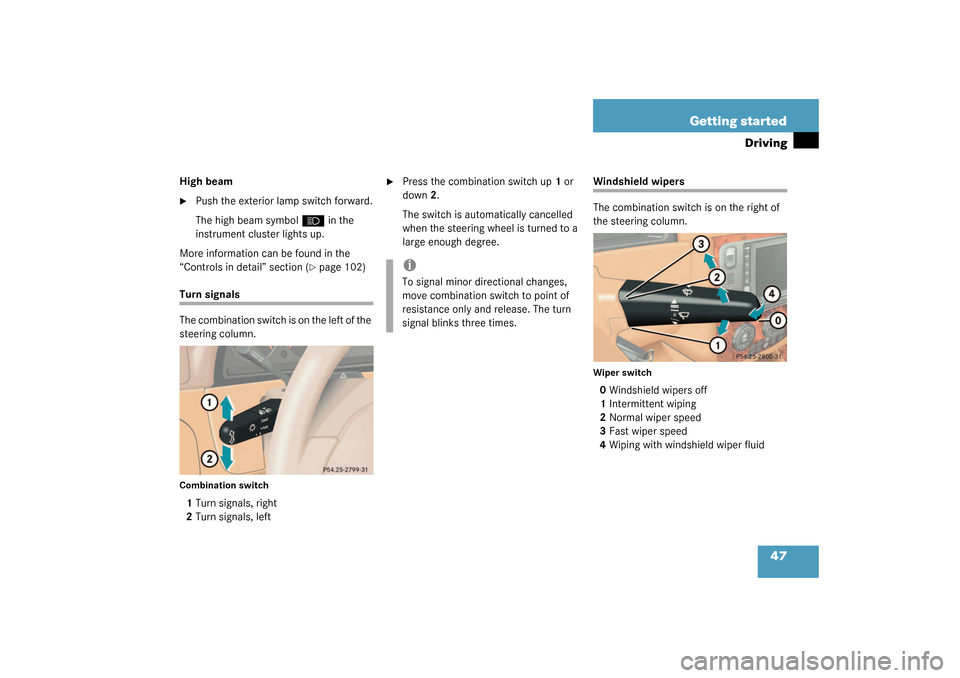
Turn signals
The combination switch is on the left of the
steering column.Combination switch1Turn signals, right
2Turn signals, left
�
Press the combination switch up1 or
down2.
The switch is automatically cancelled
when the steering wheel is turned to a
large enough degree.
Windshield wipers
The combination switch is on the right of
the steering column.Wiper switch0Windshield wipers off
1Intermittent wiping
2Normal wiper speed
3Fast wiper speed
4Wiping with windshield wiper fluid
iTo signal minor directional changes,
move combination switch to point of
resistance only and release. The turn
signal blinks three times.
Page 50 of 321

50 Getting startedParking and locking
Parking and lockingYou have now completed your first drive.
You have properly stopped and parked
your vehicle. End your drive as follows.
Parking brake
1Parking brake
2Release handle�
Step firmly on parking brake1.
When the engine is running, the indica-
tor lamp
É
in the instrument cluster
will be illuminated.
Warning!
G
Wait until the vehicle is stationary before re-
moving the key from the steering lock. The
vehicle cannot be steered when the key is
removed.Warning!
G
With the engine not running, there is no
power assistance for the steering system. In
this case, it is important to keep in mind that
a considerably higher degree of effort is nec-
essary to steer the vehicle.
Warning!
G
Do not park this vehicle in areas where com-
bustible materials such as grass, hay or
leaves can come into contact with the hot
exhaust system, as these materials could be
ignited and cause a vehicle fire.
To reduce the risk of personal injury as a re-
sult of vehicle movement, before turning off
the engine and leaving the vehicle always:�
Keep right foot on brake pedal.
�
Firmly depress parking brake pedal.
�
Move the selector lever to positionP.
�
Slowly release brake pedal.
�
When parked on an incline, turn front
wheel towards the road curb.
�
Turn the key to starter switch position 0
and remove.
�
Take the key and lock vehicle when leav-
ing.
Page 54 of 321

54 Safety and SecurityOccupant safety
Occupant safetyIn this section you will learn the most im-
portant facts about the restraint systems
of the vehicle.
The restraint systems are�
Seat belts
�
Emergency tensioning device
�
Airbags
�
Child seats
�
Child seat recognition
�
Lower anchors and tethers for children
(LATCH)
As independent systems their protective
effects work in conjunction with each oth-
er.The warning lamp
1
in the instrument
cluster (
�page 26) lights up for about
4 seconds when the key is turned to
position2. It goes out when you start the
engine. This shows that the restraint sys-
tems are operational.
If the lamp does not come on at all or if it
fails to extinguish after approximately
4 seconds or if it comes on thereafter, a
malfunction in the system has been de-
tected.
More information can be found in the
“Practical hints” section (
�page 227).
iFor information on infants and children
traveling with you in the vehicle and re-
straint systems for infants and chil-
dren, see “Children in the vehicle”
(�page 63).
Warning!
G
In the event that the SRS malfunction indica-
tor lamp lights up during driving or does not
come at all, the SRS may not be operational.
For your safety, we strongly recommend
that you visit an authorized Mercedes-Benz
Light Truck Center immediately to have the
system checked; otherwise the SRS may not
be activated when needed in an accident,
which could result in serious or fatal injury,
or it might deploy unexpectedly and unnec-
essarily which could also result in injury.
Improper work on the restraint systems can
lead to unintentional deployment or opera-
tional failure.
All work on these systems should therefore
only be carried out by an authorized
Mercedes-Benz Light Truck Center.
Page 59 of 321

59 Safety and Security
Occupant safety
Front airbags
1Driver airbag
2Passenger airbag
3Side impact airbag
Driver and passenger airbags are de-
ployed:�
in the event of a frontal impact
�
if impact exceeds a preset deployment
threshold
�
independently of the side impact air-
bagsThe airbags will not deploy in impacts
which do not exceed the system’s deploy-
ment thresholds. You will then be protect-
ed by the fastened seat belts.
The passenger airbag will only be deployed
if:
�
the passenger seat is occupied
�
the
7
indicator lamp in the instru-
ment cluster is not lit (
�page 26)Side impact airbags and window
curtain airbags
1Window curtain airbags
2Side impact airbag, rear
3Side impact airbag, front
Side impact airbags and window curtain
airbags are deployed:
�
on the impacted side of the vehicle
�
in impacts exceeding a preset deploy-
ment threshold
�
independently of the front airbags
!Do not place objects heavier than
20 lbs (9 kg) on the front passenger
seat. This could cause the front or side
impact airbag on the front passenger
side to deploy in a crash which exceeds
the system's deployment threshold.
Page 60 of 321

60 Safety and SecurityOccupant safetyThe side impact airbags and window
curtain airbags are not deployed in im-
pacts which do not exceed the system’s
deployment threshold.
The passenger airbag will only be deployed
if:�
the passenger seat is occupied
�
the
7
indicator lamp in the instru-
ment cluster is not lit (
�page 26)
Seat belts
After starting the engine, a warning sounds
and the seat belt warning lamp
<
re-
mains illuminated for approx. six seconds
if the driver’s seat is not fastened.
The use of seat belts and infant and child
restraint systems is required by law in all
50 states and all Canadian provinces. Even
where this is not the case, all vehicle occu-
pants should have their seat belts fastened
whenever the vehicle is in motion.
Information on fastening seat belts is
found in the “Getting started” section
(
�page 40).iFor information on infants and children
traveling with you in the vehicle and re-
straint systems for infants and chil-
dren, see “Children in the vehicle”
(�page 63)
Warning!
G
Always fasten your seat belt before driving
off. Always make sure your passengers are
properly restrained, even those sitting in the
rear and pregnant women.
Failure to wear and properly fasten and po-
sition your seat belt greatly increases your
risk of injuries and their likely severity in an
accident. You and your passengers should
always wear seat belts.
If you are ever in an accident, your injuries
can be considerably more severe without
your seat belt properly buckled. Without
your seat belt buckled, you are much more
likely to hit the interior of the vehicle or be
ejected from it. You can be seriously injured
or killed.
In the same crash, the possibility of injury or
death is lessened if you are properly wearing
your seat belt. Airbags can only protect as
they are designed if the occupants are prop-
erly wearing their seat belts.