Page 287 of 360
287 Practical hints
Replacing bulbs
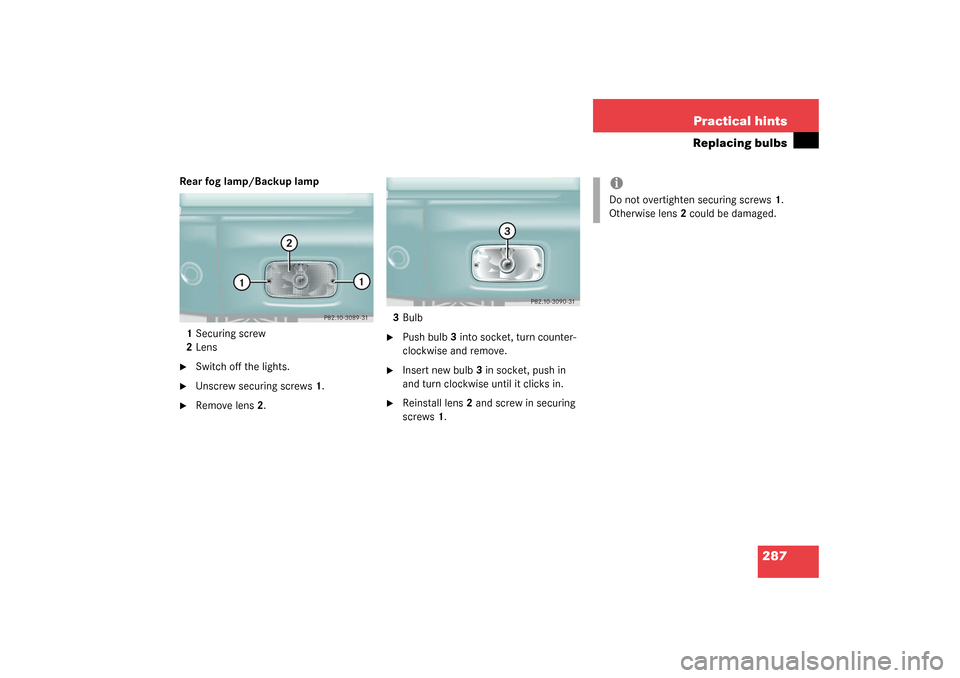
Rear fog lamp/Backup lamp
1Securing screw
2Lens�
Switch off the lights.
�
Unscrew securing screws1.
�
Remove lens2.3Bulb
�
Push bulb3 into socket, turn counter-
clockwise and remove.
�
Insert new bulb3 in socket, push in
and turn clockwise until it clicks in.
�
Reinstall lens2 and screw in securing
screws1.
iDo not overtighten securing screws1.
Otherwise lens2 could be damaged.
Page 288 of 360
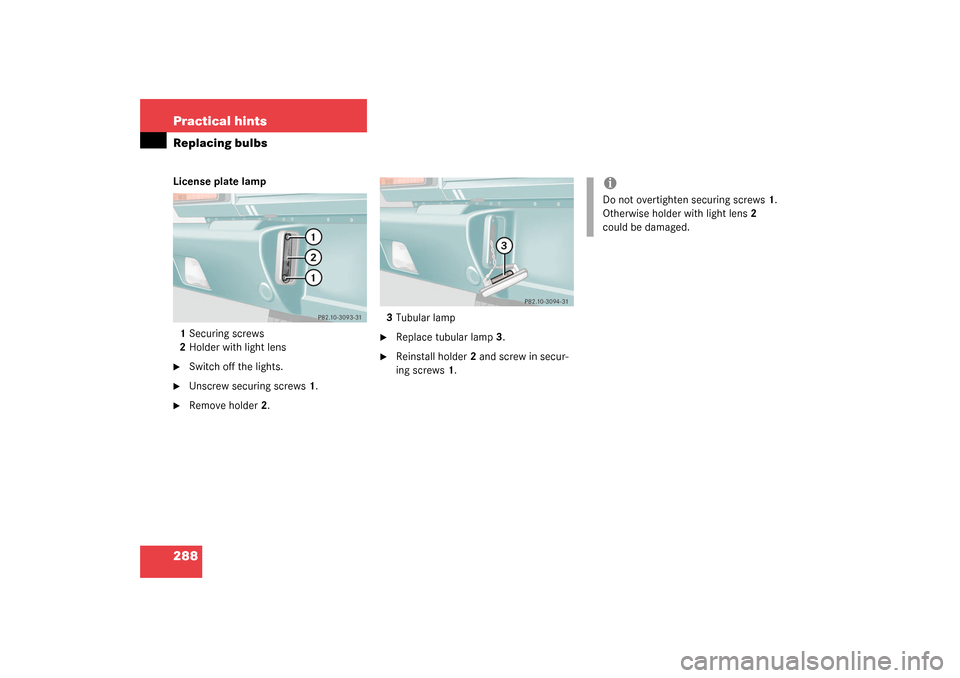
288 Practical hintsReplacing bulbsLicense plate lamp
1Securing screws
2Holder with light lens�
Switch off the lights.
�
Unscrew securing screws1.
�
Remove holder2.3Tubular lamp
�
Replace tubular lamp3.
�
Reinstall holder2 and screw in secur-
ing screws1.
iDo not overtighten securing screws1.
Otherwise holder with light lens2
could be damaged.
Page 294 of 360
.
The vehicle is resting fully on its own
weight.
�
R")
294 Practical hintsFlat tireLowering the vehicle�
Using the pump lever, open the lower-
ing screw on the jack approximately
one turn (
�page 292).
The vehicle is resting fully on its own
weight.
�
Remove the jack.
After use, disassemble pump handle
(�page 292) and store jack in the des-
ignated storage compartment
(�page 269).
1-5 Wheel bolts
�
Tighten the five wheel bolts evenly, fol-
lowing the diagonal sequence illustrat-
ed (1 to 5), until all bolts are tight.
Observe a tightening torque of 97 ft lb
(130 Nm).
�
Press the jack piston in again and close
the lowering screw. Store the jack
(�page 269) and the other vehicle
tools (
�page 268).
�
After changing the wheel, secure the
faulty wheel on the spare wheel mount-
ing bracket (
�page 271). Make sure
that the wheel cannot come loose.
�
Check the tire inflation pressure and
correct it if necessary.
A table with the tire pressure values for
your vehicle is located on the fuel filler
flap.
Warning!
G
Have the tightening torque checked after
changing a wheel as soon as possible. The
wheels could come loose if they are not
tightened to a torque of 97 ft lb (130 Nm).
Page 296 of 360

296 Practical hintsBatteryDisconnecting the battery�
Turn off all electrical consumers.
�
Disconnect the battery negative lead.
�
Remove the cover from the positive ter-
minal.
�
Disconnect the battery positive lead.
�
Remove the breather hose from the
battery.
Reconnecting the battery�
Turn off all electrical consumers.
�
Connect the positive lead and fasten its
cover.
�
Connect the negative lead.
�
Install the breather hose.
!Never loosen or detach battery termi-
nal clamps while the engine is running
or the key is in the starter switch. Oth-
erwise the alternator and other elec-
tronic components could be severely
damaged.
iWith a disconnected battery�
you will no longer be able to turn
the key in the starter switch
�
the selector lever will remain
locked in positionP
!Never invert the terminal connections.!The battery, its filler caps and the vent
tube must always be securely installed
when the vehicle is in operation.
iThe following procedures must be car-
ried out following any interruption of
battery power (e.g. due to reconnec-
tion):�
Set the clock (see COMAND opera-
tor’s manual).
�
Resynchronize the front seat head
restraints and seat adjustment fore,
aft (
�page 93).
�
Resynchronize the ESP
(�page 257).
Page 341 of 360

341 Index
Lighting 100
Automatic headlamp mode 101
Combination switch 103
Daytime running lamp mode 102
Exterior lamp switch 100
Front fog lamps 102
High beam flasher 103
High beams 103
Instrument cluster illumination 108
Instruments 108
Interior 104
Locator lighting 102
Low beam 100
Manual headlamp mode 101
Night security illumination 102
Parking lamps 100
Rear fog lamp 103
Settings (control system) 124
Limiting the gear range 137
Limp Home Mode 140
Line of fall 326
Loading 168
Cargo area cover 168
Cargo tie-down rings 175
Instructions 173
Partition net* 171Roof rack 168
Split rear bench seat 169
Locator lighting 102
Setting 125
Lock button 327
Locking 50, 84
Fuel filler flap 214
Global, SmartKey 85
Vehicle in an emergency 273
Loss of keys 86
Loss of Service and Warranty Information
Booklet 309
Low beam headlamps
Messages in display 261
Low beam lamp
Replacing bulbs 281
LOW RANGE - ABS 72
Lowering
Vehicle 294
Lubricants
Technical data 316
M
Main dimensions 315
Maintenance 230Malfunction
Displaying 118
Rear Park Assist* 167
Malfunction memory 118
Calling up 118
Clearing 119
Manual headlamp mode 101
Manual operations
Fuel filler flap 274
Interior lighting control 105
Locking the vehicle 273
Sliding/pop-up roof 276
Unlocking the driver’s door 272
Unlocking transmission selector
lever 275
MB Tex upholstery
Cleaning 236
Mechanical key 272
Memory function 97, 327
Recalling positions from memory 98
Storing exterior rear view mirror
parking positions 99
Storing key dependent settings 98
Page 342 of 360

342 IndexMenus 112
AUDIO 116
Control system 327
In control system 114, 115
Malfunction memory 118
NAVI 118
Settings menu 119
Standard display 116
Submenus 113
TEL 132
Trip computer 130
Middle tunnel
Fuse box in 305
Miles/kilometers in speedometer
Setting 122
Mirrors
Activating exterior rear view mirror
parking position 148
Adjusting 38
Automatic antiglare for rear view mirror
147
Exterior rear view mirror 38
Exterior rear view mirror parking posi-
tions 130
Inside rear view mirror 38Storing exterior rear view mirror park-
ing position 99
MON 215
MON (Motor Octane Number) 327
Monitoring reach
Rear Park Assist* 166
Mph or km/h in speedometer 122
Multicontour seat* 94
Multifunction display 111, 327
Selecting language 123
Standard display 115
Multifunction display messages
ABS 247
BAS 248
Battery 266
Brake fluid 250
Brake pads 250
Check engine 243
Coolant 251, 252
Display 267
Doors 254
Engine 243
Engine oil level 254
ESP 257
Fuel reserve tank 263
Hood 258Key 259
Lamps 259, 261
Parking brake 263
Tailgate 266
Tele Aid 266
Telephone* 258
Washer fluid 267
Multifunction steering wheel 26, 112
Buttons 112
N
Navigation system
Operating 118
See separate COMAND operating in-
structions
Night security illumination 102
Setting 125
O
Occupant safety 54
Airbags 55
Children in the vehicle 63
Fastening the seat belt 40
Infant and child restraint systems 63
LATCH child seat mounts 68
Seat belts 40, 58
Odometer, main 25
Page 346 of 360

346 IndexSafety systems
Driving 71
Saving current speed 163
Searching
Radio station 117
Seat adjustment
Synchronizing 93
Seat backrest
Folding forward 170
Returning to sitting position 170
Seat belt force limiter 62
Seat belt height adjustment 42
Seat belts 54, 60
Cleaning 236
Fastening 40
Height adjustment 42
Proper use of 42, 61
Safety guidelines 58
Warning lamp 243
Seat bench
Folding forward 170
Returning to sitting position 170
Seat cushion length
Adjusting 94Seat heater, front
Switching off 95
Switching on 95
Seat heater, rear
Switching off 96
Switching on 96
Seats 91
Adjusting 34
Easy entry/exit feature 91
Heater 95
Multicontour seat* 94
Rapid seat heating, front 95
Rapid seat heating, rear 96
Split rear bench seat 169
Securing cargo
Cargo tie-down rings 175
Selecting
Display 123
Selector lever 25
Lock 43
Position (automatic transmission) 25,
135
Self-test
BabySmart
TM airbag deactivation sys-
tem 66
Tele Aid 184Service
Calling up the service indicator 231
Major service (Service B) 230
Minor service (Service A) 230
Overdue 230
Spare parts 308
Types 230
When due 230
Service and Warranty Booklet
Loss of 309
Service indicator 230
Calling up 231
Clearing 230, 231
Service life (tires) 225
Service System see FSS 230
Setting
Convenience functions 121, 128
Cruise control 163, 164
Daytime running lamp mode 124
Higher speed in cruise control 164
Individual vehicle settings 119
Instrument lighting 108
Interior lighting delayed switch-off 126
Key dependent memory 129
Lamps and lighting
(control system) 124
Page 347 of 360

347 Index
Language, multifunction display 123
Locator lighting 125
Lower speed in cruise control 164
Miles/kilometers in speedometer 122
Night security illumination 125
Parking position for exterior rear view
mirrors 130
Slower speed in cruise control 164
Speed in cruise control 164
Speedometer display mode 122
Station selection mode 127
Temperature (interior) 152
Temperature indicator 122
Units
Speedometer 122
Temperature 122
Setting speed
Cruise control 164
Settings
Convenience functions 128
Factory, SmartKey 85
Individual (SmartKey) 129
Lighting (control system) 124
Menus and submenus 113
Resetting all (control system) 119
Resetting in the submenu 120Selective 85
Settings menu
Functions in 119
Individual vehicle settings 119
Submenus 120
Shift lock 328
Shifting
Gear selector lever positions 138
Into optimal gear range (automatic
transmission) 137
Side marker lamps 280
Replacing bulbs 279, 285
Side windows
Automatic opening 159
Cleaning 235
Closing 158, 159
Closing with SmartKey 159
Opening 158, 159
Opening fully 159
Opening with SmartKey 159
Stopping 159
Signal strength (telephone) 132
Simultaneous wiping and washing
Windshield wipers 47
Single wipe 47Sliding/pop-up roof 160
Closing 160, 276
Closing with SmartKey 161
Opening 160, 276
Opening with SmartKey 161
Stopping 160
SmartKey
Locking and unlocking 84
Opening and closing the slid-
ing/pop-up roof with 161
Opening and closing windows with 159
Unlocking with 32
Snow chains 229
Spare parts service 308
Spare wheel 270
Mounting 291
Speed
Saving current 163
Speed settings
Cruise control 164
Speedometer 25
Settings units 122
Speedometer display mode
Selecting 122
Split rear bench seat 169