Page 115 of 360
115 Controls in detail
Control system
Menus, submenus and functions
Menu 1
Menu 2
Menu 3
Menu 4
Menu 5
Menu 6
Menu 7
Standard
display
AUDIO
NAVI
Malfunction
memory
Settings
Trip computer
Telephone
Commands/submenuCoolant
temperature
display
Select radio
station
Activate route
guidance
Call up
malfunction
messages
Reset to factory
settings
Fuel
consumption
statistics after
start
Load phone book
Digital
speedometer
Operate CD
player
Instrument
cluster submenu
Fuel
consumption
statistics since
the last reset
Search for name
in phone book
Call up FSS
Lighting
submenu
Call up range
Check engine oil
level
Vehicle submenuConvenience
submenu
Page 119 of 360

119 Controls in detail
Control system
Should any malfunctions occur while driv-
ing, the number of malfunctions will reap-
pear in the display when the key in the
starter switch is turned to position0 or re-
moved from the starter switch.
Settings menu
In the
SETTINGS
menu there are two func-
tions:
�
The function
RETURN TO FACTORY SET-
TINGS
, with which you can reset all the
settings to those set at the factory.
�
A collection of submenus with which
you can make individual settings for
your vehicle.
�
Press button
è
or
ÿ
repeatedly
until the
SETTINGS
menu is seen in the
display.Resetting all settings
You can reset all the functions of all sub-
menus to the factory settings.
�
Press the reset knob in the instrument
cluster (
�page 24) for approximately
three seconds.
In the display you will see the request
to press the reset knob again to con-
firm.
�
Press the reset knob (
�page 24)
again.
The functions of all the submenus will
reset to factory settings.
iThe message memory will be cleared
when you turn the key in the starter
switch to position1 or2. You will then
only see Priority 1 malfunctions
(�page 246).
iThe settings you have changed will not
be reset unless you confirm the action
by pressing the reset knob a second
time.
Page 120 of 360
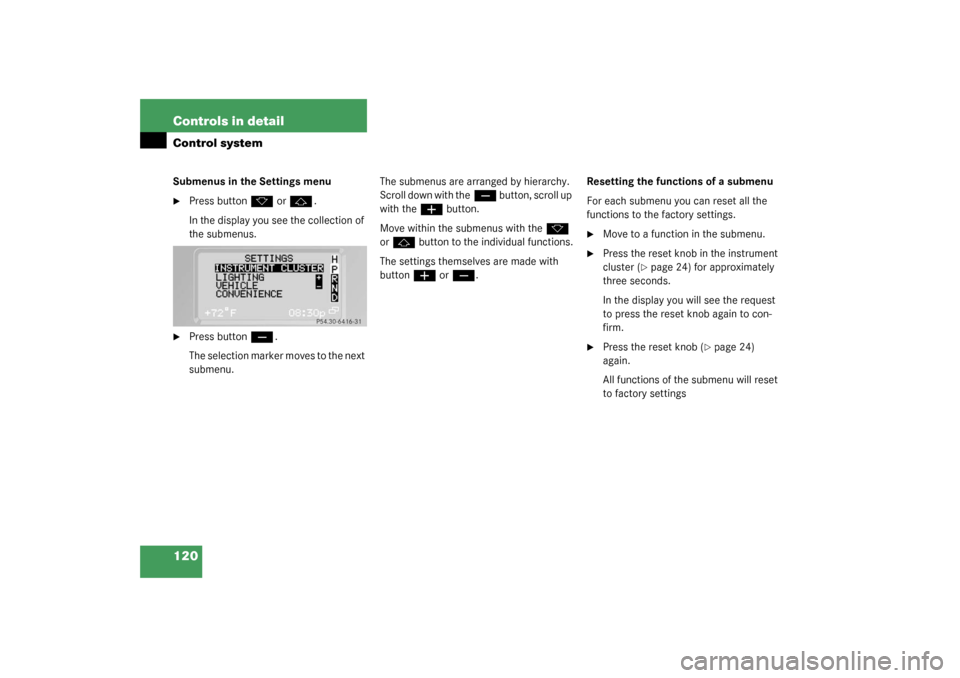
120 Controls in detailControl systemSubmenus in the Settings menu�
Press button
k
or
j
.
In the display you see the collection of
the submenus.
�
Press button
ç
.
The selection marker moves to the next
submenu.The submenus are arranged by hierarchy.
Scroll down with the
ç
button, scroll up
with the
æ
button.
Move within the submenus with the
k
or
j
button to the individual functions.
The settings themselves are made with
buttonæ
or
ç
.Resetting the functions of a submenu
For each submenu you can reset all the
functions to the factory settings.
�
Move to a function in the submenu.
�
Press the reset knob in the instrument
cluster (
�page 24) for approximately
three seconds.
In the display you will see the request
to press the reset knob again to con-
firm.
�
Press the reset knob (
�page 24)
again.
All functions of the submenu will reset
to factory settings
Page 121 of 360
121 Controls in detail
Control system
The table below shows what settings can
be changed within the various menus. De-
tailed instructions on making individual
settings can be found on the following pag-
es.INSTRUMENT CLUSTER
LIGHTING
VEHICLE
CONVENIENCE
Select temperature display
mode
Set daytime running lamp mode
(USA only)
Set station selection mode
(radio)
Activate easy-entry/exit feature
Select speedometer display
mode
Set locator lighting
Set automatic locking
Set key dependency
Select language
Exterior lamps delayed
switch-off
Set parking position for exterior
rear view mirror
Select display (speed display or
outside temperature)
Interior lighting delayed
switch-off
Page 122 of 360

122 Controls in detailControl systemInstrument cluster submenu
Access the
INSTRUMENT CLUSTER
menu via
the
SETTINGS
menu. Use the
INSTRUMENT
CLUSTER
submenu to change the instru-
ment cluster display settings. The follow-
ing functions are available:Selecting temperature display mode
�
Move the selection marker with
the
æ
or
ç
button to the
IN-
STRUMENT CLUSTER
submenu.
�
Press button
j
or
k
repeatedly
until you see this message in the dis-
play:
TEMP. INDICATOR
.
The selection marker is on the current
setting.
�
Press
æ
or
ç
to set temperature
unit to degrees Celsius (°C) or degrees
Fahrenheit (°F).Selecting speedometer display mode
�
Move the selection marker with
the
æ
or
ç
button to the
IN-
STRUMENT CLUSTER
submenu.
�
Press button
j
or
k
repeatedly
until you see this message in the dis-
play:
DISPLAY VALUES IN
.
The selection marker is on the current
setting.
�
Press
æ
or
ç
to set speedome-
ter unit to
km or
miles
.
Function
Page
Select temperature display
mode
see be-
low
Select speedometer display
mode
see be-
low
Select language
123
Select display (speed display or
outside temperature)
123
Page 145 of 360
 differential lock
2Rear axle differential lock
3F")
145 Controls in detail
Differential locks
Switching differential locks on and off
The switch is located in the center console.
1Transfer case (center) differential lock
2Rear axle differential lock
3Front differential lock
4Engagement indicator lamps (yellow)
5Function indicator lamps (red)Switching differential locks on
Transfer case differential lock
�
Press switch1.
The yellow engagement indicator lamp
for the transfer case differential lock
lights up.
The
v
warning lamp lights up.
When the differential lock engagement
operation has been completed, the red
function indicator lamp lights up.The message
ABS NOT AVAILABLE –
DIFFERENTIAL LOCKED
appears in the
multifunction display.
The
v
and
-
warning lamps in
the instrument cluster come on.
Once the transfer case differential lock
is switched on, you can now, if needed,
�
switch on rear axle differential
lock2
or
�
switch on rear axle differential lock
and front differential lock 2 and 3.
iThe differential locks can only be
switched on in the sequence 1, 2, 3.
!To avoid damage to the transfer case
and differential locks:�
Engage differential locks only at low
speed (walking speed, not more
than 5 mph)
�
Do not engage differential locks if
the driving wheels are spinning
�
Do not engage on paved roads.
Page 146 of 360

146 Controls in detailDifferential locksRear axle differential lock�
Press switch2.
The yellow engagement indicator lamp
lights up first, followed by the red func-
tion indicator lamp.
The rear axle differential lock is
switched on.
Front differential lock
�
Press switch 3.
The yellow engagement indicator lamp
lights up first, followed by the red func-
tion indicator lamp.
The front differential lock is switched
on. Switching differential locks off
There are two different methods to disen-
gage differential locks:
�
You can switch the differential locks off
in reverse order (3, 2, 1).
�
To switch off all differential locks at the
same time:�
Press switch1.
The yellow engagement indicator
lamps go out first. The red function
indicator lamps go out when the
switching process has been carried
out in the differential.To activate the ESP, BAS and ABS systems,
drive again for three seconds using a con-
stant driving style.
All messages in the multifunction display
disappear. The
v
and
-
warning
lamps in the instrument cluster go out.
iIf the function lamps do not go out
when the differential locks are disen-
gaged, bring vehicle to a stop and then
continue driving. Changing the vehicle
load can help to disengage locks. Warning!
G
Always remember to disengage the differen-
tial locks when returning to drive on paved
roads, see “A few words about differentials
and differential locks” (
�page 144).
Page 190 of 360
, and the
reserve key is not handy:�
Contact the Mercedes-Benz")
190 Controls in detailUseful features
Remote door unlock
In case you have locked your vehicle unin-
tentionally (e.g. key inside vehicle), and the
reserve key is not handy:�
Contact the Mercedes-Benz Response
Center at 1-800-756-9018 (in the USA)
or 1-888-923-8367 (in Canada).
You will be asked to provide your pass-
word which you provided when you
completed the subscriber agreement.
�
Then return to your vehicle and press
the tailgate lock for minimum of
20 seconds until the SOS button is
flashing.
The message
EMERGENCY CALL –
CALL CONNECTED appears in the multi-
function display.
As an alternative, you may unlock the vehi-
cle via Internet using the ID and password
sent to you shortly after the completion of
your acquaintance call.T h e R e s p o n s e C e n t e r w i l l t h e n u nl o c k y o u r
vehicle with the remote door unlocking
feature.
iWhen a Tele Aid call has been initiated,
the COMAND system audio is muted
and the selected mode (radio, tape or
CD) pauses. The optional cellular
phone (if installed) switches off. If you
must use this phone, the vehicle must
be parked. Disconnect the coiled cord
and place the call. The navigation sys-
tem (if engaged) will continue to run.
The display in the instrument cluster is
available for use and spoken com-
mands are only available by pressing
the RPT button on the COMAND unit. A
pop-up window will appear in the CO-
MAND display to indicate that a
Tele Aid call is in progress.
iThe remote door unlock feature is avail-
able if the relevant cellular phone net-
work is available.
The SOS button will flash and the mes-
sage
EMERGENCY CALL –
CALL CONNECTED
will appear in the mul-
tifunction display to indicate receipt of
the door unlock command.
Once the vehicle is unlocked, a Re-
sponse Center specialist will attempt
to establish voice contact with the ve-
hicle occupants.
If the tailgate lock was pressed for
more than 20 seconds before door un-
lock authorization was received by the
Response Center, you must wait
15 minutes before pressing the tailgate
lock again.