Page 252 of 360

252 Practical hintsWhat to do if …
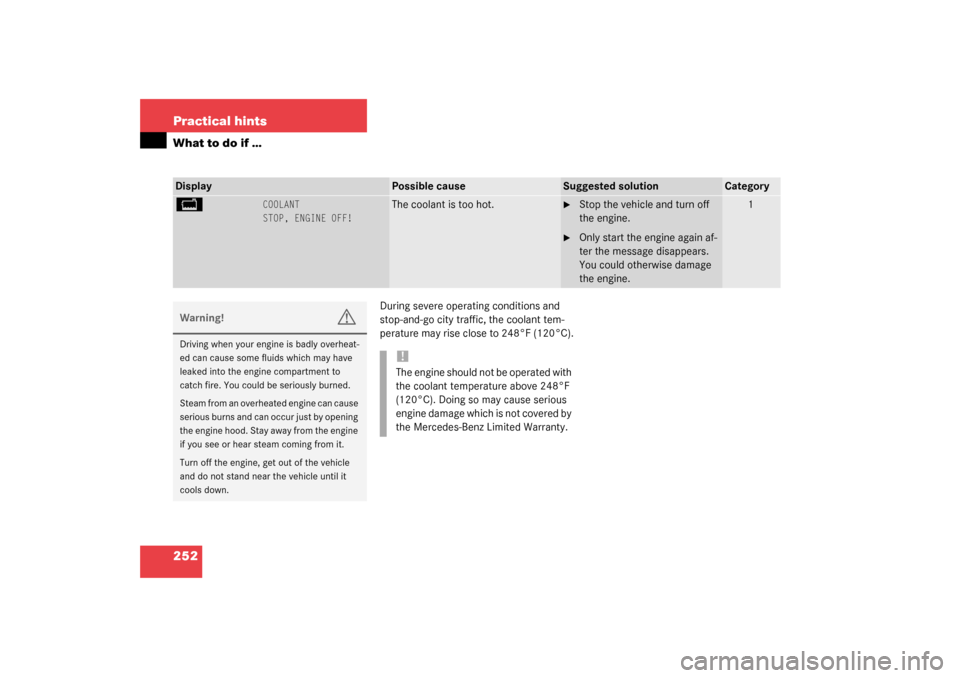
During severe operating conditions and
stop-and-go city traffic, the coolant tem-
perature may rise close to 248°F (120°C).
Display
Possible cause
Suggested solution
Category
B
COOLANT
STOP, ENGINE OFF!
The coolant is too hot.
�
Stop the vehicle and turn off
the engine.
�
Only start the engine again af-
ter the message disappears.
You could otherwise damage
the engine.
1
Warning!
G
Driving when your engine is badly overheat-
ed can cause some fluids which may have
leaked into the engine compartment to
catch fire. You could be seriously burned.
Steam from an overheated engine can cause
serious burns and can occur just by opening
the engine hood. Stay away from the engine
if you see or hear steam coming from it.
Turn off the engine, get out of the vehicle
and do not stand near the vehicle until it
cools down.
!The engine should not be operated with
the coolant temperature above 248°F
(120°C). Doing so may cause serious
engine damage which is not covered by
the Mercedes-Benz Limited Warranty.
Page 258 of 360
258 Practical hintsWhat to do if …ESP
ELEC. STABIL. PROG.
VISIT WORKSHOP!
The ESP is switched off due to a mal-
function or an interruption in the
power supply.
The brake system is still functioning
normally but without the ESP avail-
able.
If in addition the ABS is malfunction-
ing, only partial engine output will be
available.
�
Continue driving with added
caution.
�
Have the system checked at
an authorized Mercedes-Benz
Light Truck Center as soon as
possible.
Failure to follow these instructions
increases the risk of accident.
2
ì
FUNCTION
NOT AVAILABLE!
This display appears if button
ì
or
í
on the multifunction steer-
ing wheel is pressed and the vehicle
is not equipped with a telephone.
3
Y
HOOD OPEN!
You are driving with the hood open.
�
Close the hood (
�page 217).
2
Display
Possible cause
Suggested solution
Category
Page 289 of 360

289 Practical hints
Replacing wiper blades
Replacing wiper blades
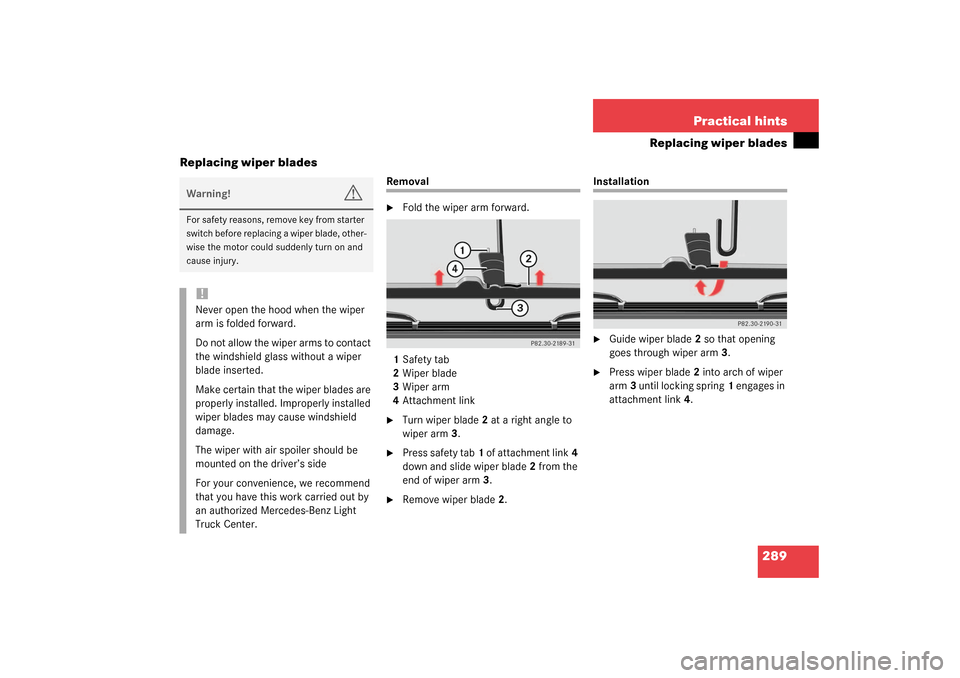
Removal�
Fold the wiper arm forward.
1Safety tab
2Wiper blade
3Wiper arm
4Attachment link
�
Turn wiper blade2 at a right angle to
wiper arm3.
�
Press safety tab1 of attachment link4
down and slide wiper blade2 from the
end of wiper arm3.
�
Remove wiper blade2.
Installation�
Guide wiper blade2 so that opening
goes through wiper arm3.
�
Press wiper blade2 into arch of wiper
arm3 until locking spring1 engages in
attachment link4.
Warning!
G
For safety reasons, remove key from starter
switch before replacing a wiper blade, other-
wise the motor could suddenly turn on and
cause injury.!Never open the hood when the wiper
arm is folded forward.
Do not allow the wiper arms to contact
the windshield glass without a wiper
blade inserted.
Make certain that the wiper blades are
properly installed. Improperly installed
wiper blades may cause windshield
damage.
The wiper with air spoiler should be
mounted on the driver’s side
For your convenience, we recommend
that you have this work carried out by
an authorized Mercedes-Benz Light
Truck Center.
Page 339 of 360

339 Index
Headlamps
Automatic control 101
Cleaning 234
Cleaning system 148, 222
Switching off 51
Switching on 46
Washer fluid 321
Washer system 321
Headliner
Cleaning 236
Heated seats 95
Heated steering wheel 194
Height adjustment
Head restraints 36
Seat belts 42
Steering wheel 37
High and low beam headlamps
Replacing bulbs 279
High beam flasher 46, 103
High beam headlamps
Messages in display 260
Switching on 103High beam lamp
Replacing bulbs 281
High mounted brake lamp 280
Hood 216
Closing 217
Messages in display 258
Opening 216
Hydroplaning 200
I
Identification labels 310
Certification label 310
Vehicle identification number
(VIN) 310
Ignition 33
Switching on 44
Immobilizer 79
Activating 79
Deactivating 79
Infant and child restraint systems 63
Installing 67
LATCH child seat mounts 68
Information
Button for Tele Aid 188Inside rear view mirror
Adjusting 38
Antiglare 147
Installing
Cargo area cover 169
Infant and child restraint systems 67
Wiper blades 289
Instructions
Loading 173
Instrument cluster 24, 108, 326
Cleaning 235
Coolant temperature display 108
Illumination 108
Lamps in 243, 244
Multifunction display 111
Outside temperature indicator 110
Selecting language 123
Instrument lighting 108
Instruments and controls see Cockpit 22
Interior lighting 104
Activating automatic control 104
Deactivating automatic control 105
Delayed switch-off 126
Manual operation 105
Page 343 of 360

343 Index
Off-road driving 203
Checklist 205
Crossing obstacles 208
Driving through water 207
Returning 209
Rules 204
Special driving features 204
Steep terrain 206
Oil
Adding 220
Consumption 217, 218
Dipstick 217
Filler neck 219, 220
Viscosity 326
Oil level
Checking 215
One-touch gearshifting 136
Canceling gear range limit 137
Downshifting 136
Upshifting 136
Opening
Ashtray 179
Doors from the inside 87
Fuel filler flap 214
Fuel filler flap manually 274
Glove box 176Hood 216
Side windows 159
Sliding/pop-up roof 160, 276
Sliding/pop-up roof in an
emergency 276
Sliding/pop-up roof with
SmartKey 161
Tailgate 87, 88
Windows 158
Windows with SmartKey 159
Operating
CD player 117
COMAND see separate operating
instructions
Navigation system 118
Radio 117
Radio transmitters 210
Telephone 132
Operator’s Manual 10
Ornamental moldings 234
Outside temperature indicator 110
Overdue service 230
Overhead control panel 29
Overspeed range 327P
Paintwork 233
Panic alarm 70
Panic button on SmartKey 70
Parcel net
In front passenger footwell 179
Parking 50, 199
Parking brake 44, 50
Engaging 50
Message in display 263
Releasing 44
Parking lamp, front
Replacing bulbs 281
Parking lamps
Replacing bulbs 279, 280
Switching on 100
Parking position
Exterior rear view mirrors 99, 130, 148
Parktronic see Rear Park Assist*
Partition net* 171
Installing behind front seats 172
Installing behind rear seat bench 171
Removing 173
Parts see Spare parts service 308