Page 270 of 360
270 Practical hintsWhere will I find ...?Spare wheel
The spare wheel is located under a cover
on the outside of the vehicle’s tailgate.
The spare wheel rim is mounted with a full
size tire of the same type as on the vehicle,
and is fully functional.
For rim and tire specifications, refer to
(�page 313).
Removing cover
1Cover ring
2Key
3Tab
�
Open lock for cover ring1 with key2
for the spare wheel cover.
�
Fold tab3 downwards.
4Cover plate
�
Pull cover ring1 slightly outwards in di-
rection of arrows and remove.
�
Pull cover plate4 upward towards you.5Catch
6Recess
iWhen replacing cover plate4, make
sure that catch5 engages in recess6.
Ensure that the lock faces downwards
when mounting cover ring1.
For safety reasons, check regularly that
the spare wheel is securely fastened.
Page 273 of 360

273 Practical hints
Unlocking/locking in an emergency
Locking the vehicle
If you are unable to lock the vehicle with
the SmartKey, lock it with the mechanical
key as follows:�
Close the passenger doors and the tail-
gate.
�
Press the central locking switch in the
cockpit (
�page 90).
�
Check to see whether the locking
knobs on the passenger doors are still
visible. If necessary, push them down
manually.
�
Slide the mechanical key out of the
SmartKey.
�
Lock the driver’s door with the me-
chanical key.
�
Lock the tailgate if necessary with the
mechanical key.
Changing batteries in the SmartKey
If the batteries in the SmartKey are dis-
charged, the vehicle can no longer be
locked or unlocked. It is recommended to
have the batteries replaced at an autho-
rized Mercedes-Benz Light Truck Center.
Batteries contain materials that can harm
the environment if disposed of improperly.
Recycling of batteries is the preferred
method of disposal. Many states require
sellers of batteries to accept old batteries
for recycling.1Mechanical key
2Battery compartment
Replacement batteries:
Lithium, type CR 2025 or equivalent.Warning!
G
Keep the batteries out of reach of children.
If a battery is swallowed, seek medical help
immediately.
iWhen changing batteries, always re-
place both batteries.
The required replacement batteries are
available at any Mercedes-Benz Light
Truck Center.
Page 277 of 360
277 Practical hints
Brush guard*
Brush guard*
Warning!
G
The brush guard is designed solely to en-
hance the appearance of the vehicle and
help protect grille and head lights from mi-
nor mishaps, either on- or off-road. Since
the safety characteristics are limited in the
event of an accident, brush guards are not
intended to prevent injury or damage in the
event of an accident. Also check state and
local regulations on installation and use.
Raise and lower brush guard in an open
space with plenty of room.
To help prevent personal injury when open-
ing or closing the brush guard, use extreme
caution not to trap hands or feet.
The brush guard must be in raised and
locked position while driving.iOnly lower brush guard to clean head
lamps or to replace bulbs.
Page 279 of 360
279 Practical hints
Replacing bulbs
Replacing bulbs
Safe vehicle operation depends on proper
exterior lighting and signaling. It is there-
fore essential that all bulbs and lamp as-
semblies are in good working order at all
times.
Correct headlamp adjustment is extremely
important. Have headlamps checked and
readjusted at regular intervals and when a
bulb has been replaced. See your autho-
rized Mercedes-Benz Light Truck Center
for headlamp adjustment.
Bulbs Front lamps
iBackup bulbs will be brought into use
when the following lamps malfunction:�
Parking lamps
�
Turn signal lamps
�
Tail lamps
Lamp
Type
1
Additional turn sig-
nal lamp
LED
2
S i d e t u r n s i g na l l a m p
WY 5 W
3
Turn signal lamp
1156 NA
4
High and low beam
H4 60 (55 W)
Parking and stand-
ing lamps
T 4 W
5
Side marker lamp
T 4 W
6
Fog lamp
H3 (55 W)
Page 280 of 360

280 Practical hintsReplacing bulbsRear lamps Notes on bulb replacement
�
Use only 12-volt bulbs of the same type
and with the specified watt rating.
�
Switch lights off before changing a bulb
to prevent short circuits.
�
Always use a clean lint-free cloth when
handling bulbs.
�
Your hands should be dry and free of oil
and grease.
�
If the newly installed bulb does not light
up, visit an authorized Mercedes-Benz
Light Truck Center.
�
Have the LEDs for the following lamps
replaced by an authorized Mer-
cedes-Benz Light Truck Center.�
The additional turn signals in the ex-
terior rear view mirrors
�
The high mounted brake lamp
Lamp
Type
7
High mounted brake
lamp
LED
8
Turn signal lamp
PY 21 W
Brake lamp
P 21 W
Tail, parking and
standing lamps
R 5 W
9
Backup lamp
P 21 W
10
License plate lamps
C 5 W
11
Side marker lamp
T 4 W
12
Rear fog lamp
P 21 W
Warning!
G
Keep bulbs out of reach of children.
Bulbs and bulb sockets can be very hot. Al-
low the lamp to cool down before changing
a bulb.
Halogen lamps contain pressurized gas. A
bulb can explode if you:�
touch or move it when hot
�
drop the bulb
�
scratch the bulb
Wear eye and hand protection.
iHave the headlamp settings checked
regularly by a Mercedes-Benz Light
Truck Center.
Do not turn the headlamp adjusting
screws. If the adjusting screws are
turned, the headlamp setting must be
checked by a Mercedes-Benz Light
Truck Center.
Page 281 of 360
281 Practical hints
Replacing bulbs
Replacing bulbs for front lamps
Headlamp assembly (halogen)Removing
Left headlamp, right headlamp laterally re-
versed1Securing screw (trim panel)
2Head lamp trim panel
3Headlamp�
Switch off the lights.
�
Unscrew securing screws1.
�
Remove head lamp trim panel2 and
seal.4Securing screw (headlamp)
�
Unscrew headlamp-securing screws4.
�
Remove headlamp3.
Installing
�
Insert headlamp3 and screw in head-
lamp-securing screws4.
�
Install head lamp trim panel2 and seal
and screw in securing screws1.
iFor vehicles with brush guard*:
Fold the brush guard* down before re-
placing bulbs (
�page 277).
G55AMG:
Remove the protective grille before re-
placing the bulbs.
Page 283 of 360
283 Practical hints
Replacing bulbs
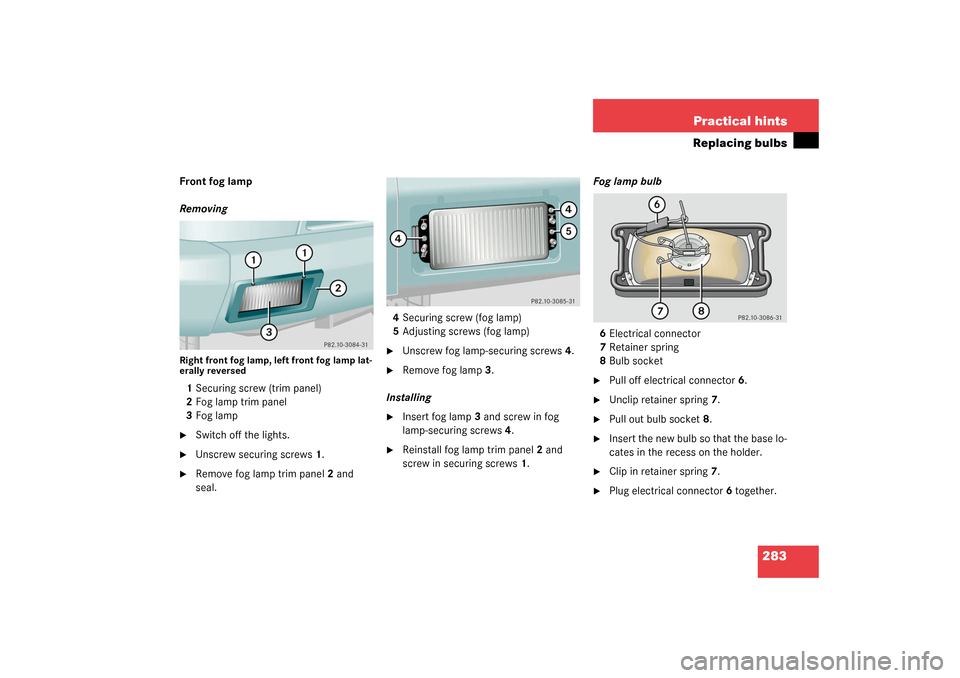
Front fog lamp
RemovingRight front fog lamp, left front fog lamp lat-
erally reversed1Securing screw (trim panel)
2Fog lamp trim panel
3Fog lamp�
Switch off the lights.
�
Unscrew securing screws1.
�
Remove fog lamp trim panel2 and
seal.4Securing screw (fog lamp)
5Adjusting screws (fog lamp)
�
Unscrew fog lamp-securing screws4.
�
Remove fog lamp3.
Installing
�
Insert fog lamp3 and screw in fog
lamp-securing screws4.
�
Reinstall fog lamp trim panel2 and
screw in securing screws1.Fog lamp bulb
6Electrical connector
7Retainer spring
8Bulb socket
�
Pull off electrical connector6.
�
Unclip retainer spring7.
�
Pull out bulb socket8.
�
Insert the new bulb so that the base lo-
cates in the recess on the holder.
�
Clip in retainer spring7.
�
Plug electrical connector6 together.
Page 284 of 360
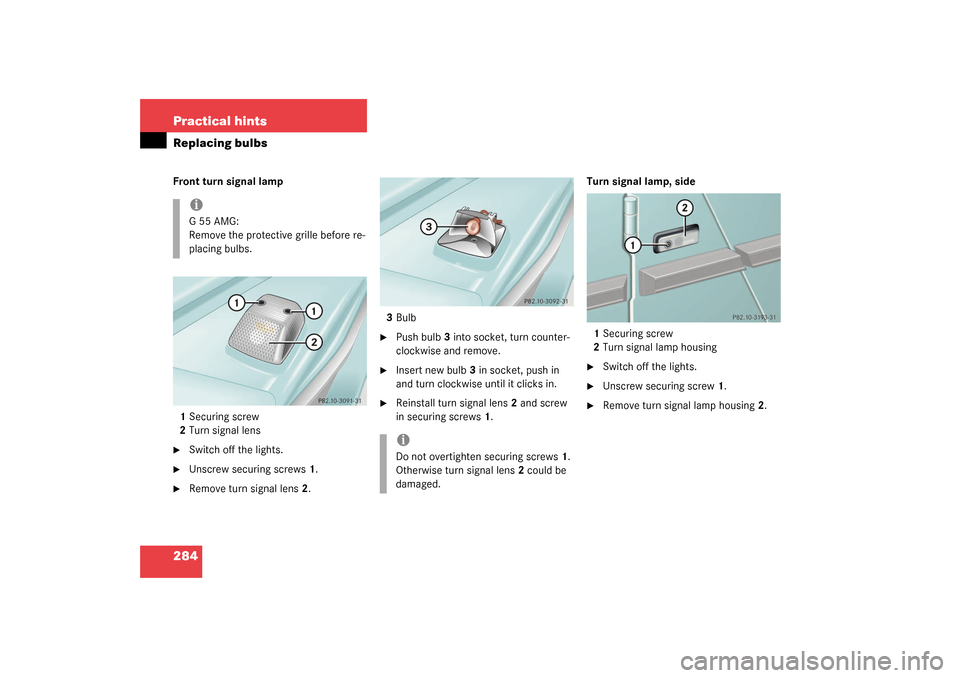
284 Practical hintsReplacing bulbsFront turn signal lamp
1Securing screw
2Turn signal lens�
Switch off the lights.
�
Unscrew securing screws1.
�
Remove turn signal lens2.3Bulb
�
Push bulb3 into socket, turn counter-
clockwise and remove.
�
Insert new bulb3 in socket, push in
and turn clockwise until it clicks in.
�
Reinstall turn signal lens2 and screw
in securing screws1.Turn signal lamp, side
1Securing screw
2Turn signal lamp housing
�
Switch off the lights.
�
Unscrew securing screw1.
�
Remove turn signal lamp housing2.
iG55AMG:
Remove the protective grille before re-
placing bulbs.
iDo not overtighten securing screws1.
Otherwise turn signal lens2 could be
damaged.


Removing
Left headlamp, right headlamp laterally re-
versed1Securing screw (trim panel)
2Head lamp trim")