Page 102 of 360

102 Controls in detailLightingDaytime running lamp mode�
Turn exterior lamp switch to
position
M
or
U
.
When the engine is running, the low beam
headlamps are automatically switched on.
In low ambient light conditions the parking
lamps will also switch on.
Canada only
When you shift from a driving position to
positionN orP, the low beam switches off
(three minutes delay).
For nighttime driving, you should turn the
exterior lamp switch to position
B
to
permit activation of the high beam head-
lamps.
USA only
The high beam headlamps can also be ac-
tivated when driving with the daytime run-
ning lamp mode activated and exterior
lamp switch in position
M
.To activate the daytime running lamp
mode, see “Setting daytime running lamp
mode” (
�page 124).
Locator lighting and night security illu-
mination
Locator lighting and night security illumi-
nation are described in the control system
section under “Setting locator lighting”
(
�page 125) and “Setting night security il-
lumination” (
�page 125).
Exterior rear view mirror lamps
If the vehicle is centrally unlocked in the
darkness, the lamps in the exterior rear
view mirrors light up.If a door is opened, the lamp on this side
goes out. If no doors are opened, the
lamps go out:
�
when the ignition is switched on
�
after a maximum of 40 seconds
Switching on front fog lamps
�
Check that the low beam headlamps
are switched on.
�
Pull out exterior lamp switch to first
stop.
The green indicator lamp
‡
in the
lamp switch lights up.
iSee notes on the exterior lamp switch
(�page 100).
iFog lamps will operate with the parking
lamps and/or the low beam headlamps
on. Fog lamps should only be used in
conjunction with low beam headlamps.
Consult your State or Province Motor
Vehicle Regulations regarding allow-
able lamp operation.
Page 103 of 360
103 Controls in detail
Lighting
Switching on rear fog lamp�
Check that the low beam headlamps
are switched on.
�
Pull out exterior lamp switch to second
stop.
The yellow indicator lamp
†
in the
lamp switch lights up.
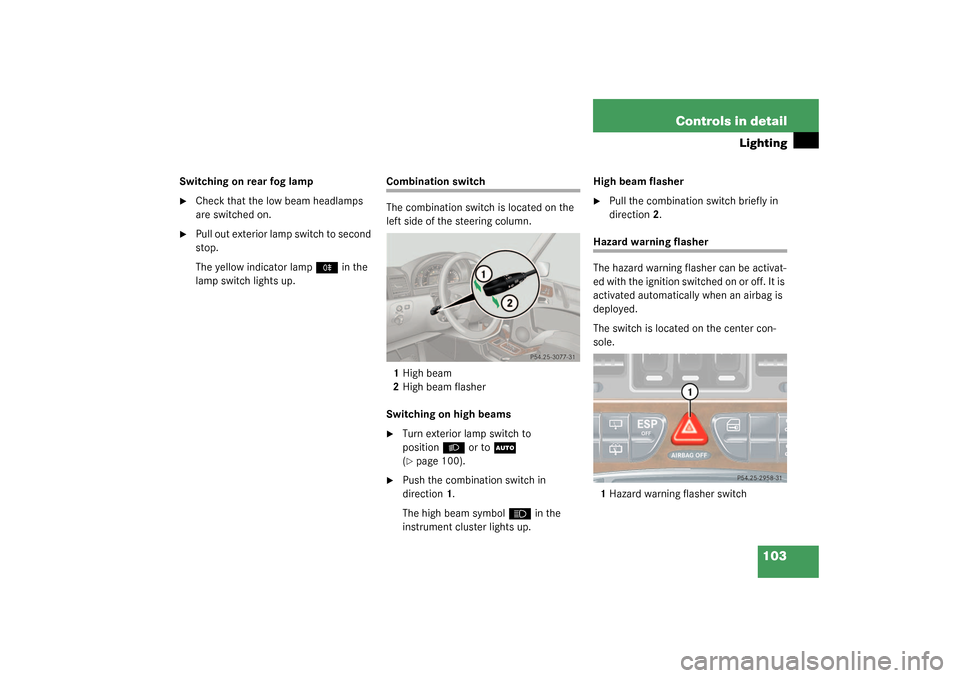
Combination switch
The combination switch is located on the
left side of the steering column.
1High beam
2High beam flasher
Switching on high beams�
Turn exterior lamp switch to
position
B
or to
U
(
�page 100).
�
Push the combination switch in
direction1.
The high beam symbol
A
in the
instrument cluster lights up.High beam flasher
�
Pull the combination switch briefly in
direction2.
Hazard warning flasher
The hazard warning flasher can be activat-
ed with the ignition switched on or off. It is
activated automatically when an airbag is
deployed.
The switch is located on the center con-
sole.
1Hazard warning flasher switch
Page 145 of 360
 differential lock
2Rear axle differential lock
3F")
145 Controls in detail
Differential locks
Switching differential locks on and off
The switch is located in the center console.
1Transfer case (center) differential lock
2Rear axle differential lock
3Front differential lock
4Engagement indicator lamps (yellow)
5Function indicator lamps (red)Switching differential locks on
Transfer case differential lock
�
Press switch1.
The yellow engagement indicator lamp
for the transfer case differential lock
lights up.
The
v
warning lamp lights up.
When the differential lock engagement
operation has been completed, the red
function indicator lamp lights up.The message
ABS NOT AVAILABLE –
DIFFERENTIAL LOCKED
appears in the
multifunction display.
The
v
and
-
warning lamps in
the instrument cluster come on.
Once the transfer case differential lock
is switched on, you can now, if needed,
�
switch on rear axle differential
lock2
or
�
switch on rear axle differential lock
and front differential lock 2 and 3.
iThe differential locks can only be
switched on in the sequence 1, 2, 3.
!To avoid damage to the transfer case
and differential locks:�
Engage differential locks only at low
speed (walking speed, not more
than 5 mph)
�
Do not engage differential locks if
the driving wheels are spinning
�
Do not engage on paved roads.
Page 146 of 360

146 Controls in detailDifferential locksRear axle differential lock�
Press switch2.
The yellow engagement indicator lamp
lights up first, followed by the red func-
tion indicator lamp.
The rear axle differential lock is
switched on.
Front differential lock
�
Press switch 3.
The yellow engagement indicator lamp
lights up first, followed by the red func-
tion indicator lamp.
The front differential lock is switched
on. Switching differential locks off
There are two different methods to disen-
gage differential locks:
�
You can switch the differential locks off
in reverse order (3, 2, 1).
�
To switch off all differential locks at the
same time:�
Press switch1.
The yellow engagement indicator
lamps go out first. The red function
indicator lamps go out when the
switching process has been carried
out in the differential.To activate the ESP, BAS and ABS systems,
drive again for three seconds using a con-
stant driving style.
All messages in the multifunction display
disappear. The
v
and
-
warning
lamps in the instrument cluster go out.
iIf the function lamps do not go out
when the differential locks are disen-
gaged, bring vehicle to a stop and then
continue driving. Changing the vehicle
load can help to disengage locks. Warning!
G
Always remember to disengage the differen-
tial locks when returning to drive on paved
roads, see “A few words about differentials
and differential locks” (
�page 144).
Page 155 of 360

155 Controls in detail
Climate control
Rear window defroster
Turn the SmartKey in starter switch to
position2.
Activating�
Press button
F
in the control panel
of the climate control.
The indicator lamp in the button lights
up.
Deactivating
�
Press button
F
in the control panel
of the climate control.
The indicator lamp in the button goes
out.
!Heavy accumulation of snow and ice
should be removed before activating
the defroster.
The defroster is automatically turned
off after approximately 6-17 minutes of
operation depending on the outside
temperature and vehicle speed.
If several power consumers are turned
on simultaneously, or the battery is
only partially charged, it is possible that
the defroster will automatically turn it-
self off.
When this happens, the indicator lamp
inside the switch starts blinking.
As soon as the battery has sufficient
voltage, the defroster turns itself back
on.
iThe rear window defroster uses a large
amount of power. To keep the battery
drain to a minimum, turn off the de-
froster as soon as the rear window is
clear.
Page 156 of 360
156 Controls in detailClimate controlResidual engine heat utilization
With the engine switched off, it is possible
to continue to heat or ventilate the interior
for a short while, depending on the temper-
ature setting of the climate control. Air vol-
ume and distribution are controlled
automatically.
Activating�
Turn the SmartKey in starter switch to
position1 or0 or remove it altogether.
�
Press button
°
.
The indicator lamp in the button lights
up.
Set the left and right temperature to
your personal requirements.Deactivating
�
Press button
°
again to switch off.
The indicator lamp in the button goes
out.
The residual heat is automatically turned
off:
�
when the SmartKey in starter switch is
turned to position2
�
after about 30 minutes
�
if the battery voltage dropsDeactivating the climate control
system
Deactivating�
Set the air volume control switch to
position0.
Reactivating
�
Set the air volume control switch to any
speed.
Page 157 of 360

157 Controls in detail
Climate control
Air conditioning
The air conditioning is operational while
the engine is running and cools the interior
air to the temperature set by the operator.
Deactivating
It is possible to deactivate the air condi-
tioning (cooling) function of the climate
control system. The air in the vehicle will
then no longer be cooled or dehumidified.�
Press button
°
(�page 151).
The indicator lamp on the button
°
lights up.Activating
Moist air can fog up the windows. You can
dehumidify the air with the air conditioner.
�
Press button
°
again (
�page 151).
The indicator lamp on the button
°
goes out.
The air conditioner uses the refrigerant
R134a. This refrigerant is free of CFCs
which are harmful to the ozone layer.Rear passenger compartment adjust-
able air vents
1Air volume control for center air vents
2Left center air vent, adjustable
3Right center air vent, adjustable
iCondensation may drip out from under-
neath the vehicle. This is normal and
not an indication of a malfunction.
!If the
°
button on the climate con-
trol panel starts to blink, this indicates
that the air conditioner is losing refrig-
erant. The compressor has turned itself
off. The air conditioner cannot be
turned on again.
�
Have the air conditioner checked at
the nearest authorized
Mercedes-Benz Center.
Page 167 of 360

167 Controls in detail
Driving systems
Warning indicator
Visual signals indicate to the driver the rel-
ative distance between the sensors and an
obstacle. The warning indicator is located
next to the tailgate.Warning indicatorAs your vehicle approaches an object, one
or more segments will light up, depending
on the distance. When the sixth segment
lights, you have reached the minimum dis-
tance.An intermittent acoustic warning will
sound as the fourth segment lights up and
a constant acoustic warning lasting a max-
imum of three seconds will sound for the
sixth segment.
Rear Park Assist malfunction
There is a malfunction in the Rear Park As-
sist system if:
�
a low warning tone sounds while the
vehicle is reversing
The Rear Park Assist sensors are dirty
or malfunctioning.�
Clean the Rear Park Assist system
sensors (
�page 234).
�
Switch on the ignition again.
�
no segments light up and no warning
sounds
The Rear Park Assist is malfunctioning.�
Have the Rear Park Assist system
checked by an authorized
Mercedes-Benz Light Truck Center
as soon as possible.
Malfunction may also be caused by inter-
ference from other radio or ultrasonic sig-
nals.
�
Check the Rear Park Assist operation
at another location to rule out interfer-
ence from outside radio or ultrasonic
signals.