Page 79 of 360
79 Safety and Security
Anti-theft systems
Anti-theft systems
Immobilizer
The immobilizer prevents unauthorized
persons from starting your vehicle.
Activating
Removing the key from the starter switch
activates the immobilizer.
Deactivating
Inserting the key in the starter switch de-
activate the immobilizer.
Anti-theft alarm
Once the alarm system has been armed, a
visual and audible alarm is triggered when
someone:�
opens a door
�
opens the tailgate
�
opens the hood
The alarm will stay on even if the activating
element (a door, for example) is immedi-
ately closed.
The alarm system will also be triggered
when
�
someone attempts to raise the vehicle
�
opening the vehicle with the mechani-
cal keyArming the alarm system
The alarm system is armed after locking
the vehicle with the SmartKey. The turn
signal lamps blink three times to indicate
that the alarm system is activated. A red
lamp in the tow-away alarm switch will
blink after approximately 10 seconds
when the alarm system is completely
armed (
�page 27).
iIf the alarm stays on for more than
20 seconds, an emergency call is initi-
ated automatically by the Tele Aid sys-
tem (
�page 183) provided Tele Aid
service was subscribed to and properly
activated, and that necessary cellular
service and GPS coverage are avail-
able.
Page 80 of 360
80 Safety and SecurityAnti-theft systemsDisarming the alarm system
The alarm system is disarmed when you
unlock your vehicle with the SmartKey. The
turn signal lamps blink once to indicate
that the alarm system is deactivated.Canceling the alarm
To cancel the alarm:
�
Insert the key in the starter switch.
or
�
Press the
Œ
or
‹
button on the
remote control.
The alarm is cancelled.
Tow-away alarm
Once the tow-away alarm is armed, a visual
and audible alarm will be triggered when
someone attempts to raise the vehicle.
iIf the turn signal lamps do not blink
three times, one of the following ele-
ments may not be properly closed:�
a door
�
the tailgate
�
the hood
Close the respective element and lock
the vehicle again.
iThe tow-away protection alarm is trig-
gered, for example, if the vehicle is lift-
ed on one side.
If the alarm stays on for more than
20 seconds, an emergency call is initi-
ated automatically by the Tele Aid sys-
tem provided Tele Aid service was
subscribed to and properly activated,
and that necessary cellular service and
GPS coverage are available.
Page 81 of 360
81 Safety and Security
Anti-theft systems
Arming tow-away alarm
When you lock your vehicle, the tow-away
alarm is automatically armed.
When you unlock your vehicle, the
tow-away protection disarms
automatically.
Disarming tow-away alarm
To prevent triggering the tow-away alarm
feature, switch off the tow-away alarm be-
fore towing the vehicle, or when parking on
a surface subject to movement, such as a
ferry or auto train.The switch is located on the center con-
sole.
1Tow-away alarm off switch
2Indicator lamp
�
Turn off the ignition and remove the
key.
�
Press upper half1 of the switch.
Indicator lamp2 in the switch lights up
briefly.
�
Lock your vehicle with the key.
The tow-away alarm remains disarmed un-
til you lock your vehicle again.
iYou cannot disarm the tow-away alarm
if the ignition is turned on.
Page 138 of 360
138 Controls in detailAutomatic transmission
Gear selector lever position
Gear
range
Effect
ç
The transmission shifts
through second gear only.
Allows the use of engine’s
braking power when driving �
on steep downgrades
�
in mountainous regions
�
under extreme operating
conditions
æ
The transmission operates
only in first gear
For maximum use of engine’s
braking effect on very steep
or lengthy downgrades.
Effect
P
Park position
Selector position when the vehicle is
parked. Only place selector lever in
positionP when vehicle is stopped.
The park position is not intended to
serve as a brake when the vehicle is
parked. Rather, the driver should al-
ways set the parking brake in addi-
tion to placing the selector lever in
positionP to secure the vehicle.
The key can only be removed from
the starter switch with the selector
lever in positionP. With the key re-
moved, the selector lever is locked in
positionP.
R
Reverse gear
Place selector lever in positionR only
when vehicle is stopped.
Effect
N
Neutral
No power is transmitted from the en-
gine to the drive axle. When the
brakes are released, the vehicle can
be moved freely (pushed or towed).
Do not engage N while driving ex-
cept:�
to coast when the vehicle is in
danger of skidding (e.g. on icy
roads) when the ESP is deactivat-
ed or malfunctioning
�
when you have to shift the trans-
fer case
D
Drive
The transmission shifts automatical-
ly. All five forward gears are avail-
able.
Page 139 of 360
139 Controls in detail
Automatic transmission
Accelerator position
Your driving style influences the transmis-
sion’s shifting behavior:
Less throttle Earlier upshifting
More throttle Later upshifting
Kickdown
Use kickdown when you want maximum
acceleration.�
Press the accelerator past the point of
resistance.
The transmission shifts into a lower
gear.
�
Ease on the accelerator when you have
reached the desired speed.
The transmission shifts up again.
!Coasting the vehicle, or driving for any
other reason with selector lever inN
can result in transmission damage that
is not covered by the Mercedes-Benz
Limited Warranty.Warning!
G
Getting out of your vehicle with the selector
lever not fully engaged in positionP is dan-
gerous. Also, positionP alone is not intend-
ed to or capable of preventing your vehicle
from moving, possibly hitting people or ob-
jects.
Always set the parking brake in addition to
shifting to positionP (
�page 50).
When parked on an incline, turn the front
wheels towards the road curb.
Warning!
G
When leaving the vehicle, always remove the
key from the starter switch, and lock the ve-
hicle. Do not leave children unattended in
the vehicle, or with access to an unlocked
vehicle. Children could move the selector le-
ver from positionP, which could result in an
accident and/or serious personal injury.
Page 173 of 360
173 Controls in detail
Loading
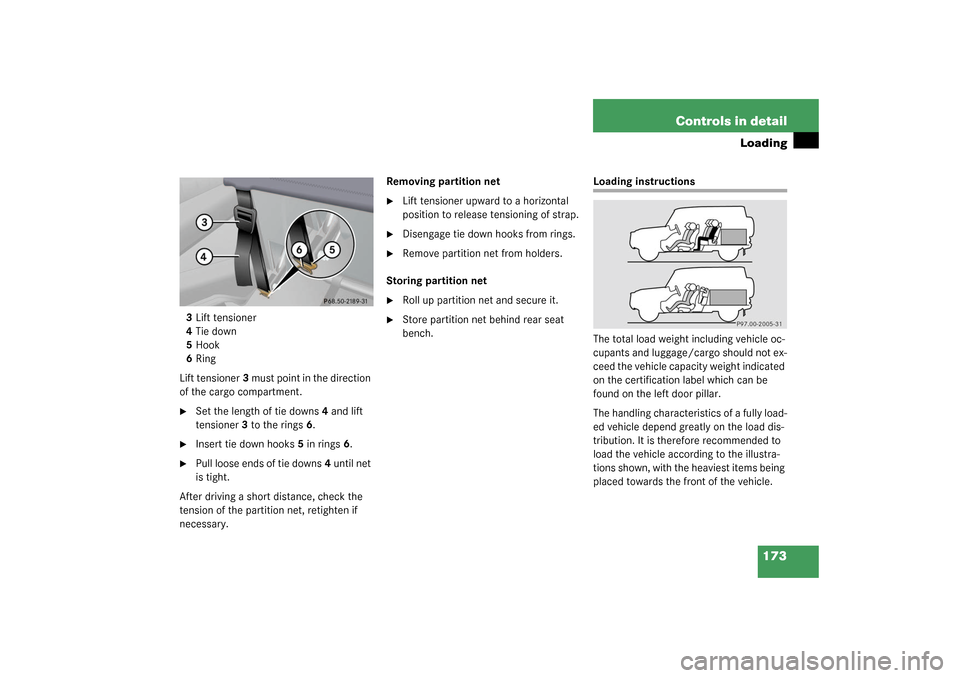
3Lift tensioner
4Tie down
5Hook
6Ring
Lift tensioner3 must point in the direction
of the cargo compartment.�
Set the length of tie downs4 and lift
tensioner3 to the rings6.
�
Insert tie down hooks5 in rings6.
�
Pull loose ends of tie downs4 until net
is tight.
After driving a short distance, check the
tension of the partition net, retighten if
necessary.Removing partition net
�
Lift tensioner upward to a horizontal
position to release tensioning of strap.
�
Disengage tie down hooks from rings.
�
Remove partition net from holders.
Storing partition net
�
Roll up partition net and secure it.
�
Store partition net behind rear seat
bench.
Loading instructions
The total load weight including vehicle oc-
cupants and luggage/cargo should not ex-
ceed the vehicle capacity weight indicated
on the certification label which can be
found on the left door pillar.
The handling characteristics of a fully load-
ed vehicle depend greatly on the load dis-
tribution. It is therefore recommended to
load the vehicle according to the illustra-
tions shown, with the heaviest items being
placed towards the front of the vehicle.
Page 176 of 360
176 Controls in detailUseful features
Useful featuresInterior storage spaces
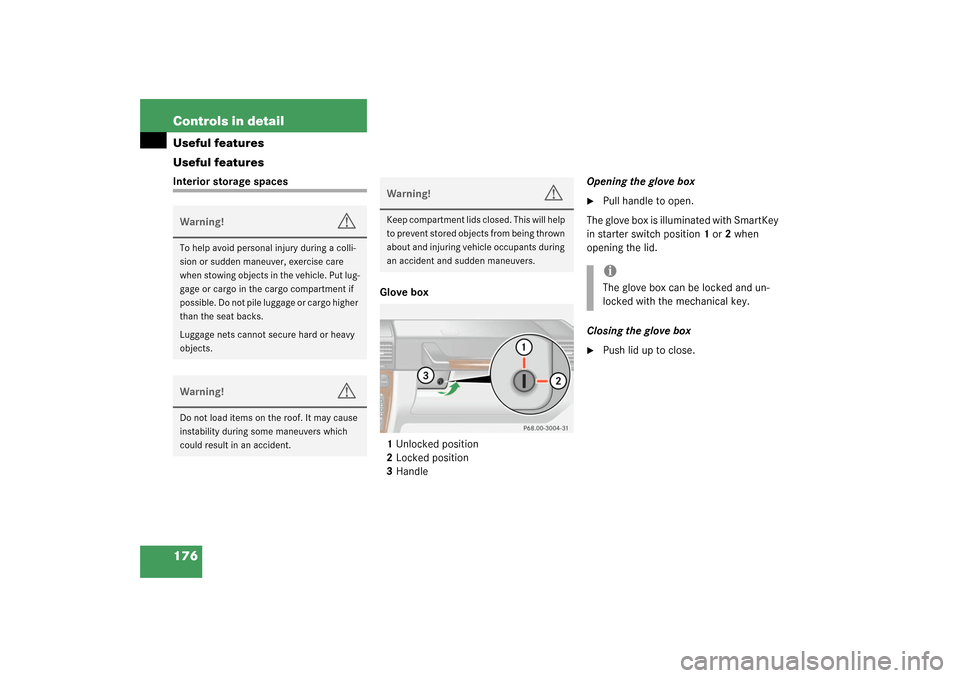
Glove box
1Unlocked position
2Locked position
3HandleOpening the glove box
�
Pull handle to open.
The glove box is illuminated with SmartKey
in starter switch position1 or2 when
opening the lid.
Closing the glove box
�
Push lid up to close.
Warning!
G
To help avoid personal injury during a colli-
sion or sudden maneuver, exercise care
when stowing objects in the vehicle. Put lug-
gage or cargo in the cargo compartment if
possible. Do not pile luggage or cargo higher
than the seat backs.
Luggage nets cannot secure hard or heavy
objects.Warning!
G
Do not load items on the roof. It may cause
instability during some maneuvers which
could result in an accident.
Warning!
G
Keep compartment lids closed. This will help
to prevent stored objects from being thrown
about and injuring vehicle occupants during
an accident and sudden maneuvers.
iThe glove box can be locked and un-
locked with the mechanical key.
Page 185 of 360

185 Controls in detail
Useful features
Emergency calls
An emergency call is initiated automatical-
ly:�
following an accident in which the
emergency tensioning devices (ETDs)
or airbags deploy
�
if the anti-theft alarm or the tow-away
alarm stays on for more than
20 seconds. See anti-theft alarm sys-
tem (
�page 79) and tow-away alarm
(
�page 80)
An emergency call can also be initiated
manually by opening the cover next to the
inside rear view mirror labeled SOS, then
briefly pressing the button located under
the cover. See below for instructions on
initiating an emergency call manually.
Once the emergency call is in progress, the
indicator lamp in the SOS button will begin
to flash. The message
EMERGENCY CALL –
CONNECTING CALL
appears in the multifunc-
tion display. When the connection is estab-
lished, the message
EMERGENCY CALL –
CALL CONNECTED
appears in the multifunction display. All information rele-
vant to the emergency, such as the loca-
tion of the vehicle (determined by the GPS
satellite location system), vehicle model,
identification number and color are gener-
ated.
A voice connection between the Response
Center and the occupants of the vehicle
will be established automatically soon af-
ter the emergency call has been initiated.
When a voice connection is established the
audio system mutes and the message
TELE AID – EMERGENCY CALL ACTIVE
ap-
pears in the multifunction display. The Re-
sponse Center will attempt to determine
more precisely the nature of the accident
provided they can speak to an occupant of
the vehicle.The Tele Aid system is available if:
�
it has been activated and is operation-
al. Activation requires a subscription
for monitoring services, connection
and cellular air time
�
the relevant cellular phone network
and GPS signals are available and pass
the information on to the response cen-
teriLocation of the vehicle on a map is only
possible if the vehicle is able to receive
signals from the GPS satellite network
and pass the information on to the re-
sponse center.