Page 98 of 360
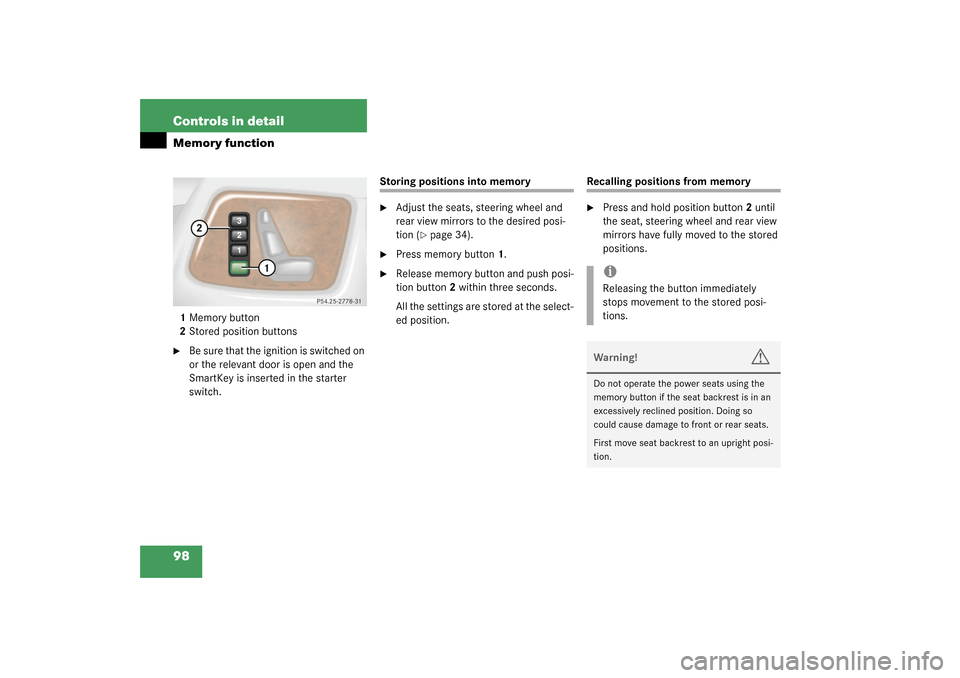
98 Controls in detailMemory function1Memory button
2Stored position buttons�
Be sure that the ignition is switched on
or the relevant door is open and the
SmartKey is inserted in the starter
switch.
Storing positions into memory�
Adjust the seats, steering wheel and
rear view mirrors to the desired posi-
tion (
�page 34).
�
Press memory button1.
�
Release memory button and push posi-
tion button2 within three seconds.
All the settings are stored at the select-
ed position.
Recalling positions from memory�
Press and hold position button2 until
the seat, steering wheel and rear view
mirrors have fully moved to the stored
positions.iReleasing the button immediately
stops movement to the stored posi-
tions.Warning!
G
Do not operate the power seats using the
memory button if the seat backrest is in an
excessively reclined position. Doing so
could cause damage to front or rear seats.
First move seat backrest to an upright posi-
tion.
Page 99 of 360

99 Controls in detail
Memory function
Storing exterior rear view mirror park-ing position
For easier parking, you can adjust the pas-
senger-side exterior rear view mirror so
that you can see the right rear wheel as
soon as you engage reverse gearR.
You can store a parking position for the
passenger exterior rear view mirror for
each key using the memory switch.
For information about activating the park-
ing position see “Activating exterior rear
view mirror parking position”
(�page 148).1Adjustment button
2Driver’s side mirror
3Passenger side mirror
4Memory button
�
Stop the vehicle.
�
Switch ignition on (if not already on).
�
Press button3 in center console.
The passenger side exterior rear view
mirror is selected.
�
Adjust the exterior rear view mirror
with button1 so that you see the rear
wheel and the curb.
�
Press memory button4 on the door.
�
Within three seconds, press bottom of
adjustment button1 above the exterior
lamp switch.
The parking position is stored if the
mirror does not move.iIf the mirror does move, repeat the
above steps. After the setting is stored
you can move the mirror again.
Page 115 of 360
115 Controls in detail
Control system
Menus, submenus and functions
Menu 1
Menu 2
Menu 3
Menu 4
Menu 5
Menu 6
Menu 7
Standard
display
AUDIO
NAVI
Malfunction
memory
Settings
Trip computer
Telephone
Commands/submenuCoolant
temperature
display
Select radio
station
Activate route
guidance
Call up
malfunction
messages
Reset to factory
settings
Fuel
consumption
statistics after
start
Load phone book
Digital
speedometer
Operate CD
player
Instrument
cluster submenu
Fuel
consumption
statistics since
the last reset
Search for name
in phone book
Call up FSS
Lighting
submenu
Call up range
Check engine oil
level
Vehicle submenuConvenience
submenu
Page 117 of 360

117 Controls in detail
Control system
Select radio station�
Turn on the radio. Refer to separate op-
erating instructions.
�
Press button
è
or
ÿ
repeatedly
until you see the currently tuned sta-
tion in the display.
1Station
2Waveband setting
3Setting for station selection using
memory
�
Press button
k
or
j
repeatedly
until the desired station is found.
The type of search depends on the set-
ting for the station tuning:
�
The next stored station is selected
(SP)
�
Station searchOperate the CD player
�
Turn on the radio and select the CD
player. Refer to separate operating in-
structions.
�
Press button
è
or
ÿ
repeatedly
until the settings for the CD currently
being played are shown in the display.
1Current track
2Current CD (for CD changer)
�
Press button
k
or
j
repeatedly
until the desired track is selected.
iYou can only store new stations by us-
ing the corresponding feature on the
radio. Refer to separate operating in-
structions.
You can also operate the radio in the
usual manner.
iTo select a CD from the magazine,
press a number on the COMAND sys-
tem key pad located in the center dash-
board.
Page 118 of 360

118 Controls in detailControl systemNAVI menu
The
NAVI
menu contains the functions
needed to operate your navigation system.
�
Press button
è
or
ÿ
repeatedly
until you see the message NAVI
in the
display.
�
If the navigation system is off, the mes-
sage
NAVI OFF
is shown in the display.
�
If the navigation system is on, the mes-
sage
NAVI ACTIVE
is shown in the dis-
play.
Please refer to the COMAND manual for in-
structions on how to activate the route
guidance system*.
Malfunction memory menu
Use the malfunction memory menu to scan
malfunction and warning messages that
may be stored in the system. The informa-
tion shown in the display depends on
whether malfunctions have actually oc-
curred.
�
Press button
è
or
ÿ
repeatedly
until you see the malfunction message
memory in the display.
No malfunction messages
If no malfunctions have occurred, the mes-
sage in the display is:
NO MALFUNCTIONMalfunctions have occurred
If malfunctions have occurred, you will see
the number of malfunctions in the display:
1Number of malfunctions�
Press button
k
or
j
.
The stored messages will now be dis-
played in order. See the “Practical
hints” section for malfunction and
warning messages (
�page 246).
Warning!
G
Malfunction and warning messages are only
indicated for certain systems and are inten-
tionally not very detailed. The malfunction
and warning messages are simply a remind-
er with respect to the operation of certain
systems and do not replace the owner’s
and/or driver’s responsibility to maintain
the vehicle’s operating safety by having all
required maintenance and safety checks
performed on the vehicle and by bringing
the vehicle to an authorized Mercedes-Benz
Light Truck Center to address the malfunc-
tion and warning messages (
�page 246).
Page 119 of 360

119 Controls in detail
Control system
Should any malfunctions occur while driv-
ing, the number of malfunctions will reap-
pear in the display when the key in the
starter switch is turned to position0 or re-
moved from the starter switch.
Settings menu
In the
SETTINGS
menu there are two func-
tions:
�
The function
RETURN TO FACTORY SET-
TINGS
, with which you can reset all the
settings to those set at the factory.
�
A collection of submenus with which
you can make individual settings for
your vehicle.
�
Press button
è
or
ÿ
repeatedly
until the
SETTINGS
menu is seen in the
display.Resetting all settings
You can reset all the functions of all sub-
menus to the factory settings.
�
Press the reset knob in the instrument
cluster (
�page 24) for approximately
three seconds.
In the display you will see the request
to press the reset knob again to con-
firm.
�
Press the reset knob (
�page 24)
again.
The functions of all the submenus will
reset to factory settings.
iThe message memory will be cleared
when you turn the key in the starter
switch to position1 or2. You will then
only see Priority 1 malfunctions
(�page 246).
iThe settings you have changed will not
be reset unless you confirm the action
by pressing the reset knob a second
time.
Page 127 of 360

127 Controls in detail
Control system
�
Press
æ
or
ç
to select the de-
sired lamp-on time period. You can se-
lect:
�
0 s
, the delayed switch-off feature
is deactivated
�
5 s,
10 s
, 15 s
or
20 s
, the delayed
switch-off feature is activatedVehicle submenu
Access the
VEHICLE
submenu via the
SETINGS
menu. Use the
VEHICLE
submenu
to make general vehicle settings. The fol-
lowing functions are available:
Setting station selection mode
Use the
PRESS BUTTON IN AUDIO MODE
function to select the manual or memory
station selection mode for the radio.�
Move the selection marker with
the
æ
or
ç
button to the
VEHICLE
submenu.
�
Press button
j
or
k
repeatedly
until you see this message in the dis-
play:
PRESS BUTTON IN AUDIO MODE
.
The selection marker is on the current
setting.
�
Press
æ
or
ç
to select the de-
sired station selection mode. You can
select:
�
STATION SEARCH
�
MEMORY
selects next stored station
Function
Page
Set station selection mode
(radio)
see
below
Set automatic locking
128
Page 129 of 360

129 Controls in detail
Control system
After entering the vehicle, the steering
wheel will move into the position stored in
memory when�
the driver’s door is closed
�
you put the key in the starter switch
and
�
press the appropriate stored position
button on the memory switch
(�page 99)
�
Move the selection marker with
the
æ
or
ç
button to the
CONVE-
NIENCE
submenu.
�
Press button
j
or
k
repeatedly
until you see this message in the dis-
play:
EASY-ENTRY FEATURE ACTIVATE
.The selection marker is on the current
setting.
�
Press
æ
or
ç
to change the
easy-entry/exit setting.
The following settings are available for the
easy-entry/exit featureSetting key dependency
Use this function to set whether the mem-
ory settings for the seats, the steering
wheel and the mirrors should be stored
separately for each key (
�page 97).
�
Move the selection marker with
the
æ
or
ç
button to the
CONVE-
NIENCE
submenu.
�
Press button
j
or
k
repeatedly
until you see this message in the dis-
play:
SETTINGS KEY-DEPENDENT
.
The selection marker is on the current
setting.
�
Press
æ
or
ç
to set key depen-
dency to
ON or
OFF
.
iTo cancel steering wheel movement,
do one of the following:�
move the steering column stalk
(�page 22)
�
press the memory switch
(�page 98)
OFF
The easy-entry/exit
feature is deactivat-
ed
STEERING COLUMN
The easy-entry/exit
feature is activated