Page 114 of 399

114 Controls in detailLightingDaytime running lamp mode�
Turn exterior lamp switch to
positionM orU.
When the engine is running, the low beam
headlamps are automatically switched on.
In low ambient light conditions the parking
lamps will also switch on.
Canada only
When you shift from a driving position to
positionN orP, the low beam switches off
(with a three-minute delay).
For nighttime driving you should turn the
exterior lamp switch to positionB to
permit activation of the high beam head-
lamps.
USA only
The high beam headlamps can also be ac-
tivated when driving with the daytime run-
ning lamp mode activated and exterior
lamp switch in positionM.To activate the daytime running lamp
mode, see "Setting daytime running lamp
mode" (
�page 139).
Locator lighting and night security illu-
mination
Locator lighting and night security illumi-
nation are described in the control system
section under "Setting locator lighting"
(
�page 139) and "Setting night security il-
lumination" (
�page 140).
Switching on front fog lamps
�
Check that the low beam headlamps
are switched on.
�
Pull out exterior lamp switch to first
stop.
The green indicator lamp‡ in the
lamp switch lights up.Switching on rear fog lamp
�
Check that the low beam headlamps
are switched on.
�
Pull out e xt eri or la m p swi tc h to s ec ond
stop.
The yellow indicator lamp† in the
lamp switch lights up.
iSee notes on the exterior lamp switch
(�page 112).
iFog lamps will operate with the parking
lamps and/or the low beam headlamps
on. Fog lamps should only be used in
conjunction with low beam headlamps.
Consult your State or Province Motor
Vehicle Regulations regarding allow-
able lamp operation.
Page 115 of 399

115 Controls in detail
Lighting
Combination switch
The combination switch is located on the
left side of the steering column.
1High beam
2High beam flasher
Switching on high beams�
Turn exterior lamp switch to
positionB (
�page 112).
�
Push the combination switch in
direction1.
The high beam symbol is illuminated on
the instrument cluster.High beam flasher
�
Pull the combination switch briefly in
direction2.
Hazard warning flasher
The hazard warning flasher can be activat-
ed with the ignition switched on or off. It is
activated automatically when an airbag is
deployed.
The switch is located on the center con-
sole.
1Hazard warning flasher switchSwitching on the hazard warning
flasher
�
Press the hazard warning flasher
switch.
All turn signals will blink.
Switching off the hazard warning
flasher
�
Press hazard warning flasher switch
again.iWith the hazard warning flasher acti-
vated and the combination switch set
for either left or right turn, only the re-
spective left or right turn signals will
operate when the key in the starter
switch is in position1 or2.
Page 116 of 399

116 Controls in detailLightingInterior lighting
The controls are located in the overhead
control panel.
1Switch for reading lamp, left
2Switch for rear compartment lighting
3Switch for automatic function
4Switch for interior lighting in front
5Switch for reading lamp, right
6Ambient lighting
7Interior lighting8Reading lamps
Activating automatic control
�
Press button3.
Interior lamps are switched on in dark-
ness, when�
unlocking the vehicle
�
opening a door
�
removing the SmartKey from the
starter switch
The interior lamps are switched off follow-
ing an adjustable time delay (
�page 141).Deactivating automatic control
�
Press button3.
The interior lighting remains switched
off, even when�
centrally unlocking the vehicle
�
opening a door
�
removing the SmartKey from the
starter switch
Manual control
Switching rear interior lights on and off
�
Press button2.
The lights in the rear passenger com-
partment go on.
�
Press button2 again.
The lights in the rear passenger com-
partment go out.
iIf the door remains open, the interior
lamps switch off automatically after ap-
proximately five minutes when the key
is removed or in starter switch
position0.
An interior lamp switched on manually
does not go out automatically.
Page 117 of 399
117 Controls in detail
Lighting
Switching left front reading lamp on and
off�
Press button1.
The left reading lamp goes on.
�
Press button1 again.
The left reading lamp goes out.
Switching right front reading lamp on
and off
�
Press button5.
The right reading lamp goes on.
�
Press button5 again.
The right reading lamp goes out.
Door entry lamps
The appropriate door entry lamp switches
on if a door is opened in darkness and if
the interior lighting is switched to the auto-
matic function.
The entry lamp goes out automatically
when the door is closed.
Trunk lamp
The trunk lamp switches on if the trunk lid
is opened.
If you leave the trunk open for an extended
period of time, the trunk lamp will switch
off automatically after approximately ten
minutes.
iIf you turn the key in the starter switch
to position0 or remove the key, the
door entry lamps will remain lit for ap-
proximately five minutes.
Page 119 of 399
.
The")
119 Controls in detail
Instrument cluster
Coolant temperature displayDuring severe operating conditions and
stop-and-go city traffic, the coolant tem-
perature may rise close to 248°F (120°C).
The engine should not be operated with
the coolant temperature above 248°F
(120°C). Doing so may cause serious en-
gine damage which is not covered by the
Mercedes-Benz Limited Warranty.
Trip odometer�
Check to see that the trip odometer
and main odometer (
�page 121) ap-
pear in the multifunction display.
�
Press and hold the reset knob on the in-
strument cluster (
�page 22) until the
trip odometer is reset.
Warning!
G
�
Driving when your engine is badly over-
heated can cause some fluids which
may have leaked into the engine com-
partment to catch fire. You could be se-
riously burned.
�
Steam from an overheated engine can
cause serious burns and can occur just
by opening the engine hood. Stay away
f r o m t h e e n g i n e i f y o u s e e o r h e a r s t e a m
coming from it.
Turn off the engine, get out of the vehicle
and do not stand near the vehicle until it
cools down.iExcessive coolant temperatures trigger
a warning in the multifunction display.
Page 126 of 399

126 Controls in detailControl system
Standard display menu
You can select the functions in the stan-
dard display menu with buttonk
orj.
The following functions are available:
Display digital speedometer�
Press buttonj twice.
The current vehicle speed is shown in
the multifunction display.
AUDIO menu
The functions in the
Audio
menu operate
the audio equipment which you currently
have turned on.
If no audio equipment is currently turned
on, the message
AUDIO OFF
is shown in the
display.
The following functions are available:
iThe headings used in the menus table
are designed to facilitate navigation
within the system and are not neces-
sarily identical to those shown in the
control system displays.
The first function displayed in each
menu will automatically show you
which part of the system you are in.
Function
Page
Call up digital speedometer
see
below
Call up FSS PLUS
275
Check tire pressure*
270
Check engine oil level
262
Function
Page
Select radio station
127
Operate CD player*
127
Operate cassette player
128
Page 132 of 399
132 Controls in detailControl systemThe table below shows what settings can
be changed within the various menus. De-
tailed instructions on making individual
settings can be found on the following pag-
es.INSTRUMENT CLUSTER
TIME/DATE
LIGHTING
VEHICLE
Select temperature display
mode
Set time (hours)
Set daytime running lamp mode
(USA only)
Set automatic locking
Select speedometer display
mode
Set time (minutes)
Set locator lighting
Select language
Set date (month)
Ambient lighting
Select display (speed display or
outside temperature) for status
line
Set date (day)
Exterior lamps delayed
switch-off
Tire pressure unit display*
Set date (year)
Interior lighting delayed
switch-off
Page 138 of 399
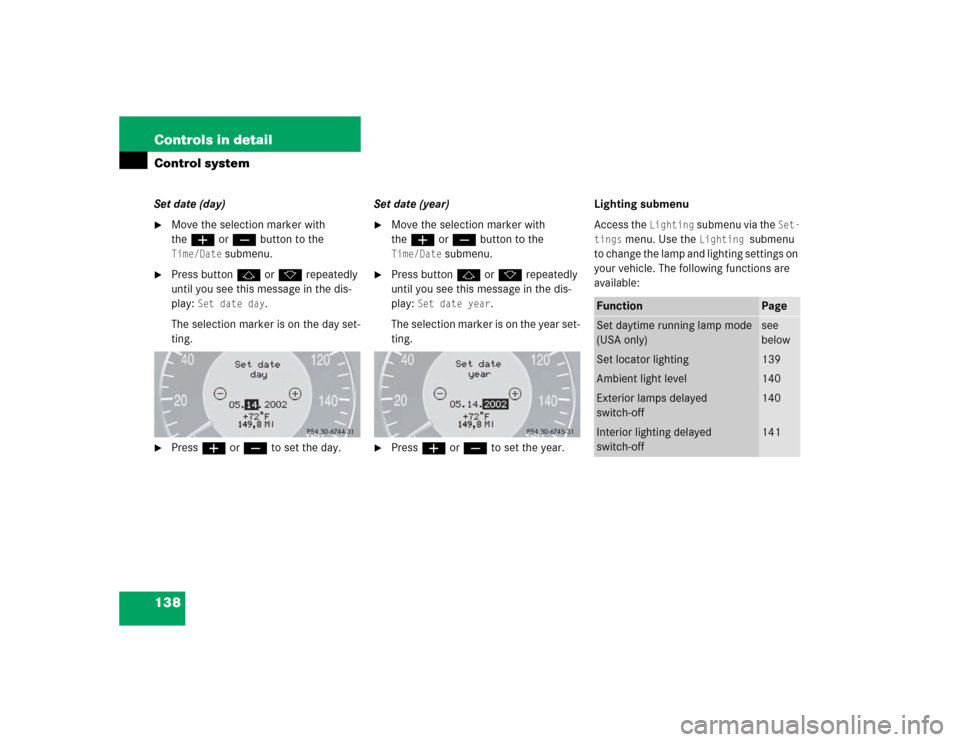
138 Controls in detailControl systemSet date (day)�
Move the selection marker with
theæ orç button to the Time/Date
submenu.
�
Press buttonj ork repeatedly
until you see this message in the dis-
play:
Set date day
.
The selection marker is on the day set-
ting.
�
Pressæ orç to set the day.Set date (year)
�
Move the selection marker with
theæ orç button to the Time/Date
submenu.
�
Press buttonj ork repeatedly
until you see this message in the dis-
play:
Set date year
.
The selection marker is on the year set-
ting.
�
Pressæ orç to set the year.Lighting submenu
Access the
Lighting
submenu via the
Set-
tings
menu. Use the
Lighting
submenu
to change the lamp and lighting settings on
your vehicle. The following functions are
available:
Function
Page
Set daytime running lamp mode
(USA only)
see
below
Set locator lighting
139
Ambient light level
140
Exterior lamps delayed
switch-off
140
Interior lighting delayed
switch-off
141