Page 93 of 399

93 Controls in detail
Locking and unlocking
Loss of the SmartKey with KEYLESS-GO
If you lose your SmartKey with KEY-
LESS-GO, you should do the following:�
Have the SmartKey with KEYLESS-GO
deactivated by an authorized Mer-
cedes-Benz Center.
�
Report the loss immediately to your car
insurance company.
�
Have the mechanical lock replaced if
necessary.
Your authorized Mercedes-Benz Center
will be glad to supply you with a replace-
ment.
Opening the doors from the inside
You can open a locked door from the in-
side. Open door only when conditions are
safe to do so.
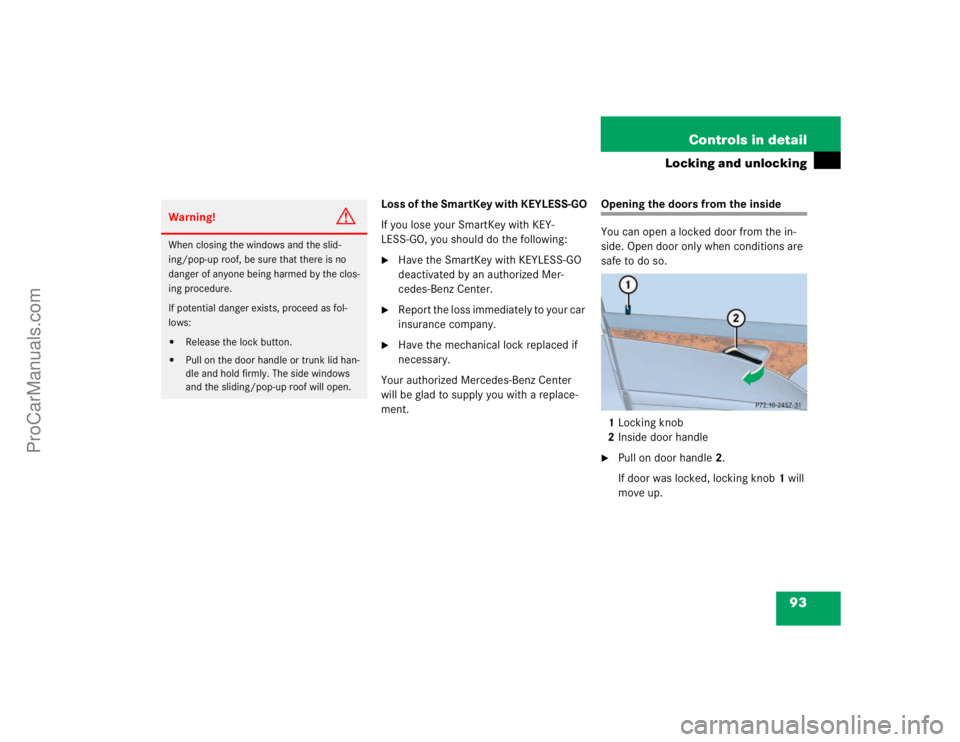
1Locking knob
2Inside door handle�
Pull on door handle2.
If door was locked, locking knob1 will
move up.
Warning!
G
When closing the windows and the slid-
ing/pop-up roof, be sure that there is no
danger of anyone being harmed by the clos-
ing procedure.
If potential danger exists, proceed as fol-
lows:�
Release the lock button.
�
Pull on the door handle or trunk lid han-
dle and hold firmly. The side windows
and the sliding/pop-up roof will open.
ProCarManuals.com
Page 96 of 399

96 Controls in detailLocking and unlockingOpening the trunk
A minimum height clearance of 5.75 ft.
(1.75 m) is required to open the trunk lid.
The handle is located above the rear li-
cense plate recess.�
Pull on the handle and lift up the trunk
lid.
The trunk lid swings open upwards au-
tomatically. Always make sure that
there is sufficient overhead clearance.
Closing the trunk
1Handle�
Lower trunk lid using handle1.Vehicles with trunk lid opening/closing
system*
Closing from the inside
�
Press the remote control switch until
the indicator lamp in the switch goes
out and the trunk lid is closed.
When closing, if the trunk lid comes into
contact with an object (e.g. luggage that
has been piled too high) in the upper mo-
tion sequence, the closing procedure is
stopped and the trunk re-opens slightly.
iThe vehicle must be unlocked.
Warning!
G
To prevent possible personal injury, always
keep hands and fingers away from the trunk
opening when closing the trunk. Be espe-
cially careful when small children are
around.
Warning!
G
Monitor the closing procedure carefully to
ensure that no one is in danger of being in-
jured. To prevent possible personal injury,
always keep hands and fingers away from
the trunk opening when closing the trunk.
Be especially careful when small children
are around. To stop the closing procedure,
let go of the remote control switch for the
trunk.
ProCarManuals.com
Page 97 of 399

97 Controls in detail
Locking and unlocking
Closing from outside
1Trunk closing switch�
Press the closing switch briefly.
The trunk lid closes automatically.
When closing, if the trunk lid comes into
contact with an object (e.g. luggage that
has been piled too high) in the upper mo-
tion sequence, the closing procedure is
stopped and the trunk re-opens slightly.
Trunk lid emergency release
The emergency release button is located
on the inside of the trunk lid.
1Emergency release button�
Briefly press the emergency release
button.
The trunk unlocks and the trunk lid
opens.
Warning!
G
Monitor the closing procedure carefully to
ensure that no one is in danger of being in-
jured. To prevent possible personal injury,
always keep hands and fingers away from
the trunk opening when closing the trunk.
Be especially careful when small children
are around. To stop the closing procedure,
press the remote control switch for the
trunk lid or the
Š
key on the remote con-
trol.
!Do not place the key in the open trunk.
You may lock yourself out.
Vehicles with KEYLESS-GO*:
To prevent a possible inadvertent lock-
out, the trunk lid will open automatical-
ly if a SmartKey with KEYLESS-GO is
recognized in the area of the rear shelf
or inside the trunk.
!The emergency release button unlocks
and opens the trunk while the vehicle is
standing or driving.
ProCarManuals.com
Page 100 of 399
100 Controls in detailLocking and unlockingLocking and unlocking from the inside
You can lock or unlock the doors and the
trunk from inside using the central locking
switch. This can be useful, for example, if
you want to lock the vehicle before starting
to drive.
The fuel filler flap cannot be locked or un-
locked with the central locking switch.The switch is located in the center console.
Central locking switch1Locking
2Indicator lamp
3UnlockingLocking
�
Press upper half1 of the central lock-
ing switch.
If both front doors are closed, the vehi-
cle locks.
Unlocking
�
Press lower half2 of the central lock-
ing switch.
The vehicle unlocks.
Warning!
G
When leaving the vehicle, always remove the
key from the starter switch, take it with you
and lock the vehicle. Do not leave children
unattended in the vehicle, or with access to
an unlocked vehicle. Unsupervised use of
vehicle equipment may cause serious per-
sonal injury.
ProCarManuals.com
Page 102 of 399

102 Controls in detailSeats
SeatsInformation on seat adjustment can be
found in the "Getting started" section
(�page 35).
Easy-entry/exit feature*
With the easy-entry/exit feature activated,
the steering wheel tilts upwards and the
driver’s seat moves to the rear.
This allows easier entry into and exit from
the vehicle when the driver’s door is
opened. However, the engine must be
turned off.
When the SmartKey is inserted in the start-
er switch and the driver’s door is closed,
the steering wheel and the driver’s seat re-
turn to their last set positions.You can activate the following functions:
�
Steering column:
Only the steering column is adjusted.
�
Steering column and seat:
The steering column and the seat are
adjusted.
The easy-entry/exit feature can be
switched on or off in the individual setting
menu
Convenience
- Easy-entry feature
activate
(�page 143).
Warning!
G
You must ensure that no one can become
trapped or injured by the moving steering
wheel and driver’s seat when the
easy-entry / exit feature is activated, the
driver’s door is being opened and the engine
is turned off or the SmartKey removed from
the starter switch. Do not leave children un-
attended in the vehicle, or with access to an
unlocked vehicle. Unsupervised use of vehi-
cle equipment may cause serious personal
injury.
iTo cancel seat/steering wheel move-
ment, do one of the following:�
Press seat adjustment switch
(�page 28).
�
Move steering column stalk
(�page 38).
�
Press the memory switch
(�page 28).
ProCarManuals.com
Page 103 of 399

103 Controls in detailSeats
Head restraints
Information on head restraint adjustment
can be found in the "Getting started" sec-
tion (
�page 36).Front seat head restraints
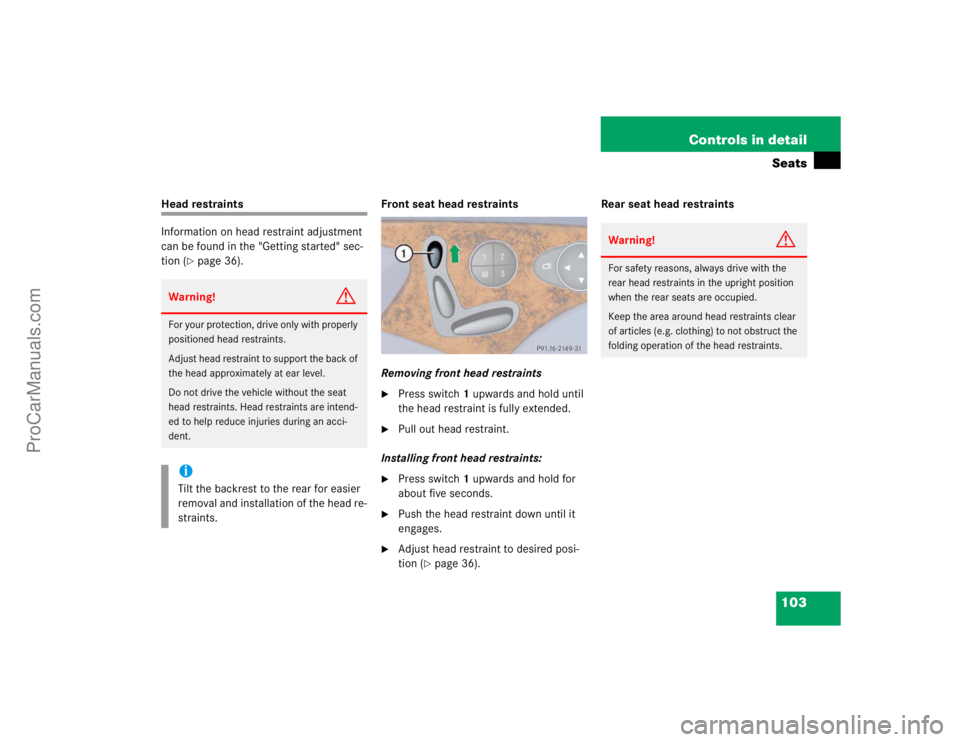
Removing front head restraints
�
Press switch1 upwards and hold until
the head restraint is fully extended.
�
Pull out head restraint.
Installing front head restraints:
�
Press switch1 upwards and hold for
about five seconds.
�
Push the head restraint down until it
engages.
�
Adjust head restraint to desired posi-
tion (
�page 36).Rear seat head restraints
Warning!
G
For your protection, drive only with properly
positioned head restraints.
Adjust head restraint to support the back of
the head approximately at ear level.
Do not drive the vehicle without the seat
head restraints. Head restraints are intend-
ed to help reduce injuries during an acci-
dent.iTilt the backrest to the rear for easier
removal and installation of the head re-
straints.
Warning!
G
For safety reasons, always drive with the
rear head restraints in the upright position
when the rear seats are occupied.
Keep the area around head restraints clear
of articles (e.g. clothing) to not obstruct the
folding operation of the head restraints.
ProCarManuals.com
Page 109 of 399

109 Controls in detail
Memory function
Memory function
You can store up to three different settings
per key.
The following settings are saved for each
stored position:�
Driver’s seat and backrest position
�
Steering wheel position
�
Driver’s side exterior rear view mirror
position
�
Passenger side exterior rear view mir-
ror position
�
Front passenger seat position
These key-dependent memory settings
can be deactivated if desired
(
�page 110).
!Prior to operating the vehicle, the driv-
er should check and adjust the seat
height, seat position fore and aft, and
backrest angle if necessary, to ensure
adequate control, reach and comfort.
The head restraint should also be ad-
justed for proper height. Also see the
section on airbags (
�page 57) for
more information on proper seat posi-
tioning.
In addition, adjust the steering wheel to
ensure adequate control, reach, opera-
tion and comfort. Both the inside and
outside rear view mirrors should be ad-
justed for adequate rear vision.
Fasten seat belts. Infants and small
children should be seated in a properly
secured restraint system that complies
with U.S. Federal Motor Vehicle Safety
Standard 213 and Canadian Motor Ve-
hicle Safety Standard 213.
Warning!
G
Do not activate the memory function while
driving. Activating the memory function
while driving could cause the driver to lose
control of the vehicle.
ProCarManuals.com
Page 110 of 399

110 Controls in detailMemory functionThe memory button is located on the door.
MMemory button
1,2,3Stored positions�
Be sure that the ignition is switched on
or the relevant door is open and the
SmartKey is inserted in the starter
switch.
Storing positions into memory�
Adjust the seats, steering wheel and
rear view mirrors to the desired posi-
tion (
�page 34).
�
Press memory buttonM.
�
Release memory button and press
stored position button 1, 2 or 3 within
three seconds.
All the settings are stored at the select-
ed position.
Recalling positions from memory�
On memory button, press and hold
stored position button1, 2 or3 until
the seat, steering wheel and rear view
mirrors have fully moved to the stored
positions.iReleasing the button immediately
stops movement to the stored posi-
tions.Warning!
G
Do not operate the power seats using the
memory button if the backrest is in an ex-
cessively reclined position. Doing so could
cause damage to front or rear seats.
First move backrest to an upright position.
ProCarManuals.com