Page 287 of 399
287 Practical hints
What to do if …
Where will I find ...?
Unlocking/locking in an emergency
Opening/closing in an emergency
Replacing bulbs
Replacing wiper blades
Flat tire
Batteries
Jump starting
Towing the vehicle
Fuses
ProCarManuals.com
Page 319 of 399
319 Practical hints
What to do if …
Display
Possible cause
Possible solution
H
Tire pressure monitor-
ing activated
The tire pressure is being checked.
Tire pressure monitor-
ing Reactivate
The tire inflation pressure monitor* is de-
activated.
�
Activate the tire inflation pressure moni-
tor* (
�page 271).
Tire pressure monitor-
ing currently inactive
The tire inflation pressure monitor* is un-
able to monitor the tire pressure due to�
the presence of several wheel sensors
in the vehicle.
�
excessive wheel sensor temperatures.
�
a nearby radio interference source.
�
unrecognized wheel sensors mounted.
�
Check the tire pressure at the next ser-
vice station.
Warning!
G
Do not drive with a flat tire. A flat tire affects
the ability to steer or brake the vehicle.
You may lose control of the vehicle. Contin-
ued driving with a flat tire will cause exces-
sive heat build-up and possibly a fire.
ProCarManuals.com
Page 320 of 399
320 Practical hintsWhat to do if …Display
Possible cause
Possible solution
H
Tire pressure monitor-
ing
Visit workshop!
The tire inflation pressure monitor is mal-
functioning.
A wheel without proper sensor was in-
stalled.
�
Have the tire inflation pressure monitor
checked by an authorized
Mercedes-Benz Center.
�
Change the wheel.
Tire pressure, rear left
Caution tire defect!
The left rear tire is rapidly deflating.
�
Carefully bring the vehicle to a halt,
avoiding abrupt steering and braking ma-
neuvers.
�
Change the wheel (
�page 338).
Tire pressure, rear left
Check tires!
The left rear tire pressure is low.
�
Carefully bring the vehicle to a halt.
�
Check the tire pressure.
�
Change the wheel (
�page 338).
Warning!
G
Do not drive with a flat tire. A flat tire affects
the ability to steer or brake the vehicle. You
may lose control of the vehicle.
Continued driving with a flat tire will cause
excessive heat build-up and possibly a fire.
ProCarManuals.com
Page 321 of 399
321 Practical hints
What to do if …
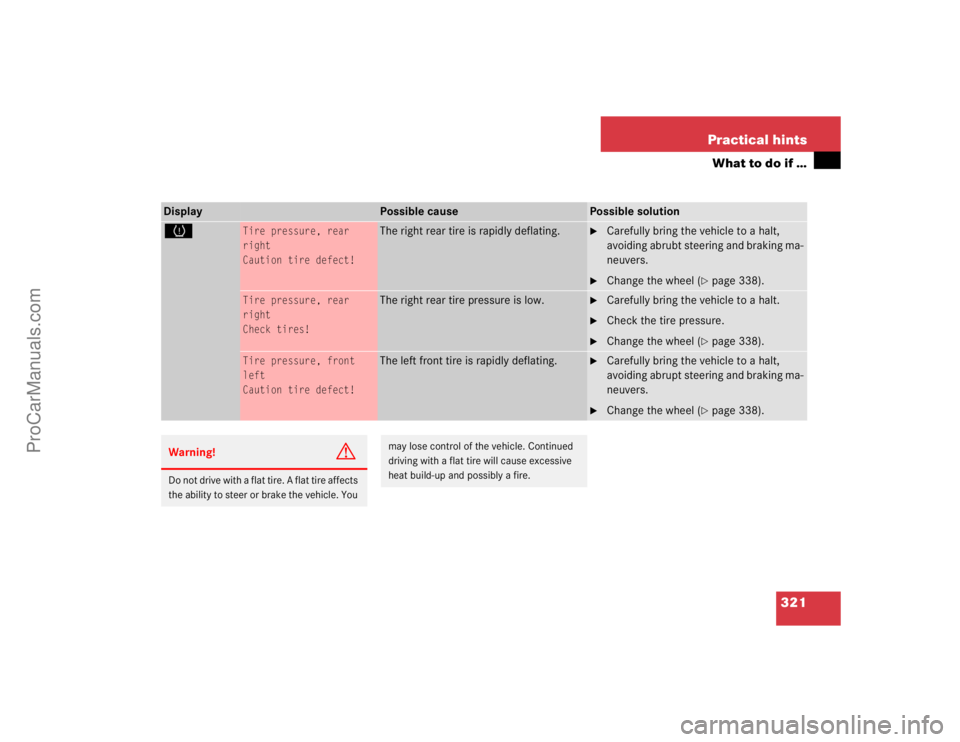
Display
Possible cause
Possible solution
H
Tire pressure, rear
right
Caution tire defect!
The right rear tire is rapidly deflating.
�
Carefully bring the vehicle to a halt,
avoiding abrubt steering and braking ma-
neuvers.
�
Change the wheel (
�page 338).
Tire pressure, rear
right
Check tires!
The right rear tire pressure is low.
�
Carefully bring the vehicle to a halt.
�
Check the tire pressure.
�
Change the wheel (
�page 338).
Tire pressure, front
left
Caution tire defect!
The left front tire is rapidly deflating.
�
Carefully bring the vehicle to a halt,
avoiding abrupt steering and braking ma-
neuvers.
�
Change the wheel (
�page 338).
Warning!
G
Do not drive with a flat tire. A flat tire affects
the ability to steer or brake the vehicle. You
may lose control of the vehicle. Continued
driving with a flat tire will cause excessive
heat build-up and possibly a fire.
ProCarManuals.com
Page 322 of 399
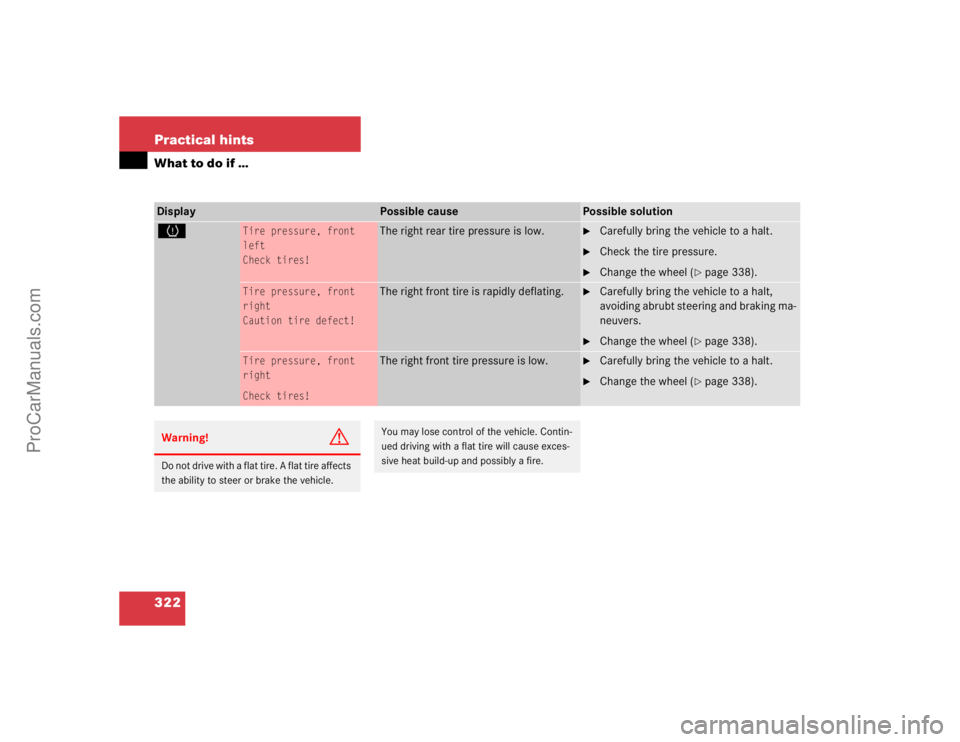
322 Practical hintsWhat to do if …Display
Possible cause
Possible solution
H
Tire pressure, front
left
Check tires!
The right rear tire pressure is low.
�
Carefully bring the vehicle to a halt.
�
Check the tire pressure.
�
Change the wheel (
�page 338).
Tire pressure, front
right
Caution tire defect!
The right front tire is rapidly deflating.
�
Carefully bring the vehicle to a halt,
avoiding abrubt steering and braking ma-
neuvers.
�
Change the wheel (
�page 338).
Tire pressure, front
right
Check tires!
The right front tire pressure is low.
�
Carefully bring the vehicle to a halt.
�
Change the wheel (
�page 338).
Warning!
G
Do not drive with a flat tire. A flat tire affects
the ability to steer or brake the vehicle.
You may lose control of the vehicle. Contin-
ued driving with a flat tire will cause exces-
sive heat build-up and possibly a fire.
ProCarManuals.com
Page 325 of 399

325 Practical hints
Where will I find ...?
Minispare wheel
In the case of a flat tire, you may tempo-
rarily use the Minispare* wheel when ob-
serving the following restrictions:�
Do not exceed a vehicle speed of
50 mph (80km/h).
�
Drive to the nearest tire repair facility
to have the flat tire repaired or re-
placed as appropriate.
�
Do not operate vehicle with more than
one spare wheel mounted.More information can be found in the
"Technical data" section (
�page 362).
Luggage box
Remove luggage box
1Fastening clip
2Luggage box�
Turn fastening clips1 to the left up-
wards from fastening bolts.
�
Lift luggage box in the area of the fas-
tening bolts and remove it from trunk.Install luggage box
�
Insert luggage box into trunk so that
fastening clips are in line with fastening
bolts.
�
Push front edge of luggage box in direc-
tion of arrow under cover of trunk sill.
�
Press fastening clips onto fastening
bolts until they lock into place.
Warning!
G
The dimensions of the Minispare* wheel are
different from those of the road wheels. As
a result, the vehicle handling characteristics
change when driving with a Minispare*
wheel mounted.
The spare wheel should only be used tempo-
rarily, and replaced with a regular road
wheel as quick as possible.
ProCarManuals.com
Page 338 of 399

338 Practical hintsFlat tire
Flat tirePreparing the vehicle�
Park the vehicle as far as possible from
moving traffic on a hard surface.
�
Turn on the hazard warning flashers.
�
Engage the steering wheel lock in the
straight-ahead position and set the
parking brake.
�
Move the selector lever toP.
�
Have any passenger exit the vehicle at
a safe distance from the roadway.
Mounting the spare wheel
Preparing the vehicle
Prepare the vehicle as described under
"Preparing the vehicle" on this page.�
Take the spare wheel out of the trunk
(�page 324).
Lifting the vehicle
�
Prevent the vehicle from rolling away
by blocking wheels with wheel chocks
(not included) or other sizable objects.
When changing wheel on a level surface:
�
Place one chock in front of and one be-
hind the wheel that is diagonally oppo-
site to the wheel being changed.When changing wheel on a hill:
�
Place chocks on the downhill side
blocking both wheels of the other axle.
�
Take the two-piece wheel wrench and
the jack out of the trunk (
�page 326).
Assemble wheel wrench.
Warning!
G
The jack is designed exclusively for jacking
up the vehicle at the jack take-up brackets
built into either side of the vehicle. To help
avoid personal injury, use the jack only to lift
the vehicle during a wheel change. Never
get beneath the vehicle while it is supported
by the jack. Keep hands and feet away from
the area under the lifted vehicle. Always
firmly set parking brake and block wheels
before raising vehicle with jack.
Do not disengage parking brake while the
vehicle is raised. Be certain that the jack is
ProCarManuals.com
Page 339 of 399
.
The jack take-up brackets are located di-
rec")
339 Practical hints
Flat tire
�
On whee l to b e c hang ed, l oose n but d o
not yet remove the wheel bolts (ap-
proximately one full turn with wrench).
The jack take-up brackets are located di-
rectly behind the front wheel housing and
in front of the rear wheel housing. 1Jack take-up bracket
2Jack
3Crank
�
Position jack2 on firm ground under
the respective jack take-up bracket1.Make sure that the foot of the jack is di-
rectly under the take-up bracket so that it
is always vertical (plumb-line) as seen from
the side, even if the vehicle is parked on an
incline
�
Turn crank3 until the tire is a maxi-
mum of 1.2 in (3 cm) off the ground.
Never start engine while vehicle is
raised.
always vertical (plumb line) when in use, es-
pecially on hills. Always try to use the jack
on level surface. Be sure that the jack arm is
fully seated in the jack take-up bracket. Al-
ways lower the vehicle onto sufficient ca-
pacity jackstands before working under the
vehicle.
ProCarManuals.com