Page 332 of 399

332 Practical hintsReplacing bulbs
Replacing bulbsSafe vehicle operation depends on proper
exterior lighting and signaling. It is there-
fore essential that all bulbs and lamp as-
semblies are in good working order at all
times.
Correct headlamp adjustment is extremely
important. Have headlamps checked and
readjusted at regular intervals and when a
bulb has been replaced. See your autho-
rized Mercedes-Benz Center for headlamp
adjustment.
Bulbs Front lamps
iBackup bulbs will be brought into use
when the following lamps malfunction:�
Standing lamps
�
Tail lamps
Lamp
Type
1
Additional turn sig-
nal lamps
LED
2
Turn signal lamp
1156 NA
3
Side marker lamp
W 5 W
4
Low beam
H7 (55 W)
Bi-Xenon*
1
D2S-35 W
1Vehicles with Bi-Xenon headlamps*: Low beam
and high beam use the same D2S-35W lamp. For
safety reasons (high voltage), do not replace the
Bi-Xenon bulb yourself. See your authorized Mer-
cedes-Benz Center.5
High beam
H7 (55 W)
Parking and stand-
ing lamps
W 5 W
6
Fog lamp
HB4/9006
(55 W)
ProCarManuals.com
Page 333 of 399

333 Practical hints
Replacing bulbs
Rear lamps Notes on bulb replacement
�
Use only 12-volt bulbs of the same type
and with the specified watt rating.
�
Switch lights off before changing a bulb
to prevent short circuits.
�
Always use a clean lint-free cloth when
handling bulbs.
�
Y o u r h a n d s s h o u l d b e d r y a n d f r e e o f o i l
and grease.
�
If the newly installed bulb does not light
up, visit an authorized Mercedes-Benz
Center.
�
Have the LEDs and bulbs for the follow-
ing lamps replaced by an authorized
Mercedes-Benz Center:�
Additional turn signal lamps in the
exterior rear view mirrors
�
High mounted brake lamp
�
Bi-Xenon lamps
�
Front fog lamps
Lamp
Type
7
High mounted brake
lamp
LED
8
Tail, parking and
standing lamp
HiP
9
License plate lamps
C 5 W
Warning!
G
Keep bulbs out of reach of children.
Bulbs and bulb sockets can be very hot. Al-
low the lamp to cool down before changing
a bulb.
Halogen lamps contain pressurized gas. A
bulb can explode if you:�
touch or move it when hot
�
drop the bulb
�
scratch the bulb
Wear eye and hand protection.
Because of high voltage in Bi-Xenon lamps,
it is dangerous to replace the bulb or repair
the lamp and its components. We recom-
mend that you have such work done by a
qualified technician.
ProCarManuals.com
Page 334 of 399

334 Practical hintsReplacing bulbsReplacing bulbs for front lamps
1Bulb socket for turn signal lamp
2High beam bulb
3Bulb socket for parking and standing
lamp
High beam bulb (Halogen headlamps
only)�
Switch off the lights.
�
Open the hood (
�page 261).
�
Press the clamp and remove headlamp
cover.
�
Pull electrical connector off.
�
Turn the locking mechanism counter-
clockwise and take out the high beam
bulb2.
�
Insert the new high beam bulb so that
the base is in the recess of the holder.
�
Turn the locking mechanism clockwise.
�
Plug the connector onto the high beam
bulb.
�
Align headlamp cover and click into
place.
High beam bulb (Bi-Xenon* headlamps
only)
�
Switch off the lights.
�
Open the hood (
�page 261).
�
Press the clamp and remove headlamp
cover.
�
Pull electrical connector off.
�
Turn the locking mechanism counter-
clockwise and take out the high beam
bulb2.
�
Insert the new high beam bulb so that
the base is in the recess of the holder.
�
Turn the locking mechanism clockwise.
�
Plug the connector onto the high beam
bulb.
�
Align headlamp cover and click into
place.
Warning!
G
Because of high voltage in Bi-Xenon lamps,
it is dangerous to replace the bulb or repair
the lamp and its components. We recom-
mend that you have such work done by a
qualified technician.
ProCarManuals.com
Page 335 of 399
.
�
Twist bulb socket1 counterclockwise
and pull out.
�
Push bulb into socket, turn")
335 Practical hints
Replacing bulbs
Front turn signal lamp bulb�
Switch off the lights.
�
Open the hood (
�page 261).
�
Twist bulb socket1 counterclockwise
and pull out.
�
Push bulb into socket, turn counter-
clockwise and remove.
�
Insert new bulb in socket, push in and
twist clockwise.
�
Reinsert bulb socket in lamp and twist
clockwise.Parking and standing lamp bulb
�
Switch off the lights.
�
Open the hood (
�page 261).
�
Press the clamp and remove headlamp
cover.
�
Pull out the bulb socket3 with the
bulb.
�
Pull the bulb out of the bulb socket.
�
Insert a new bulb in the socket.
�
Reinstall the bulb socket.
�
Align headlamp cover and click into
place.Side marker lamp bulb
�
Switch off the lights.
�
Carefully slide lamp towards front.
�
Remove rear end first.
�
Twist bulb socket counterclockwise
and pull out.
�
Pull bulb out of the bulb socket.
�
Insert new bulb in socket.
�
Reinstall bulb socket, push in and twist
clockwise.
�
To reinstall lamp, set rear end in
bumper and let front end snap into
place.
ProCarManuals.com
Page 336 of 399
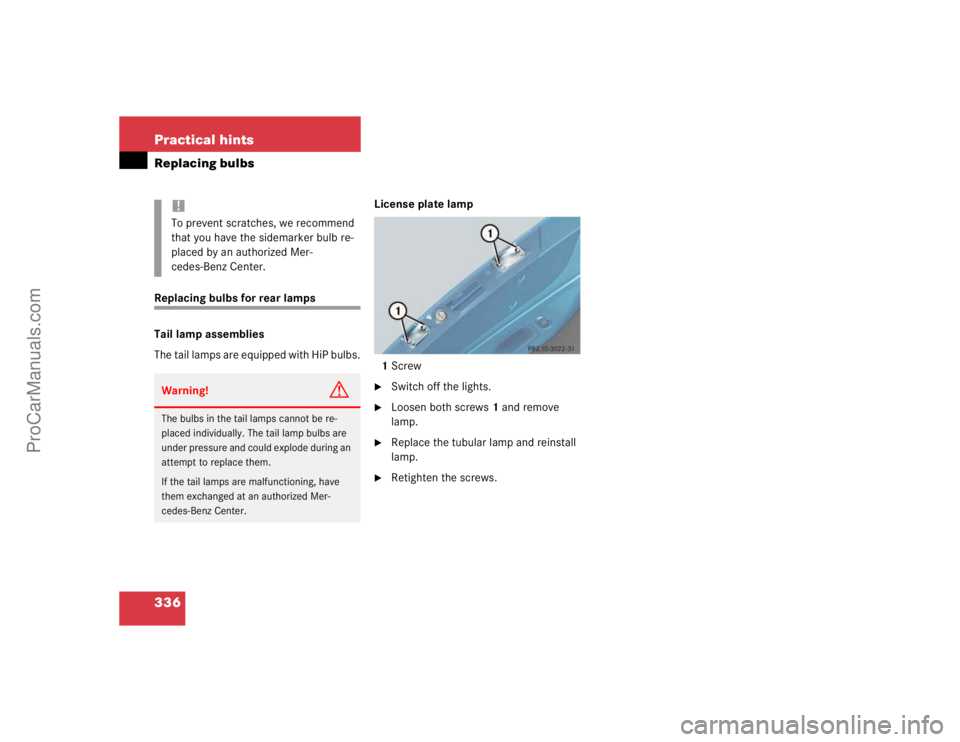
336 Practical hintsReplacing bulbsReplacing bulbs for rear lamps
Tail lamp assemblies
The tail lamps are equipped with HiP bulbs.License plate lamp
1Screw
�
Switch off the lights.
�
Loosen both screws1 and remove
lamp.
�
Replace the tubular lamp and reinstall
lamp.
�
Retighten the screws.
!To prevent scratches, we recommend
that you have the sidemarker bulb re-
placed by an authorized Mer-
cedes-Benz Center.Warning!
G
The bulbs in the tail lamps cannot be re-
placed individually. The tail lamp bulbs are
under pressure and could explode during an
attempt to replace them.
If the tail lamps are malfunctioning, have
them exchanged at an authorized Mer-
cedes-Benz Center.
ProCarManuals.com
Page 383 of 399

383 Index
Batteries, vehicle
Charging 344
Disconnecting 344
Messages in display 303, 304
Reconnecting 345
Removing 344
Service 343
Battery discharged
Jump starting 346
Bi-Xenon headlamps* 375
Blocking
Rear window operation 71
Brake assist system (BAS) 375
Brake pads
Message in display 305
Brakes
Warning lamp 291
Bulbs, replacing
Front lamps 332, 334
High beam bulb (Bi-Xenon* headlamps
only) 334
License plate lamps 336
Parking lamps 335
Standing lamps 335
Tail lamp assemblies 336C
CAC (Customer Assistance Center) 375
Calling up
Distronic* settings 128
Range (distance to empty) 147
CAN system 375
Cargo area see Trunk 88
Cargo tie-down rings 225
Cassette player
Operating 128
CD player*
Operating 127, 128
Center console
Lower part 26
PASSENGER AIRBAG OFF indicator
lamp 294
Upper part 25
Centigrade
Setting temperature units 134
Central locking
Automatic 99
From inside 100
Switch 100
Switching on/off (control
system) 142
Unlocking from inside 100Central locking switch 100
Changing
Batteries (SmartKey) 329
Key setting 143
Vehicle level 210
Charcoal filter 180
Charging
Vehicle batteries 344
Child safety 65
Airbags 58
Infant and child restraint systems 61,
65
Child safety switch see Blocking of rear
window operation 71
Cigarette lighter 232
Cleaning
Headlamps 158
Parktronic* system sensor 284
Windshield 48
Cleaning and care of the vehicle
Distronic system sensor 283
MB Tex upholstery 285
Climate control 162
Adjusting 166
Defrosting 167
Setting the temperature 165
ProCarManuals.com
Page 387 of 399

387 Index
Exterior rear view mirrors
Adjusting 39
Parking position for 144
F
Fahrenheit
Setting temperature units 134
Fastening the seat belts 40
Fine adjustment
Cruise control 196
Distronic* 203
First aid kit 324
Flat tire 338
Spare wheel 338
Flexible Service System (FSS) 275, 377
Fog lamp, rear 114
Fog lamps, front 114
Messages in display 316
Replacing bulbs 332
Switching on 114
Front airbags 60
Front lamps 332
Messages in display 313
Replacing bulbs 334
Switching on 112
Front seat head restraints
Power seat 103Front seats
Heater* 107
FSS (Flexible Service System) 275, 377
Fuel 260
Premium unleaded gasoline 260
Fuel consumption statistics
After start 146
Since last reset 146
Fuel filler flap 259
Locking 259
Unlocking 259
Fuel reserve tank
Message in display 313, 323
Fuel tank
Filler flap 259
Fuels, coolants, lubricants etc. 366
Functions (control system) 125
Resetting 131
Fuse chart 353
Fuses 352
Fuse chart 353
Fuse extractor 353
Spare fuses 353G
Garage door opener 27, 243
Erasing in remote control 246
Integrated remote control 244
Rolling code programming 245
Gasoline see Fuel 260
Gear range 377
Automatic transmission 153
Limiting 153
Shifting into optimal 152
Gear range limit
Canceling 152
Gear selector lever
Position 154
Global
Locking 87
Locking with KEYLESS-GO* 91
Unlocking 87
Unlocking with KEYLESS-GO* 91
Global Positioning System (GPS) 377
Glove box 226
Closing 226
Opening 226
Good visibility 157
GPS 377
GPS see COMAND* 243
ProCarManuals.com
Page 389 of 399

389 Index
Key, Mechanical 327
Key, SmartKey
Battery check lamp 87
Checking the batteries 88
Factory setting 87
Global locking 87
Global unlocking 87
Loss of 89
Positions in starter switch 31
Remote controls 86
Restoring to factory setting 87
Selective setting 87
Starting the engine 44
Turning off the engine 52
Unlocking the trunk lid 88
Unlocking with 30
Key, SmartKey with KEYLESS-GO*
Turning off the engine 53
KEYLESS-GO*
Activating ignition with 33
Closing side windows 92
Closing sliding/pop-up roof* 92
Factory setting 91
Global locking 91
Global unlocking 91
Important notes 90Locking the vehicle 92
Remote controls 89
Starting the engine 44
Turning off engine 53
Unlocking with 32
Unlocking, trunk lid 92
KEYLESS-GO* card
Messages in display 309
Keys 86
Kickdown 156, 377
Kilometers/miles in speedometer 134
Km/h or mph in speedometer 134
L
Lamp bulbs, exterior 332
Lamps, exterior
Front 332
Light sensor 313
Messages in display 313–??
Replacing bulbs for rear 333, 336
Lamps, indicator and warning
ABS 289
Airbag Off 61
Battery (SmartKey) 87
Brakes 291
Coolant 292
DTR* 199ESP 288
SBC 77
Seat belts 293
SRS 56
Language
Multifunction display 135
Setting 135
Layout of poly-V-belt drive 359
Level control system
AIRMATIC DC 209
Lever
Cruise control 201
License plate lamps 333
Messages in display 316
Replacing bulbs 336
Light sensor 313
Lighter see Cigarette lighter 232
Lighting 112
Automatic headlamp mode 113
Combination switch 115
Daytime running lamp mode 114
Door entry lamps 117
Exterior lamp switch 112
Front fog lamps 114
High beams 115
Instrument cluster illumination 118
ProCarManuals.com