Page 206 of 399
.
Deactivating
�
Press")
206 Controls in detailDriving systemsActivating�
Press button1.
Indicator lamp 2 on the button lights
up. A loudspeaker symbol appears in
the multifunction display (
�page 201).
Deactivating
�
Press button1.
Indicator lamp 2 on the button goes
out. No loudspeaker symbol appears in
the multifunction display.Driving with Distronic
This section describes a number of driving
situations where special precaution is re-
quired on the part of the driver. Be pre-
pared to brake in such situations. This will
deactivate the Distronic system.
Warning!
G
Distronic works to maintain the speed se-
lected by the driver unless a moving obsta-
cle proceeding directly ahead of it in the
same travel direction is detected (e.g. fol-
lowing another vehicle ahead of you at a dis-
tance set by Distronic). This means that:�
your vehicle can pass another vehicle af-
ter you change lanes
�
while in a sharp turn or if the vehicle in
front is in a sharp turn, Distronic could
lose sight of a vehicle traveling in front
of it, then your vehicle could accelerate
to the previously selected speed.
Distronic regulates only the distance be-
tween your vehicle and those directly ahead
of it, but does not register stationary objects
in the road, e.g.: �
a stopped vehicle in a traffic jam
�
a disabled vehicle
�
an oncoming vehicle
The driver must always be on the alert, ob-
serve all traffic and intercede as required by
steering or braking the vehicle.
Warning!
G
Distronic should not be used in snowy or icy
road conditions.
ProCarManuals.com
Page 207 of 399
207 Controls in detail
Driving systems
The most likely cause for a malfunctioning
system is a dirty sensor (located behind
the hood grille), especially at times of snow
and ice or heavy rain. In such a case, Dis-
tronic will switch off, and the message Distronic - Clean sensor! see oper.
Manual
appears in the multifunction dis-
play.
For cleaning and care of the Distronic sen-
sor, see "Cleaning the Distronic system
sensor" (�page 283).Turns and bends
In turns or bends, Distronic may not detect
a moving vehicle in front, or it may detect
one too soon. This may cause your vehicle
to brake late or unexpectedly.
iIf the message "Distronic - clean sen-
sor!" See oper. manual disappears dur-
ing driving and the last speed stored
flashes for approximately five seconds,
the dirt (e.g. slush) has dissolved;
Distronic works again.
ProCarManuals.com
Page 208 of 399
208 Controls in detailDriving systemsOffset driving
A vehicle traveling in your lane but offset
from your direct line of travel may not be
detected by Distronic. There will be insuffi-
cient distance to the vehicle ahead.Lane changing
Distronic has not yet detected the vehicle
changing lanes. There will be insufficient
distance to the lane-changing vehicle.Narrow vehicles
Because of its narrow profile, the vehicle
traveling near the edge of the roadway has
not yet been detected by Distronic. There
will be insufficient distance to the vehicle
ahead.
ProCarManuals.com
Page 209 of 399
*
Vehicle level control
Your vehicle automatically adjusts its ride
height to�
reduce fuel consumption
�
increase vehicle safety
The f")
209 Controls in detail
Driving systems
AIRMATIC DC (Dual Control)*
Vehicle level control
Your vehicle automatically adjusts its ride
height to�
reduce fuel consumption
�
increase vehicle safety
The following vehicle chassis ride heights
are possible:
�
Normal
�
Raised
�
Lowered
The vehicle chassis ride height is raised or
lowered according to the selected level
setting and to the vehicle speed:
�
With increasing speed, ride height is re-
duced automatically by up to approxi-
mately 0.6 inch (15 mm) "Lowered"
level.
�
With decreasing speed, the ride height
is again raised to the "Normal" level.
Select the "Raised" level only when re-
quired by current driving conditions. Oth-
erwise
�
fuel consumption may increase
�
handling may be impairediThese height adjustments are so small
that you may not notice any change.
Warning!
G
To help avoid personal injury, keep hands
and feet away from wheel housing area, and
stay away from under the vehicle when low-
ering the vehicle chassis.
ProCarManuals.com
Page 210 of 399

210 Controls in detailDriving systemsThe following vehicle level settings can be
selected when the vehicle is stationary and
the engine is running:
The switch is located in the lower section
of the center console.
1Vehicle level control switch
2Indicator lamp
�
Briefly press switch1 to change from
"Normal" level to "Raised" level. When
vehicle is at "Raised" level, pressing the
switch will return the vehicle to "Nor-
mal" level.
Vehicle level when
stationary
Use for
Ride height increase
over normal
Automatic lowering
Indicator lamp (
�page 210)
Normal
Normal operation
None
Max. approx. 0.6 in (15 mm)
Lamp off
Raised
Driving with snow
chains or very
rough road sur-
face conditions
Approx. 1 in (25 mm)
Max. approx. 1 in (25 mm)
Lamp on
iAt a speed of approx. above 75 mph
(120 km/h) or if the speed amounts to
between 50 mph (80 km/h) and
75 mph (120 km/h) for approx. five
minutes the setting "Raised" is can-
celed. The message
Level selec.
canceled
appears in the multifunction
display.
If you do not drive in this speed range,
the "Raised" level remains stored even
if the key is removed from the ignition.
ProCarManuals.com
Page 211 of 399
211 Controls in detail
Driving systems
Comfort-/Sport setting
The AIRMATIC DC (Dual Control) consists
of two components:�
Adaptive-Damping-System (ADS)
�
Suspension style
The ADS automatically selects the opti-
mum damping for the respective driving
conditions. At the same time the suspen-
sion style is set to either sporty or regular.The suspension tuning is set according to:
�
your driving style
�
road surface conditions
�
your choice of suspension style,
"sporty I", "sporty II" or "regular", which
you select using the damping switch.
The selected suspension style is stored
in memory, even after the key is re-
moved from the starter switch.
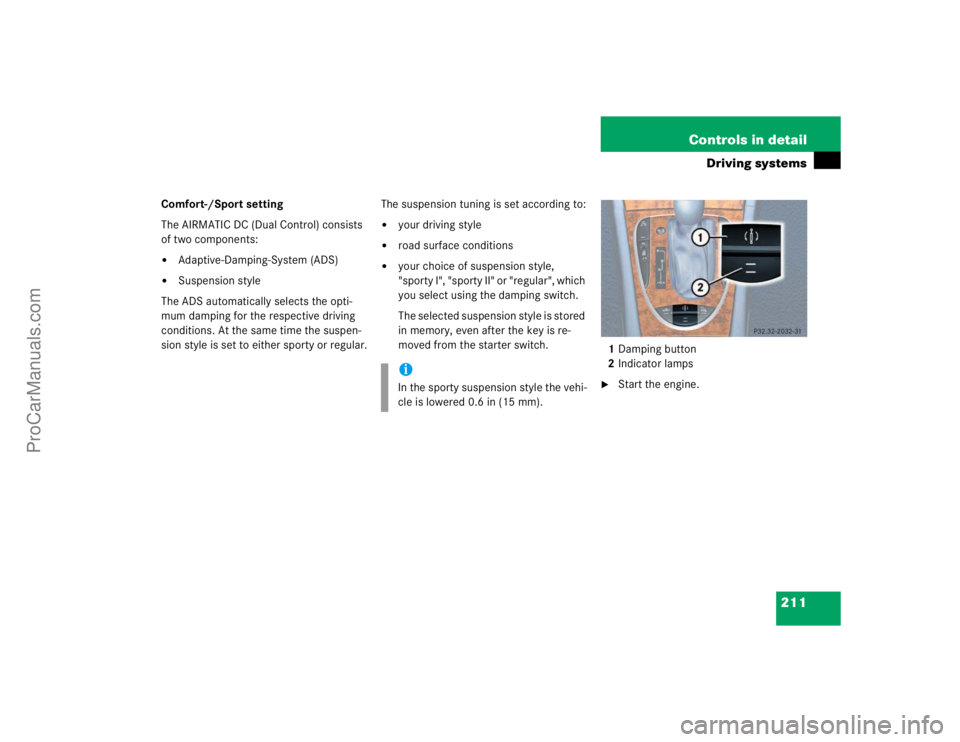
1Damping button
2Indicator lamps
�
Start the engine.
iIn the sporty suspension style the vehi-
cle is lowered 0.6 in (15 mm).
ProCarManuals.com
Page 212 of 399

212 Controls in detailDriving systemsSuspension for sporty driving style I
The setting for sporty driving I is selected
when one indicator lamp2 is illuminated.�
Press button1.
One indicator lamp2 comes on.
Suspension for sporty driving style II
The setting for sporty driving II is selected
when two indicator lamps2 are illuminat-
ed.
�
Press button1 twice.
Two indicator lamps2 come on.
Suspension for regular driving style
The setting for regular driving is selected
when the two indicator lamps2 are off.
�
Press button1 repeatedly until all indi-
cator lamps go out.
The indicator lamps2 go out.
PARKTRONIC system*
The Parktronic system is an electronic aid
designed to assist the driver during park-
ing maneuvers. It visually and audibly indi-
cates the relative distance between the
vehicle and an obstacle.
The Parktronic system is automatically ac-
tivated when you switch on the ignition
and release the parking brake. The Park-
tronic system deactivates at speeds over
11 mph (18 km/h). At lower speeds the
Parktronic system turns on again.Warning!
G
Parktronic is a supplemental system. It is
not intended to, nor does it replace, the
need for extreme care. The responsibility
during parking and other critical maneuvers
always rests with the driver.
Special attention must be paid to objects
having smooth surfaces or low silhouettes
(e.g. trailer couplings, painted posts, or
street curbs). Such objects may not be de-
tected by the system and can damage the
vehicle.
The operational function of the Parktronic
can be affected by dirty sensors, especially
at times of snow and ice. See "Cleaning the
Parktronic system sensors" (
�page 284).
Interference caused by other ultrasonic sig-
nals (e.g. working jackhammers or the air
brakes of trucks) can cause the system to
send erratic indications, and should be tak-
en into consideration.
Warning!
G
Be sure that no persons or animals are in the
area in which you are maneuvering. You
could otherwise injure them.
ProCarManuals.com
Page 213 of 399

213 Controls in detail
Driving systems
The Parktronic system monitors the sur-
roundings of your vehicle with six sensors
in the front bumper and four sensors in the
rear bumper.
1Sensors in the front bumperRange of the sensors
To function properly, the sensors must be
free of dirt, ice, snow and slush. Clean the
sensors regularly, being careful not to
scratch or damage the sensors.
Front sensors
Rear sensorsMinimum distance
If the system encounters an obstacle in
this range, all the warning lamps light up
and you hear a warning signal. If the obsta-
cle is closer than the minimum distance,
the actual distance may no longer be indi-
cated by the system.
Center
approx. 40 in (100 cm)
Corners
approx. 23 in (60 cm)
Center
approx. 48 in (120 cm)
Corners
approx. 32 in (80 cm)
!During parking maneuvers, pay special
attention to objects located above or
below the height of the sensors (e.g.
planters or trailer hitches). The Park-
tronic system will not detect such ob-
jects at close range and damage to
your vehicle or the object may result.
Ultrasonic signals from outside sourc-
es (e.g. truck air brakes or jackham-
mers) may impair the operation of the
Parktronic system.
Center
approx. 8 in (20 cm)
Corners
approx. 6 in (15 cm)
ProCarManuals.com
, especially at times of snow
and ice or heavy rain. In su")