Page 313 of 394
 side facing up.
�
Return battery compartment into h")
313 Practical hints
Unlocking/locking in an emergency
�
Using a lint-free cloth, insert new bat-
teries under the contact spring with the
plus (+) side facing up.
�
Return battery compartment into hous-
ing until it locks into place.
Fuel filler flap
1Release lever�
Remove the right side trim panel in the
trunk.
�
Reach inside in direction of arrow 2.
�
Turn release knob 1 clockwise as far as
it will go.
The fuel filler flap can be opened.Manually unlocking the transmission
selector lever
In case of power failure, the transmission
selector lever can be manually unlocked,
e.g. to tow the vehicle.�
Open the storage compartment in front
of the center armrest.
�
Take out cover 1.
�
Insert a pin into the opening of
division2 and pry the division out.
�
Insert a tool3 (e.g. screwdriver) into
the opening.
�
Perform the following two steps simul-
taneously:�
Push pin3 forward in the direction
of the arrow.
�
Move selector lever from
positionP.
�
Reinstall the division and cover after re-
moving the tool from the opening.iThe selector lever is locked again when
moving it to positionP.
Page 315 of 394
315 Practical hints
Opening/closing in an emergency
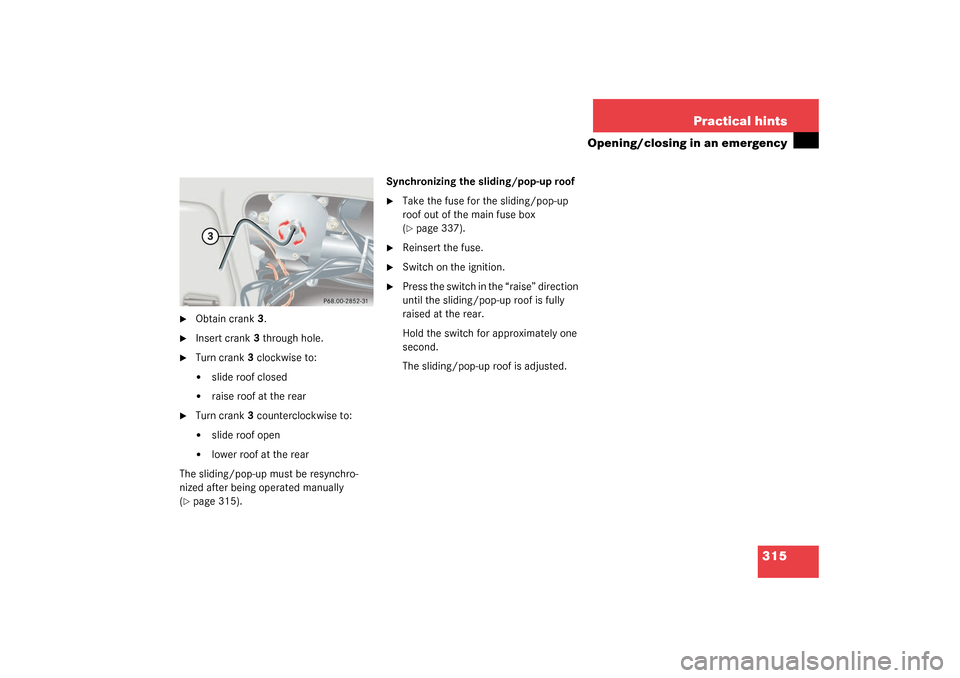
�
Obtain crank3.
�
Insert crank3 through hole.
�
Turn crank3 clockwise to:�
slide roof closed
�
raise roof at the rear
�
Turn crank3 counterclockwise to:�
slide roof open
�
lower roof at the rear
The sliding/pop-up must be resynchro-
nized after being operated manually
(
�page 315).Synchronizing the sliding/pop-up roof
�
Take the fuse for the sliding/pop-up
roof out of the main fuse box
(�page 337).
�
Reinsert the fuse.
�
Switch on the ignition.
�
Press the switch in the “raise” direction
until the sliding/pop-up roof is fully
raised at the rear.
Hold the switch for approximately one
second.
The sliding/pop-up roof is adjusted.
Page 319 of 394
.
�
Turn housing cover1 or 2 counter-
clockwise and remove.
�
Turn bulb holder 4 or")
319 Practical hints
Replacing bulbs
Low beam and high beam bulb�
Switch off the lights.
�
Open the hood (
�page 253).
�
Turn housing cover1 or 2 counter-
clockwise and remove.
�
Turn bulb holder 4 or 5 with the bulb
counterclockwise and remove.
�
Press the bulb backwards and turn
counterclockwise out of the bulb hold-
er.
�
Press the new bulb into the holder and
twist it clockwise.
�
Place the bulb holder back into the
lamp and turn it clockwise.
�
Place the corresponding housing cov-
ers back on and turn them clockwise.Front turn signal lamp bulb
�
Switch off the lights.
�
Open the hood (
�page 253).
�
Twist bulb socket3 counterclockwise
and pull out.
�
Push bulb into socket, turn counter-
clockwise and remove.
�
Insert new bulb in socket, push in and
twist clockwise.
�
Reinsert bulb socket in lamp and twist
clockwise.Parking and standing lamp bulb
�
Switch off the lights.
�
Open the hood (
�page 253).
�
Turn housing cover2 counterclockwise
and remove.
�
Pull out the bulb socket with the bulb.
�
Pull the bulb out of the bulb socket.
�
Insert a new bulb in the socket.
�
Reinstall the bulb socket.
�
Align housing cover and click into
place.
Page 320 of 394
320 Practical hintsReplacing bulbsFront lamps Bi-Xenon*-type
1Bulb socket for turn signal lamp
2Housing cover for high beam lamp
3Housing cover for Bi-Xenon* lamp4High beam bulb
5Parking and standing lampHigh beam bulb
�
Switch off the lights.
�
Open the hood (
�page 253).
�
Turn housing cover2 counterclockwise
and remove.
�
Turn bulb holder 4 with the bulb coun-
terclockwise and remove.
�
Press the bulb backwards and turn
counterclockwise out of the bulb hold-
er.
�
Press the new bulb into the holder and
twist it clockwise.
�
Place the bulb holder back into the
lamp and turn it clockwise.
�
Place the housing cover 2 back on and
turn them clockwise.
Warning!
G
Do not remove the cover 3 for the Bi-Xenon*
headlamp. Because of high voltage in xenon
lamps, it is dangerous to replace the bulb or
repair the lamp and its components. We rec-
o mme nd t h at y ou ha ve s uc h w o rk do n e by a
qualified technician.
Page 321 of 394
.
�
Twist bulb socket1 counterclockwise
and pull out.
�
Push bulb into socket, turn")
321 Practical hints
Replacing bulbs
Front turn signal lamp bulb�
Switch off the lights.
�
Open the hood (
�page 253).
�
Twist bulb socket1 counterclockwise
and pull out.
�
Push bulb into socket, turn counter-
clockwise and remove.
�
Insert new bulb in socket, push in and
twist clockwise.
�
Reinsert bulb socket in lamp and twist
clockwise.Parking and standing lamp bulb
�
Switch off the lights.
�
Open the hood (
�page 253).
�
Turn housing cover2 counterclockwise
and remove.
�
Pull out the bulb socket with the bulb.
�
Pull the bulb out of the bulb socket.
�
Insert a new bulb in the socket.
�
Reinstall the bulb socket.
�
Align housing cover and click into
place.
Side marker lamp bulb�
Switch off the lights.
�
Carefully slide lamp towards rear.
�
Remove front end first.
�
Twist bulb socket counterclockwise
and pull out.
�
Pull bulb out of the bulb socket.
�
Insert new bulb in socket.
�
Reinstall bulb socket, push in and twist
clockwise.
�
To reinstall lamp, set rear end in
bumper and let front end snap into
place.
Page 322 of 394
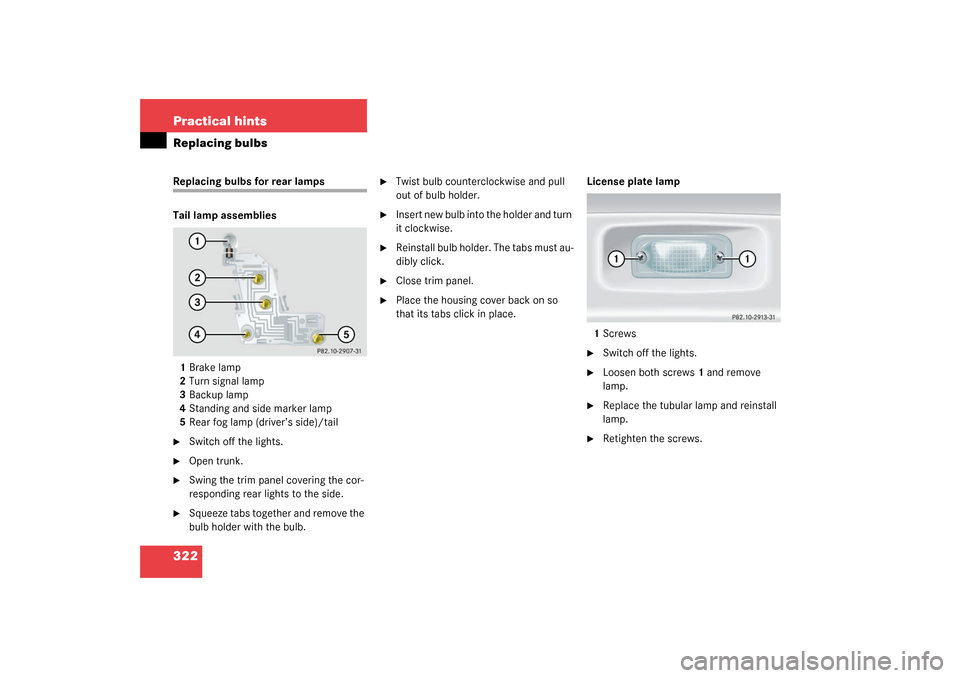
322 Practical hintsReplacing bulbsReplacing bulbs for rear lamps
Tail lamp assemblies
1Brake lamp
2Turn signal lamp
3Backup lamp
4Standing and side marker lamp
5Rear fog lamp (driver’s side)/tail�
Switch off the lights.
�
Open trunk.
�
Swing the trim panel covering the cor-
responding rear lights to the side.
�
Squeeze tabs together and remove the
bulb holder with the bulb.
�
Twist bulb counterclockwise and pull
out of bulb holder.
�
Insert new bulb into the holder and turn
it clockwise.
�
Reinstall bulb holder. The tabs must au-
dibly click.
�
Close trim panel.
�
Place the housing cover back on so
that its tabs click in place. License plate lamp
1Screws
�
Switch off the lights.
�
Loosen both screws1 and remove
lamp.
�
Replace the tubular lamp and reinstall
lamp.
�
Retighten the screws.
Page 328 of 394
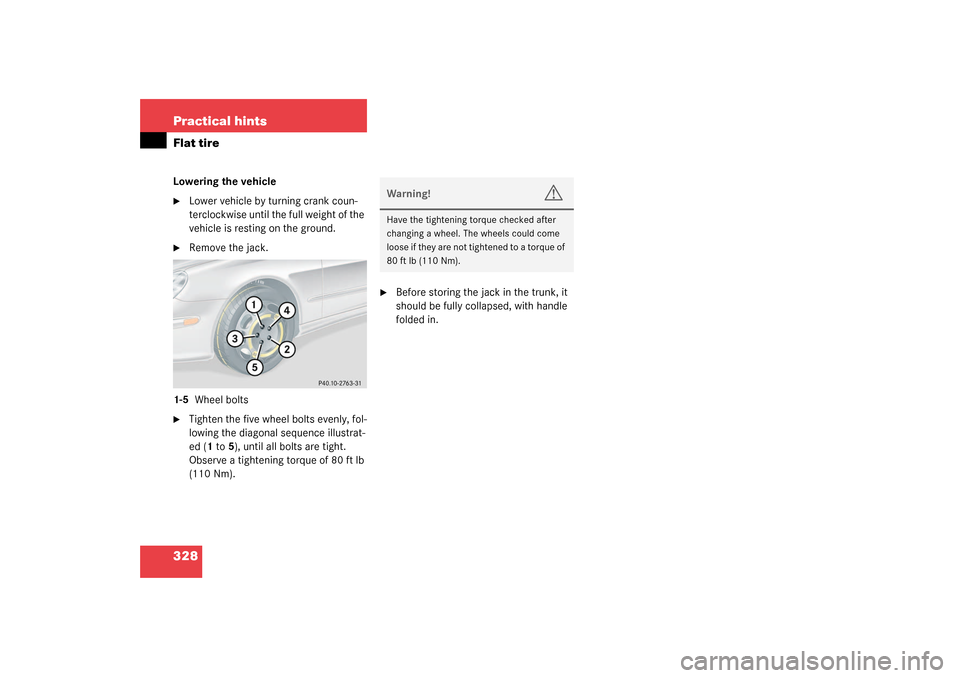
328 Practical hintsFlat tireLowering the vehicle�
Lower vehicle by turning crank coun-
terclockwise until the full weight of the
vehicle is resting on the ground.
�
Remove the jack.
1-5 Wheel bolts
�
Tighten the five wheel bolts evenly, fol-
lowing the diagonal sequence illustrat-
ed (1 to 5), until all bolts are tight.
Observe a tightening torque of 80 ft lb
(110 Nm).
�
Before storing the jack in the trunk, it
should be fully collapsed, with handle
folded in.Warning!
G
Have the tightening torque checked after
changing a wheel. The wheels could come
loose if they are not tightened to a torque of
80 ft lb (110 Nm).
Page 331 of 394
331 Practical hints
Battery
Reconnecting the batteries�
Turn off all electrical consumers.
�
Connect the positive lead and fasten its
cover 2.
�
Connect the negative lead 1.
�
Reinstall the filter box.Batteries contain materials that can harm
the environment if disposed of improperly.
Large 12-volt storage batteries contain
lead. Recycling of batteries is the preferred
method of disposal. Many states require
sellers of batteries to accept old batteries
for recycling.!NEVER invert the terminal connections.!The battery, its filler caps and the vent
tube must always be securely installed
when the vehicle is in operation.
iThe following procedures must be car-
ried out following any interruption of
battery power (e.g. due to reconnect-
ing):�
Set the clock (
�page 128) (vehi-
cles with COMAND*: see COMAND
operator’s manual).
�
Resynchronize the ESP
(�page 294).
�
Resynchronize side windows
(�page 189).
�
Resynchronize sliding/pop-up roof
(�page 315).