Page 218 of 394

218 Controls in detailLoadingThe handling characteristics of a fully load-
ed vehicle depend greatly on the load dis-
tribution. It is therefore recommended to
load the vehicle according to the illustra-
tions shown, with the heaviest items being
placed towards the front of the vehicle.
Always place items being carried against
front or rear seat backrests, and fasten
them as securely as possible.
The heaviest portion of the cargo should al-
ways be kept as low as possible since it in-
fluences the handling characteristics of
the vehicle.
Cargo tie-down rings
Four rings (arrows) are located in the cargo
compartment.�
Carefully secure cargo by applying
even load on all rings with rope of suffi-
cient strength to hold down the cargo.
Always follow loading instructions
(�page 217).
Warning!
G
Always fasten items being carried as secure-
ly as possible.
In an accident, during hard braking or sud-
den maneuvers, loose items will be thrown
around inside the vehicle and can cause in-
jury to vehicle occupants unless the items
are securely fastened in the vehicle.
To help avoid personal injury during a colli-
sion or sudden maneuver, exercise care
when transporting cargo. Put luggage or car-
go in the trunk if possible. Do not pile lug-
gage or cargo higher than the seat backs.
Do not place anything on the shelf below the
rear windows.
Never drive vehicle with trunk open. Deadly
carbon monoxide (CO) gases may enter ve-
hicle interior resulting in unconsciousness
and death.
Page 219 of 394
219 Controls in detail
Useful features
Useful features
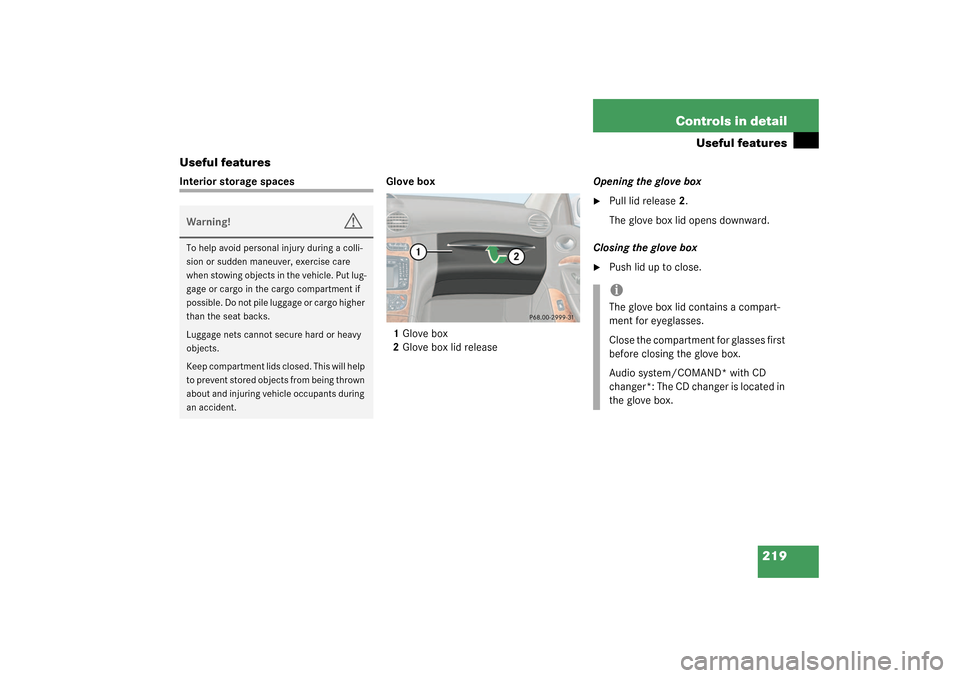
Interior storage spaces Glove box
1Glove box
2Glove box lid releaseOpening the glove box
�
Pull lid release2.
The glove box lid opens downward.
Closing the glove box
�
Push lid up to close.
Warning!
G
To help avoid personal injury during a colli-
sion or sudden maneuver, exercise care
when stowing objects in the vehicle. Put lug-
gage or cargo in the cargo compartment if
possible. Do not pile luggage or cargo higher
than the seat backs.
Luggage nets cannot secure hard or heavy
objects.
Keep compartment lids closed. This will help
to prevent stored objects from being thrown
about and injuring vehicle occupants during
an accident.
iThe glove box lid contains a compart-
ment for eyeglasses.
Close the compartment for glasses first
before closing the glove box.
Audio system/COMAND* with CD
changer*: The CD changer is located in
the glove box.
Page 223 of 394
223 Controls in detail
Useful features
Ashtrays
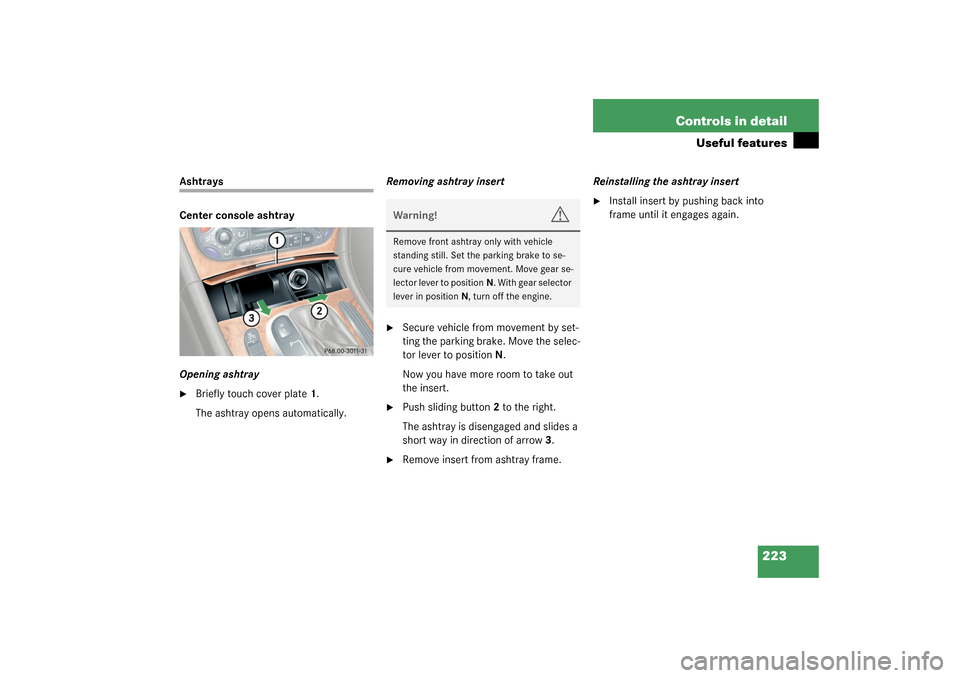
Center console ashtray
Opening ashtray�
Briefly touch cover plate1.
The ashtray opens automatically.Removing ashtray insert
�
Secure vehicle from movement by set-
ting the parking brake. Move the selec-
tor lever to positionN.
Now you have more room to take out
the insert.
�
Push sliding button2 to the right.
The ashtray is disengaged and slides a
short way in direction of arrow 3.
�
Remove insert from ashtray frame.Reinstalling the ashtray insert
�
Install insert by pushing back into
frame until it engages again.
Warning!
G
Remove front ashtray only with vehicle
standing still. Set the parking brake to se-
cure vehicle from movement. Move gear se-
lector lever to positionN. With gear selector
lever in positionN, turn off the engine.
Page 225 of 394
225 Controls in detail
Useful features
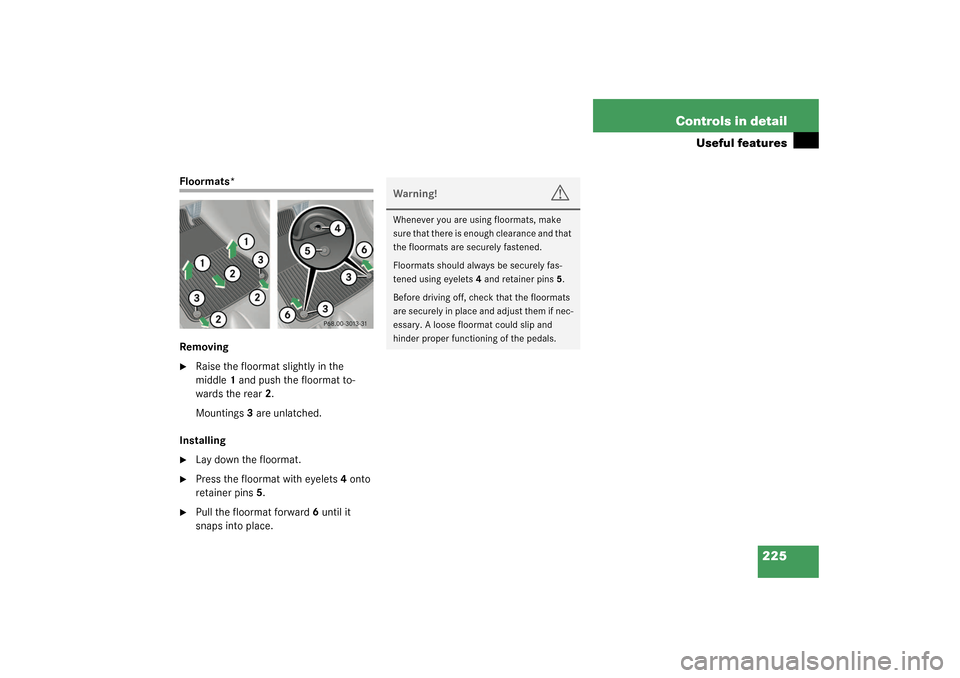
Floormats*
Removing�
Raise the floormat slightly in the
middle1 and push the floormat to-
wards the rear2.
Mountings3 are unlatched.
Installing
�
Lay down the floormat.
�
Press the floormat with eyelets4 onto
retainer pins5.
�
Pull the floormat forward6 until it
snaps into place.
Warning!
G
Whenever you are using floormats, make
sure that there is enough clearance and that
the floormats are securely fastened.
Floormats should always be securely fas-
tened using eyelets4 and retainer pins5.
Before driving off, check that the floormats
are securely in place and adjust them if nec-
essary. A loose floormat could slip and
hinder proper functioning of the pedals.
Page 247 of 394
.
Standing water
Passenger compartmentDriving abroad
Abroad, there is a widely-spread
Mercedes-Benz service netwo")
247 Operation
Driving instructions
For more information on winter driving
(�page 264).
Standing water
Passenger compartmentDriving abroad
Abroad, there is a widely-spread
Mercedes-Benz service network at your
disposal. If you plan to drive into areas
which are not listed in the index of your
Mercedes-Benz Center directory, you
should request pertinent information from
your authorized Mercedes-Benz Center.
Warning!
G
If the vehicle becomes stuck in snow, make
sure that snow is kept clear of the exhaust
pipe and from around the vehicle with the
engine running. Otherwise, deadly carbon
monoxide (CO) gases may enter vehicle in-
terior resulting in unconsciousness and
death.
To assure sufficient fresh air ventilation,
open a window slightly on the side of the ve-
hicle not facing the wind.Warning!
G
The outside temperature indicator is not de-
signed to serve as an ice-warning device and
is therefore unsuitable for that purpose. In-
dicated temperatures just above the freez-
ing point do not guarantee that the road
surface is free of ice.
!Do not drive through flooded areas or
water of unknown depth.
If you must drive through standing wa-
ter, drive slowly to prevent water from
entering the passenger compartment
or the engine compartment. Water in
these areas could cause damage to
electrical components or wiring of the
engine or transmission, or could result
in water being ingested by the engine
through the air intake, causing severe
internal engine damage. Any such dam-
age is not covered by the
Mercedes-Benz Limited Warranty.
Warning!
G
Always fasten items being carried as secure-
ly as possible.
In an accident, during hard braking or sud-
den maneuvers, loose items will be thrown
around inside the vehicle, and cause injury
to vehicle occupants unless the items are
securely fastened in the vehicle.
The trunk is the preferred place to carry ob-
jects.
Page 306 of 394

306 Practical hintsWhere will I find...?3Arrow
4Minispare wheel
5Vehicle tool kit storage well casing
6Vehicle tool kit
Wheel wrench
Vehicle jackVehicle jackThe vehicle jack is stored in the space un-
derneath the trunk floor together with the
vehicle tool kit in the vehicle tool kit stor-
age well casing.
�
Remove the vehicle jack from its com-
partment.
�
Push the crank handle up.
iArrow3 on vehicle tool kit storage well
casing5 must point in the direction of
travel. Otherwise you cannot place the
storage well casing on top and secure
the Minispare wheel with retaining
screw 1 (
�page 305).
Warning!
G
The jack is designed exclusively for jacking
up the vehicle at the jack take-up brackets
built into both sides of the vehicle. To help
avoid personal injury, use the jack only to lift
the vehicle during a wheel change. Never
get beneath the vehicle while it is supported
by the jack. Keep hands and feet away from
the area under the lifted vehicle. Always
firmly set parking brake and block wheels
before raising vehicle with jack.
Do not disengage parking brake while the
vehicle is raised. Be certain that the jack is
always vertical (plumb line) when in use, es-
pecially on hills. Always try to use the jack
on a level surface. Make sure that the jack
arm is fully seated in the jack take-up brack-
et. Always lower the vehicle onto sufficient
capacity jackstands before working under
the vehicle.
Page 308 of 394

308 Practical hintsWhere will I find...?Storing the Minispare wheel�
Place Minispare wheel3 in wheel well.
�
Place vehicle tool kit storage well
casing4 over the Minispare wheel. Be
sure that the arrow 2 on storage well
casing4 points in the direction of trav-
el.
�
Place storage well casing
(�page 305) over the vehicle tool kit
storage well casing 4 and turn the re-
taining screw (
�page 305) clockwise
as far as it will go to secure the
Minispare wheel.
iThe arrow 2 on vehicle tool kit storage
well casing4 must point in the direc-
tion of travel, otherwise you cannot
place the storage well casing
(�page 305) on top and secure the
Minispare wheel with the retaining
screw (
�page 305).
!To prevent damage, always disengage
trunk floor handle from upper edge of
trunk and lower trunk floor before clos-
ing the trunk lid.
Warning!
G
The dimensions of the Minispare wheel are
different from those of the road wheels. As
a result, the vehicle handling characteristics
change when driving with a Minispare wheel
mounted.
The Minispare wheel should only be used
temporarily, and should be replaced with a
regular road wheel as quickly as possible.
Page 329 of 394

329 Practical hints
Battery
Battery
The battery is located in the engine com-
partment on the right hand side.
Removal of filter box:�
Release the three clamps1.
�
Remove filter box.
Installation of filter box:
�
Insert filter box properly.
�
Secure it with the three clamps1.
Warning!
G
Failure to follow these instructions can re-
sult in severe injury or death.
Never lean over batteries while connecting,
you might get injured.
Battery fluid contains sulfuric acid. Do not
allow this fluid to come in contact with eyes,
skin or clothing. In case it does, immediately
flush affected area with water and seek
medical help if necessary.
A battery will also produce hydrogen gas,
which is flammable and explosive. Keep
flames or sparks away from battery, avoid
improper connection of jumper cables,
smoking etc.
!Never loosen or detach battery termi-
nal clamps while the engine is running
or the key is in the starter switch. Oth-
erwise the alternator and other elec-
tronic components could be severely
damaged.
Have the battery checked regularly by
an authorized Mercedes-Benz Center.
Refer to Service Booklet for mainte-
nance intervals or contact your autho-
rized Mercedes-Benz Center for further
information.Warning!
G
Do not place metal objects on the battery as
this could result in a short circuit.
Use leak-proof battery only to avoid the risk
of acid burns in the event of an accident.