Page 308 of 394

308 Practical hintsWhere will I find...?Storing the Minispare wheel�
Place Minispare wheel3 in wheel well.
�
Place vehicle tool kit storage well
casing4 over the Minispare wheel. Be
sure that the arrow 2 on storage well
casing4 points in the direction of trav-
el.
�
Place storage well casing
(�page 305) over the vehicle tool kit
storage well casing 4 and turn the re-
taining screw (
�page 305) clockwise
as far as it will go to secure the
Minispare wheel.
iThe arrow 2 on vehicle tool kit storage
well casing4 must point in the direc-
tion of travel, otherwise you cannot
place the storage well casing
(�page 305) on top and secure the
Minispare wheel with the retaining
screw (
�page 305).
!To prevent damage, always disengage
trunk floor handle from upper edge of
trunk and lower trunk floor before clos-
ing the trunk lid.
Warning!
G
The dimensions of the Minispare wheel are
different from those of the road wheels. As
a result, the vehicle handling characteristics
change when driving with a Minispare wheel
mounted.
The Minispare wheel should only be used
temporarily, and should be replaced with a
regular road wheel as quickly as possible.
Page 311 of 394

311 Practical hints
Unlocking/locking in an emergency
Unlocking the trunk
If you are unable to unlock the trunk with
the SmartKey, open the trunk with the me-
chanical key as follows:Trunk lid lock1Locking
2Unlocking�
Insert the mechanical key into the
trunk lid lock.
�
Perform the following two steps simul-
taneously:�
Turn the key counterclockwise to
position2.
�
Pull the trunk lid handle and lift lid.
Locking the vehicle
If you are unable to lock the vehicle with
the SmartKey, lock it with the mechanical
key as follows:�
Close the passenger door and the trunk
lid.
�
Press the central locking switch in the
cockpit (
�page 96).
�
Check to see whether the locking knob
on the passenger door is still visible. If
necessary push it down manually.
�
Lock the driver’s door with the me-
chanical key.
�
Lock the trunk lid if necessary with the
mechanical key (
�page 94).
!When opening the trunk completely, al-
ways make sure that there is sufficient
overhead clearance.iUnlocking your vehicle with the me-
chanical key will trigger the anti-theft
alarm system. To cancel the alarm, do
one of the following:�
Press button
Œ
or
‹
on the
SmartKey.
�
Insert the key in the starter switch.
�
Press the KEYLESS-GO* start/stop
button (
�page 33).
Page 313 of 394
 side facing up.
�
Return battery compartment into h")
313 Practical hints
Unlocking/locking in an emergency
�
Using a lint-free cloth, insert new bat-
teries under the contact spring with the
plus (+) side facing up.
�
Return battery compartment into hous-
ing until it locks into place.
Fuel filler flap
1Release lever�
Remove the right side trim panel in the
trunk.
�
Reach inside in direction of arrow 2.
�
Turn release knob 1 clockwise as far as
it will go.
The fuel filler flap can be opened.Manually unlocking the transmission
selector lever
In case of power failure, the transmission
selector lever can be manually unlocked,
e.g. to tow the vehicle.�
Open the storage compartment in front
of the center armrest.
�
Take out cover 1.
�
Insert a pin into the opening of
division2 and pry the division out.
�
Insert a tool3 (e.g. screwdriver) into
the opening.
�
Perform the following two steps simul-
taneously:�
Push pin3 forward in the direction
of the arrow.
�
Move selector lever from
positionP.
�
Reinstall the division and cover after re-
moving the tool from the opening.iThe selector lever is locked again when
moving it to positionP.
Page 322 of 394
322 Practical hintsReplacing bulbsReplacing bulbs for rear lamps
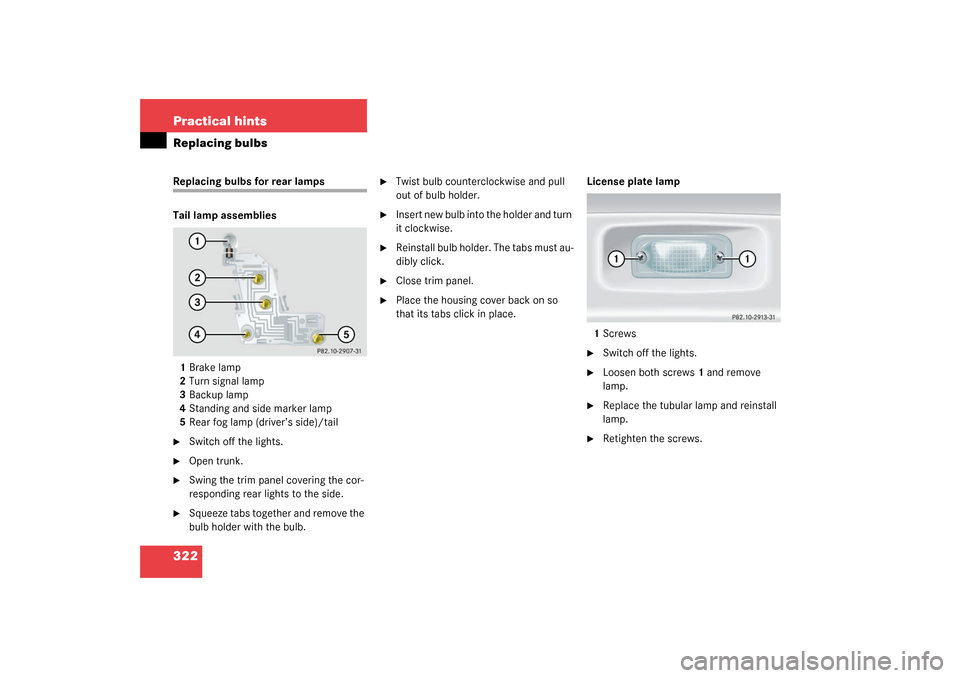
Tail lamp assemblies
1Brake lamp
2Turn signal lamp
3Backup lamp
4Standing and side marker lamp
5Rear fog lamp (driver’s side)/tail�
Switch off the lights.
�
Open trunk.
�
Swing the trim panel covering the cor-
responding rear lights to the side.
�
Squeeze tabs together and remove the
bulb holder with the bulb.
�
Twist bulb counterclockwise and pull
out of bulb holder.
�
Insert new bulb into the holder and turn
it clockwise.
�
Reinstall bulb holder. The tabs must au-
dibly click.
�
Close trim panel.
�
Place the housing cover back on so
that its tabs click in place. License plate lamp
1Screws
�
Switch off the lights.
�
Loosen both screws1 and remove
lamp.
�
Replace the tubular lamp and reinstall
lamp.
�
Retighten the screws.
Page 324 of 394

324 Practical hintsFlat tire
Flat tirePreparing the vehicle�
Park the vehicle as far as possible from
moving traffic on a hard surface.
�
Turn on the hazard warning flashers.
�
Engage the steering wheel lock in the
straight ahead position and set the
parking brake.
�
Move the selector lever toP.
�
Have any passenger exit the vehicle at
a safe distance from the roadway.
Mounting the Minispare wheel
In case of a flat tire, you may temporarily
use the spare wheel when observing the
following restrictions:�
Do not exceed a vehicle speed of
50 mph (80 km/h).
�
Drive to the nearest tire repair facility
to have the flat tire repaired or re-
placed as appropriate.
�
Do not operate the vehicle with more
than one spare wheel mounted.Preparing the vehicle
Prepare the vehicle as described on
(
�page 324).
�
Take the wheel wrench and the jack
out of the trunk (
�page 307).
�
Take the Minispare wheel out of the
trunk (
�page 307).
Lifting the vehicle
�
Prevent the vehicle from rolling away
by blocking wheels with wheel chocks
(not included) or other sizable objects.
When changing wheel on a level surface:
�
Place one chock in front of and one be-
hind the wheel that is diagonally oppo-
site to the wheel being changed.
When changing wheel on a hill:
�
Place chocks on the downhill side
blocking both wheels of the other axle.
Warning!
G
The dimensions of the Minispare wheel are
different from those of the road wheels. As
a result, the vehicle handling characteristics
change when driving with a Minispare wheel
mounted.
The spare wheel should only be used tempo-
rarily, and should be replaced with a regular
road wheel as quickly as possible.
��
Page 328 of 394
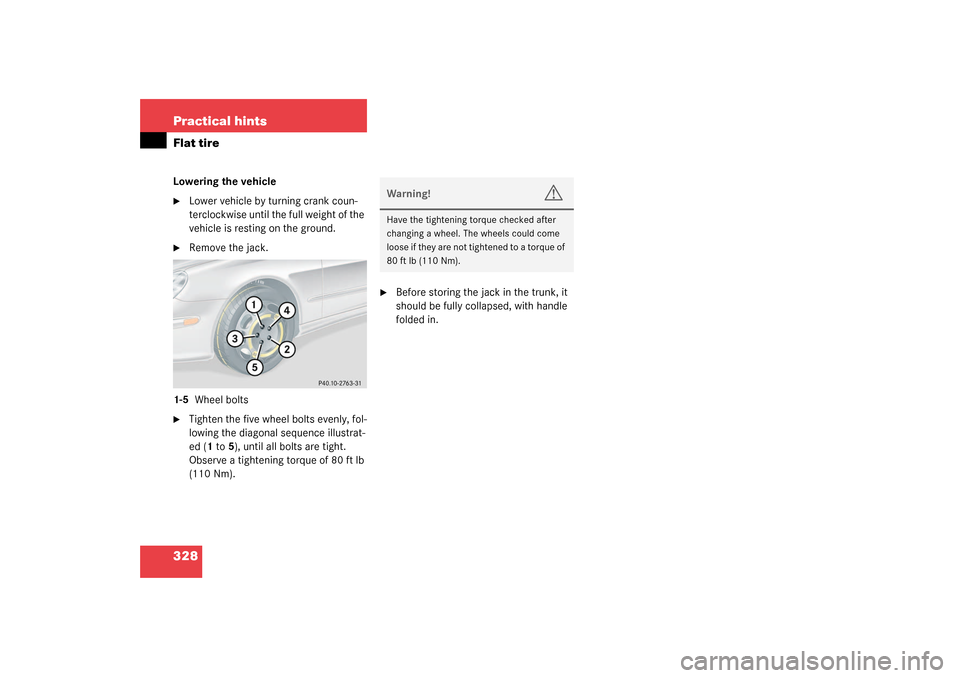
328 Practical hintsFlat tireLowering the vehicle�
Lower vehicle by turning crank coun-
terclockwise until the full weight of the
vehicle is resting on the ground.
�
Remove the jack.
1-5 Wheel bolts
�
Tighten the five wheel bolts evenly, fol-
lowing the diagonal sequence illustrat-
ed (1 to 5), until all bolts are tight.
Observe a tightening torque of 80 ft lb
(110 Nm).
�
Before storing the jack in the trunk, it
should be fully collapsed, with handle
folded in.Warning!
G
Have the tightening torque checked after
changing a wheel. The wheels could come
loose if they are not tightened to a torque of
80 ft lb (110 Nm).
Page 336 of 394

336 Practical hintsTowing the vehicle
Installing towing eye bolt
1Cover on right side of front bumper2Cover on right side of rear bumper
To remove cover:
�
Press mark on cover in direction of ar-
row.
�
L i f t c o v e r o f f t o r e v e a l t h r e a d e d h o l e f o r
towing eye bolt.
The towing eye bolt is supplied with the
tool kit (located in the compartment under-
neath the trunk floor).
�
Screw towing eye bolt to its stop and
tighten with lug wrench.
To reinstall cover:
�
Fit cover and snap into place.
!When towing the vehicle with all wheels
on the ground, please note the follow-
ing:
With the automatic central locking acti-
vated and the key in starter switch
position2, or KEYLESS-GO* start/stop
button (if so equipped) in position2,
the vehicle doors lock if the left front
wheel as well as the right rear wheel
are turning at vehicle speeds of approx.
9 mph (15 km / h) or more.
Switch off the tow-away alarm
(�page 81).
To prevent the vehicle door locks from
locking, deactivate the automatic cen-
tral locking (
�page 133).
Towing of the vehicle should only be
done using the properly installed tow-
ing eye bolt. Never attach tow cable,
tow rope or tow rod to the vehicle chas-
sis, frame or suspension parts.
iThe selector lever will remain locked in
positionP and the key will not turn in
the starter switch if the battery is dis-
connected or discharged. See notes on
the battery (
�page 329) or on jump
starting (
�page 332).
Page 338 of 394
338 Practical hintsFusesOpening fuse box
5Fuse box cover
6Clamps�
Release clamps6.
�
Remove cover5.
Closing fuse box
�
Ensure that the sealing rubber is prop-
erly positioned.
�
Press the cover down and secure with
clamps6.
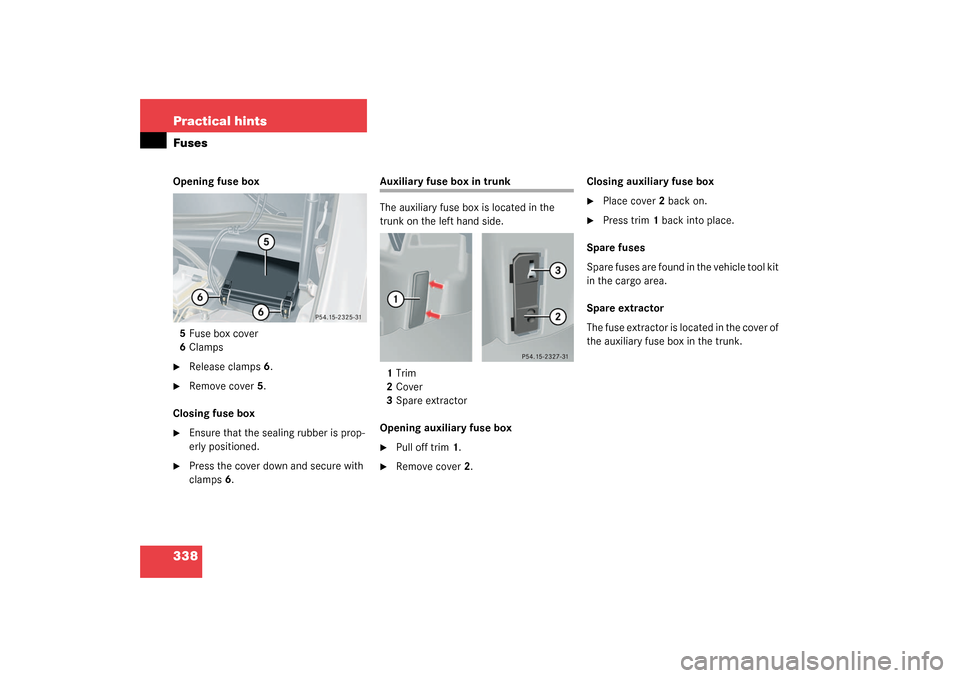
Auxiliary fuse box in trunk
The auxiliary fuse box is located in the
trunk on the left hand side.
1Trim
2Cover
3Spare extractor
Opening auxiliary fuse box�
Pull off trim1.
�
Remove cover2.Closing auxiliary fuse box
�
Place cover 2 back on.
�
Press trim1 back into place.
Spare fuses
Spare fuses are found in the vehicle tool kit
in the cargo area.
Spare extractor
The fuse extractor is located in the cover of
the auxiliary fuse box in the trunk.