Page 148 of 225
140 NavigationDestination input�
Turn the right-hand rotary/push-button
v to highlight highlight the desired ca-
tegory and press to confirm.
An input menu, e.g. “Airport” will ap-
pear.
�
Select an entry (
�page 124) and then
activate the list.Activating the list
�
Press the right-hand rotary/push-
button v longer than 2 seconds.
or
�
Turn the right-hand rotary/push-button
v to highlight “List” and press to con-
firm.
The list will appear.
�
Turn the right-hand rotary/push-button
v to highlight the desired entry and
press to confirm.
�
Then calculate the route (
�page 141).
P82.85-9189-31
Page 149 of 225
141 Navigation
Destination input
This function allows you to display up to 12
destinations you last selected.
1Destination selected last
�
Turn the right-hand rotary/push-button
v to highlight “Last destinations...” in
the main destination input menu and
press to confirm.
The list “Last destinations...” will ap-
pear.
�
Turn the right-hand rotary/push-button
v to highlight the desired destination
and press to confirm.
�
Then calculate the route.First select the calculation mode and then
calculate your route.
Selecting calculation mode
COMAND calculates the route either as
the Fast Route 1 or Short Route 2 whereby
traffic routes 3, 4 and 5 can be included or
avoided (with several selections).
Selecting the last destinations
P82.85-9190-31
1
Calculating a route
Page 151 of 225
143 Navigation
Destination input
7Calculation method
8Destination
Cancel route calculation�
Turn the right-hand rotary/push-button
v to highlight “Cancel” and press to
confirm.
The main destination input menu will
appear.During the calculation, the symbol display
will appear after a few seconds.
9Calculation of route
10Arrow indicating the direction to the
destination (as the crow flies)
11Distance to the destination (as the
crow flies)The route will be calculated. COMAND
identifies the road you are travelling on.
Position 12 now indicates the driving di-
rection.
You will e.g. hear the voice output “Please,
make the next right turn”.
P82.85-9192-31
78
P82.85-9194-31P82.85-9194-31
12
Page 154 of 225
146 NavigationRoute guidanceAfter the destination is selected and the
route is calculated, the navigation system
will guide you to the destination using both
pictorial displays and voice outputs.
During route guidance, you can select the
following 3 screen displays:�
Symbol display
Always appears after a route has been
calculated
�
Map display
Activate the map with menu field 5,
switch back to symbol display with
menu field 8
�
Mix
Before the vehicle makes a turn,
COMAND switches automatically from
the map to the symbol display.
Once the turn has been completed, the
map is displayed again.
iIn the map display, menu fields 6, 8, 9
are removed after 6 seconds.
Turn the right-hand rotary/push-button
v to display the menu fields again.
iThe map appears automatically after 5
seconds if the vehicle is located on a
road which is not digitized (message
OFF ROAD).
If COMAND recognizes a stored road,
the symbol display is called up again.
Page 155 of 225
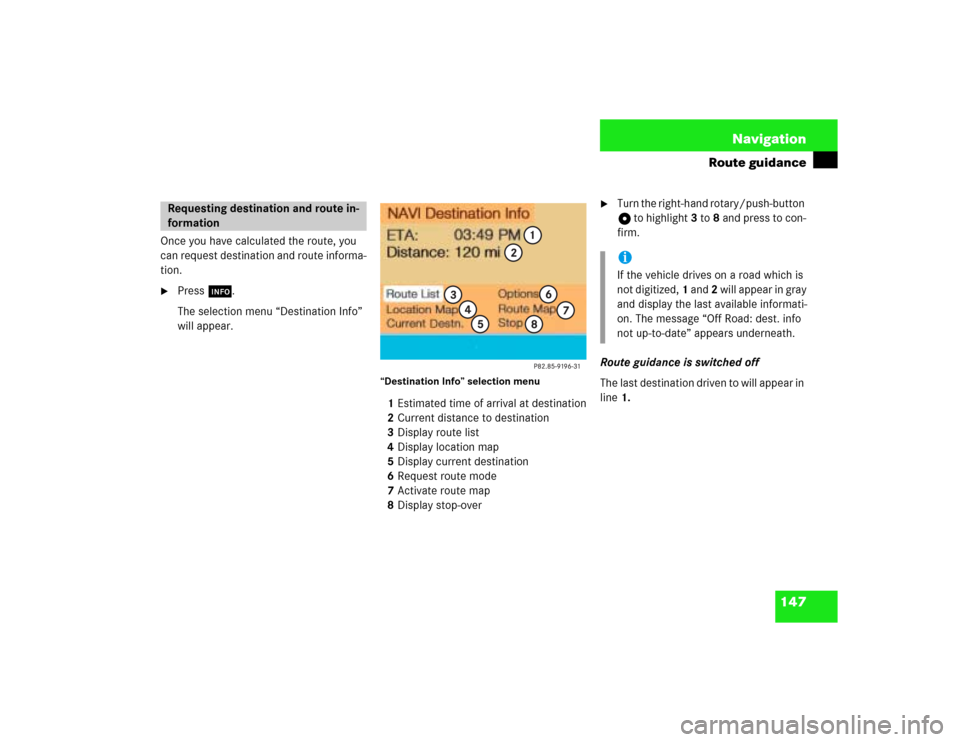
147 Navigation
Route guidance
Once you have calculated the route, you
can request destination and route informa-
tion.�
Press ..
The selection menu “Destination Info”
will appear.
“Destination Info” selection menu 1Estimated time of arrival at destination
2Current distance to destination
3Display route list
4Display location map
5Display current destination
6Request route mode
7Activate route map
8Display stop-over
�
Turn the right-hand rotary/push-button
v to highlight 3 to 8 and press to con-
firm.
Route guidance is switched off
The last destination driven to will appear in
line 1.
Requesting destination and route in-
formation
iIf the vehicle drives on a road which is
not digitized, 1 and 2 will appear in gray
and display the last available informati-
on. The message “Off Road: dest. info
not up-to-date” appears underneath.
Page 157 of 225
149 Navigation
Route guidance
Activating the location map
If route guidance is active�
Turn the right-hand rotary/push-button
v in the selection menu “Destination
Info” to highlight “Location map” and
press to confirm.
The location map faces north (North-
up).
1Geographic longitude and latitude for
your current location
2Number of satellites received
3Scale used the last time the location
map was activated
4Current vehicle location in the center of
the screen
5Name of the street the vehicle is
currently travelling onAltering the map scale (
�page 158).
Switching back to the symbol or map dis-
play
�
Press * twice.
If route guidance is switched off
�
Press l.
The location map will appear.
�
Press l again to activate the main
destination input menu.iIf the location map appears after
COMAND has been switched on,
pressb to activate the main desti-
nation input menu.
Page 158 of 225
150 NavigationRoute guidanceDisplaying current destination�
Turn the right-hand rotary/push-button
v in the selection menu “Destination
Info” to highlight “Current Destination”
and press to confirm.
You will see the current destination.
Switching back to the symbol or map dis-
play
�
Press *.Requesting route mode
1Settings for route calculation mode
�
Turn the right-hand rotary/push-button
v in the selection menu “Destination
Info” to highlight “Options” and press
to confirm.
The settings for the current route are
displayed. Switching back to the symbol or map dis-
play
After 15 seconds, COMAND will return au-
tomatically to the symbol or map display.
or
�
Press *.
P82.85-9200-31
1
iSelecting calculation mode
(�page 141)
Selecting a detour during destination
guidance (
�page 163)
Marking a way point (
�page 160)
Page 159 of 225
151 Navigation
Route guidance
Activating the route map
1Current vehicle location
2Route displayed as blue line
3Destination
�
Turn the right-hand rotary/push-button
v in the selection menu “Destination
Info” to highlight “Route Map” and
press to confirm.
The route map faces north (North-up)
and shows the general view for the
whole route.
The map scale selected depends on the
route.
Switching back to the symbol or map dis-
play
�
Press *.Displaying a stop-over
You can display this information if you
have previously selected a way point
(
�page 160).
1Way point
Place, type of stop-over and name
�
Turn the right-hand rotary/push-button
v in the selection menu “Destination
Info” to highlight “Stop” and press to
confirm.