Page 86 of 384

86 Controls in detailLocking and unlockingChecking vehicle lock status
If you cannot remember whether you have
locked the vehicle, you can check the lock
status using the KEYLESS-GO card.�
Briefly press programming button1.
The indicator lamp for “Driver’s door”2
or “Global unlock”3 lights up in red or
green.
Vehicle lock status:
Red Vehicle is locked
Green Vehicle is unlockedLocking the vehicle
1Trunk lock button
�
Press the lock button at door
(�page 52) or trunk1.
Closing the side windows and the
sliding / pop-up roof
�
Press and hold lock button at door
(�page 52) until the side windows and
the sliding / pop-up roof are closed.
iWhen the vehicle is unlocked and the
anti-theft alarm system is switched off,
the turn signals illuminate briefly. If it is
dark, the locator lighting also switches
on (
�page 137).
When the vehicle is locked and the an-
ti-theft alarm system is activated, the
the turn signals flash three times.
Warning!
G
When closing the windows and the sliding /
pop-up roof, make sure that there is no dan-
ger of anyone being harmed by the closing
procedure.
If potential danger exists, proceed as fol-
lows:�
Release the lock button.
�
Pull on the door handle and hold firmly.
The side windows and the
sliding / pop-up roof will open for as long
as the door handle is held but the door
not opened.
Page 88 of 384
 i")
88 Controls in detailLocking and unlocking
Opening the trunk lid from the inside
You can open the trunk from the inside if
the vehicle is stationary.
A minimum height clearance of 6.1 ft
(1.90 m) is required to open the trunk lid.
The switch is located on the driver’s door.
1Indicator lamp
2Remote trunk lid release switch
�
Pull remote trunk lid release switch2.
The trunk opens. The indicator lamp1
comes on. It remains lit until you close
the trunk again.
The trunk can also be opened from the in-
side in an emergency, see “Trunk lid emer-
gency release” (
�page 89).
iIf the vehicle has previously been
locked from the outside with the
SmartKey, opening a door from the in-
side will trigger the anti-theft alarm sys-
tem.
To cancel the alarm, do one of the fol-
lowing:�
Press button
Œ
or
‹
on the
SmartKey.
�
Insert the SmartKey in the starter
switch.
iIf you open a door, the side windows on
that side of the vehicle will lower slight-
ly. The windows close again when you
close the door.
!The trunk lid swings open automatical-
ly. Always make sure that there is suffi-
cient overhead clearance.
Page 151 of 384
 and for setting the rear view
mirrors (
�page 38) is found in the “Get-
ting started” secti")
151 Controls in detail
Good visibility
Good visibility
Information on the windshield wipers
(�page 47) and for setting the rear view
mirrors (
�page 38) is found in the “Get-
ting started” section.
Rear view mirror
Automatic antiglare rear view mirror
The reflection brightness of the exterior
rear view mirror on the driver’s side and
the inside rear view mirror will respond au-
tomatically to glare when�
the ignition is switched on, and
�
incoming light from headlamps falls on
the sensor in the inside rear view mir-
ror.
The rear view mirror will not react if
�
reverse gear is engaged
�
the interior lighting is turned on
Warning!
G
The automatic antiglare function does not
react if incoming light is not aimed directly
at sensors in the inside rear view mirror.
The inside rear view mirror and the exterior
rear view mirror on the driver’s side do not
react, for example, if the rear window sun-
shade is in raised position.
Glare can endanger you and others.Warning!
G
In the case of an accident liquid electrolyte
may escape from the mirror housing if the
mirror glass breaks.
Electrolyte has an irritating effect. Do not al-
low the liquid to come into contact with
eyes, skin, clothing, or respiratory system.
In case it does, immediately flush affected
area with water, and seek medical help if
necessary.
Warning!
G
Exercise care when using the passenger
side exterior rear view mirror. The mirror
surface is convex (outwardly curved surface
for a wider field of view). Objects in mirror
are closer than they appear. Check your in-
side rear view mirror or glance over your
shoulder before changing lanes.!Electrolyte drops coming into contact
with the vehicle paint finish can be
completely removed only while in the
liquid state by applying plenty of water.
Page 155 of 384
155 Controls in detail
Good visibility
Sun visors
The sun visors protect you from sun glare
while driving.�
Swing sun visors down when you expe-
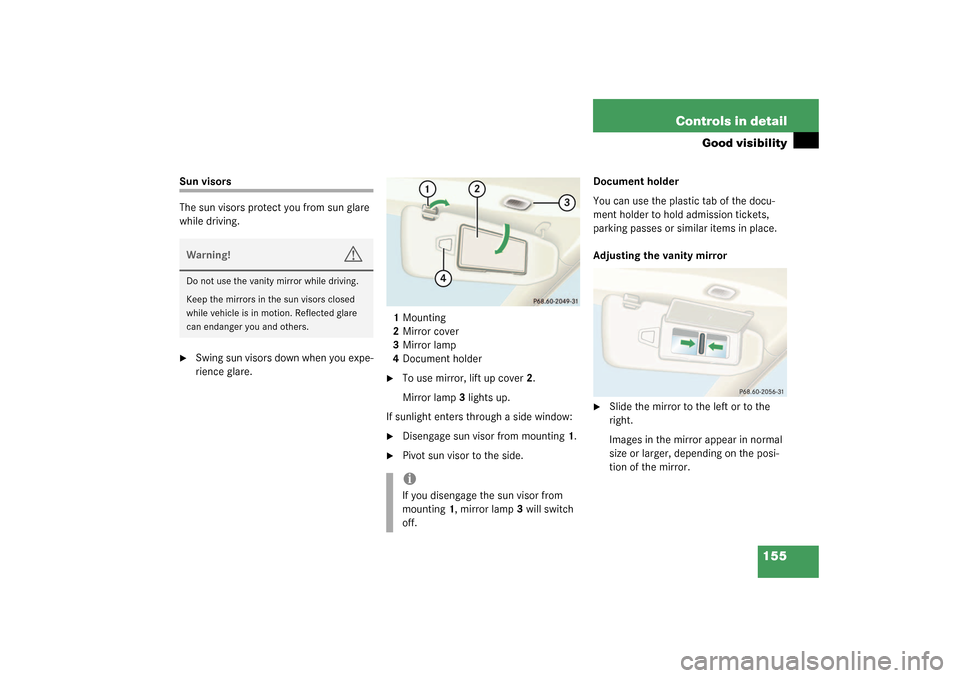
rience glare.1Mounting
2Mirror cover
3Mirror lamp
4Document holder
�
To use mirror, lift up cover2.
Mirror lamp3 lights up.
If sunlight enters through a side window:
�
Disengage sun visor from mounting1.
�
Pivot sun visor to the side.Document holder
You can use the plastic tab of the docu-
ment holder to hold admission tickets,
parking passes or similar items in place.
Adjusting the vanity mirror
�
Slide the mirror to the left or to the
right.
Images in the mirror appear in normal
size or larger, depending on the posi-
tion of the mirror.
Warning!
G
Do not use the vanity mirror while driving.
Keep the mirrors in the sun visors closed
while vehicle is in motion. Reflected glare
can endanger you and others.
iIf you disengage the sun visor from
mounting1, mirror lamp3 will switch
off.
Page 156 of 384
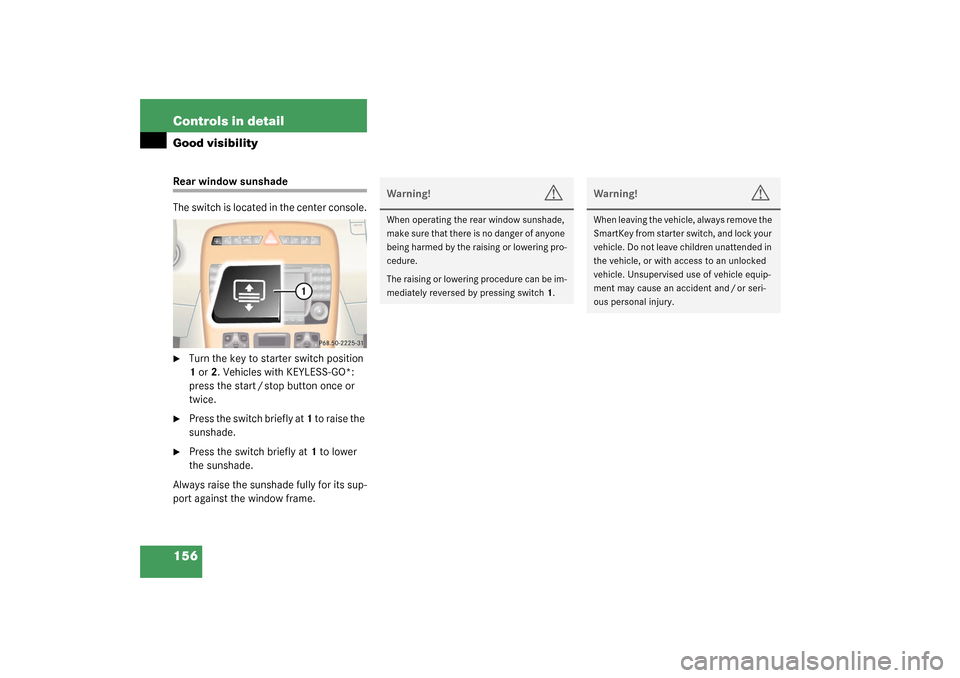
156 Controls in detailGood visibilityRear window sunshade
The switch is located in the center console.�
Turn the key to starter switch position
1 or 2. Vehicles with KEYLESS-GO*:
press the start / stop button once or
twice.
�
Press the switch briefly at 1 to raise the
sunshade.
�
Press the switch briefly at 1 to lower
the sunshade.
Always raise the sunshade fully for its sup-
port against the window frame.
Warning!
G
When operating the rear window sunshade,
ma ke s ur e th at t h ere is no dan ge r o f an y on e
being harmed by the raising or lowering pro-
cedure.
The raising or lowering procedure can be im-
mediately reversed by pressing switch1.
Warning!
G
When leaving the vehicle, always remove the
SmartKey from starter switch, and lock your
vehicle. Do not leave children unattended in
the vehicle, or with access to an unlocked
vehicle. Unsupervised use of vehicle equip-
ment may cause an accident and / or seri-
ous personal injury.
Page 159 of 384

159 Controls in detail
Automatic climate control
Automatic climate control panel
The automatic climate control is operation-
al whenever the engine is running. You can
operate the climate control system in ei-
ther the automatic or manual mode. The
system cools or heats the interior depend-
ing on the selected interior temperature
and the current outside temperature.
Nearly all dust particles, pollutants and
odors are filtered out before outside air en-
ters the passenger compartment through
the air distribution system.
The air conditioning will not engage (no
cooling) if the AC
OFF
mode is selected
(
�page 166).
Item
1
Windshield defroster
2
Rear window defroster
3
Display
4
Residual engine heat utilization
5
Automatic climate control on / off
6
Air distribution, right
7
AC cooling on / off
8
Temperature control, right
9
Air volume (automatic, manual)
10
Temperature control, left
11
Air recirculation
12
Air distribution, left
13
Activated charcoal filter
Warning!
G
Follow the recommended settings for heat-
ing and cooling given on the following pag-
es. Otherwise the windows could fog up,
impairing visibility and endangering you and
others.
Page 160 of 384

10for the left side or8 for the right side to
separately adjust the air temperature on")
160 Controls in detailAutomatic climate control
Setting the temperature
Use temperature controls (
�page 159)
10for the left side or8 for the right side to
separately adjust the air temperature on
each side of the passenger compartment.
You should raise or lower the temperature
setting in small increments, preferably
starting at 72°F (22°C).
Increasing / decreasing
�
Press button 10 or 8 repeatedly up or
down until the display shows the de-
sired temperature.
The automatic climate control system
will accordingly adjust the interior air
temperature.Adjusting the temperature for center
air vents
When outside temperatures are low, you
can manually raise the air temperature for
the center and side air vents. The
thumbwheel4 is located between the cen-
ter air vents (
�page 157).
Automatic temperature control
�
Turn thumbwheel 4 to A.
The indicator lamp above the thumb-
wheel lights up. The temperature is au-
tomatically adjusted to the set value.
Turning on warm air
�
Turn thumbwheel4 in the direction of
the white marking.
Warm air will enter from the center air
vent.
iThe current climate control settings
(ON / OFF, temperature, air volume, ac-
tivated charcoal filter, etc.) are stored
for each electronic key before it is re-
moved from the starter switch or when
the vehicle is locked using the
KEYLESS-GO* card (
�page 105).
If the vehicle interior is hot, ventilate
the interior before driving off.
Keep the air intake grille in front of the
windshield free of snow, leaves, sticks
and any other debris.
Do not obstruct air volume by placing
objects on the air volume-through ex-
haust slots below the rear window.
iWhen operating the climate control
system in automatic mode, you will
only rarely need to adjust the tempera-
ture, air volume and air distribution.
Page 161 of 384

161 Controls in detail
Automatic climate control
Turning on cooler air�
Turn thumbwheel4 in the direction of
the blue marking.
Cooler air will enter from the center air
vent.
Adjusting air distribution
Use the air distribution controls12 and6
(�page 159) to separately adjust the air
distribution on each side of the passenger
compartment. The following symbols are
found on the controls:Adjusting manually
�
Press button
U
.
The button emerges and the
h
,
V
, j
and
k
symbols become
visible.
�
Turn the marking on the regulator to
the desired symbol.
The air will be directed to the vents cor-
responding to this symbol.
Adjusting automatically
�
Press button
U
until it clicks in.
The
h
, V
, j
and
k
sym-
bols are no longer visible. The air distri-
bution is adjusted automatically.Windows fogged on the inside
�
Press button AC
OFF
t o s w i t c h o n t h e a i r
conditioning (
�page 159).
The indicator lamp in the button goes
out.
�
Press button
,
to switch off the air
recirculation (
�page 159).
The indicator lamp on the button goes
out.
�
Adjust left and right air vents1 and6
upwards (
�page 157).
�
Set blower to the maximum speed.
�
Increase temperature setting.
�
Open the side air vents9 and direct
them onto the side windows
(�page 157).
Symbol
Function
h
Directs air through the cen-
ter air vents
j
Directs air to the windows
V
Directs air into the entire
vehicle interior
k
Directs air to the footwells