Page 88 of 384

88 Controls in detailLocking and unlocking
Opening the trunk lid from the inside
You can open the trunk from the inside if
the vehicle is stationary.
A minimum height clearance of 6.1 ft
(1.90 m) is required to open the trunk lid.
The switch is located on the driver’s door.
1Indicator lamp
2Remote trunk lid release switch
�
Pull remote trunk lid release switch2.
The trunk opens. The indicator lamp1
comes on. It remains lit until you close
the trunk again.
The trunk can also be opened from the in-
side in an emergency, see “Trunk lid emer-
gency release” (
�page 89).
iIf the vehicle has previously been
locked from the outside with the
SmartKey, opening a door from the in-
side will trigger the anti-theft alarm sys-
tem.
To cancel the alarm, do one of the fol-
lowing:�
Press button
Œ
or
‹
on the
SmartKey.
�
Insert the SmartKey in the starter
switch.
iIf you open a door, the side windows on
that side of the vehicle will lower slight-
ly. The windows close again when you
close the door.
!The trunk lid swings open automatical-
ly. Always make sure that there is suffi-
cient overhead clearance.
Page 89 of 384

89 Controls in detail
Locking and unlocking
Opening the trunk lid from the outside
The trunk lid lock is located in the rear li-
cense plate recess.
A minimum height clearance of 6.1 ft
(1.90 m) is required to open the trunk lid.�
Press trunk lid lock1.
The trunk lid swings open. Always make
sure that there is sufficient overhead clear-
ance.The trunk can also be opened from the in-
side of the trunk in an emergency, see
“Trunk lid emergency release”
(
�page 89).
Trunk lid emergency release
The emergency release button is located in
the trunk lid.
Illumination of the emergency release but-
ton:�
The button will blink for 30 minutes af-
ter opening the trunk.
�
The button will blink for 60 minutes af-
ter closing the trunk.
�
Briefly press the emergency release
button.
The trunk unlocks and the trunk lid
opens.
iThe vehicle must be unlocked.
!The emergency release button does
not open the trunk lid if the vehicle bat-
tery is discharged or disconnected.iIf the emergency release button is
pressed and the vehicle was centrally
locked, the exterior lamps will flash and
the alarm will sound as the trunk lid
opens.
To cancel the alarm, insert the key in
the starter switch or press button
Œ
or
‹
on the key.
Page 91 of 384

91 Controls in detail
Locking and unlocking
�
Pull the mechanical key out of the
SmartKey (
�page 297).
�
Insert the mechanical key into the
trunk lid lock.
�
Turn the key completely to the right to
position 1.
The trunk remains locked even when the
vehicle is centrally unlocked.
Separately unlocking the trunk�
Turn the key completely to the left to
position 2.
You can now open the trunk.
Trunk lid opening / closing system*
You can open or close the trunk lid from
the inside if the vehicle is stationary.
A minimum height clearance of 6.1 ft
(1.90 m) is required to open the trunk lid.
Opening from the inside
1Indicator lamp
2Remote trunk lid switch�
Pull remote trunk lid switch2.
The trunk opens. The indicator lamp1
comes on. It remains lit until you close
the trunk again.If the trunk lid does not open, it is still
locked separately (
�page 91).
The trunk can also be opened from the in-
side in an emergency, see “Trunk lid emer-
gency release” (
�page 89).
You can stop the opening procedure as fol-
lows:
�
Press the remote trunk lid switch2.
The trunk lid stops moving.
iYou can only cancel the separate trunk
locking mode by means of the mechan-
ical key.
!The trunk lid swings open automatical-
ly. Always make sure that there is suffi-
cient overhead clearance.iThe vehicle must be unlocked.
Page 93 of 384

93 Controls in detail
Locking and unlocking
Closing and locking the trunk lid with
KEYLESS-GO*
On vehicles with trunk lid opening/closing
system and KEYLESS-GO, you can close
the trunk lid and lock the vehicle simulta-
neously.
1Trunk lid closing switch
2KEYLESS-GO switch�
Make sure that you have the SmartKey
and the KEYLESS-GO card with you.
�
Press switch2 in the trunk lid.
The trunk lid closes automatically and
the vehicle is locked. The turn signals
flash three times to confirm locking.Limiting opening height of trunk lid
The trunk lid opening height can be limited
when transporting goods on a roof rack (e.g. presence of an MB sport luggage con-
tainer). When activated, the trunk lid opens
to approximately the height of the roof
edge.
�
With the trunk lid closed, press the re-
mote trunk lid switch and hold for at
least five seconds (
�page 91).
Depending on its previous status, the
opening height restriction is then
switched on or off.
iTo prevent a possible inadvertent lock-
out, the trunk lid will open automatical-
ly if a KEYLESS-GO card is recognized
in the area of the rear shelf or inside
the trunk. Warning!
G
Monitor the closing procedure carefully to
ensure that no one is in danger of being in-
jured. To prevent possible personal injury,
always keep hands and fingers away from
the trunk opening when closing the trunk.
Be especially careful when small children
are around. To stop the closing procedure,
press the trunk lid closing switch1 in the
trunk lid, the
Š
button on the SmartKey
or the remote trunk lid switch (on driver's
door control panel).
iIf the trunk lid comes into contact with
an object while closing (e.g. luggage
that has been piled too high), the clos-
ing procedure is stopped and the trunk
re-opens slightly.
The closing procedure can be stopped
at anytime by once again pressing the
trunk lid closing switch in the trunk lid
or the remote control switch in the driv-
er’s door or the
Š
button on the
SmartKey.
Page 99 of 384

99 Controls in detail
Seats
Multicontour seat*
The multicontour seat has a movable seat
cushion and inflatable air cushions built
into the seat backrest to provide additional
lumbar and side support.
The seat cushion movement, seat backrest
cushion height and curvature can be con-
tinuously varied with regulators on the
right side of the seat after turning the
SmartKey in the starter switch to
position2 or pressing the KEYLESS-GO*
start / stop button twice.1Shoulder region support
2Side bolster adjustment
3Massage function (PULSE)
4Lumbar region support
Adjusting the multicontour seat in the or-
der listed above is recommended.
�
Make sure the ignition is switched on.
All lamps in the instrument cluster light
up.
Shoulder region support
�
Press
æ
or
ç
on switch1.
The air cushion inflates or deflates.Lumbar region support
�
Press
k
or
j
on rocker
switch4.
This selects the air cushion you wish to
adjust.
�
Press
æ
or
ç
on rocker
switch4.
The air cushion inflates or deflates.
Side bolsters adjustment
�
Adjust the side bolsters so that they
provide good lateral support using
switch 2.iWhen the engine is turned off, the last
cushion setting is retained in memory,
and the cushion is automatically ad-
justed to this setting when the engine
is restarted.
Page 105 of 384
105 Controls in detail
Memory function
Memory function
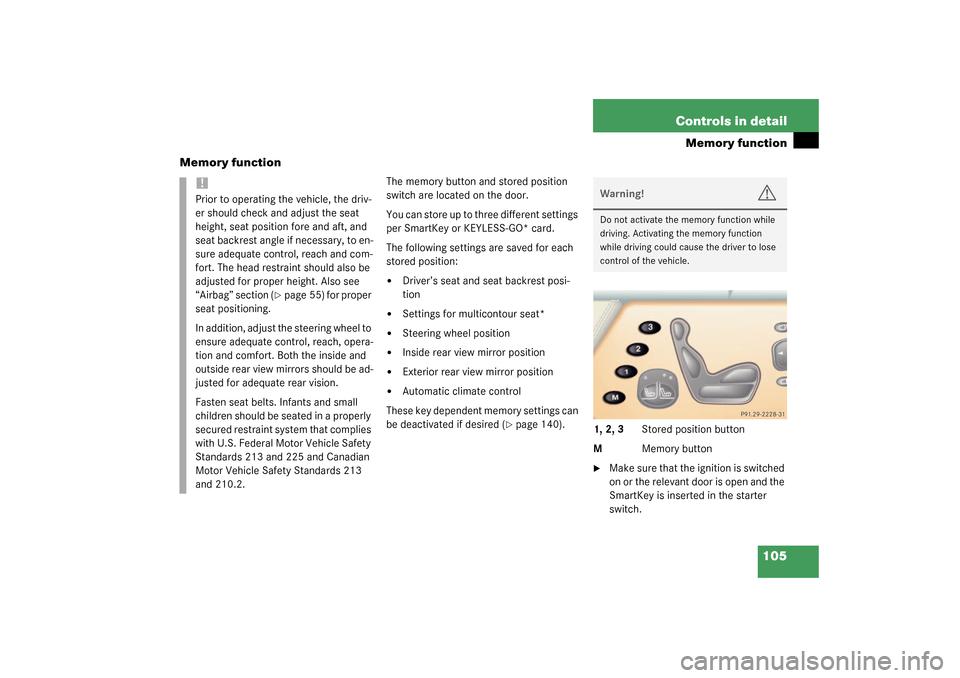
The memory button and stored position
switch are located on the door.
You can store up to three different settings
per SmartKey or KEYLESS-GO* card.
The following settings are saved for each
stored position:�
Driver’s seat and seat backrest posi-
tion
�
Settings for multicontour seat*
�
Steering wheel position
�
Inside rear view mirror position
�
Exterior rear view mirror position
�
Automatic climate control
These key dependent memory settings can
be deactivated if desired (
�page 140).
1, 2, 3 Stored position button
MMemory button
�
Make sure that the ignition is switched
on or the relevant door is open and the
SmartKey is inserted in the starter
switch.
!Prior to operating the vehicle, the driv-
er should check and adjust the seat
height, seat position fore and aft, and
seat backrest angle if necessary, to en-
sure adequate control, reach and com-
fort. The head restraint should also be
adjusted for proper height. Also see
“Airbag” section (
�page 55) for proper
seat positioning.
In addition, adjust the steering wheel to
ensure adequate control, reach, opera-
tion and comfort. Both the inside and
outside rear view mirrors should be ad-
justed for adequate rear vision.
Fasten seat belts. Infants and small
children should be seated in a properly
secured restraint system that complies
with U.S. Federal Motor Vehicle Safety
Standards 213 and 225 and Canadian
Motor Vehicle Safety Standards 213
and 210.2.
Warning!
G
Do not activate the memory function while
driving. Activating the memory function
while driving could cause the driver to lose
control of the vehicle.
Page 190 of 384
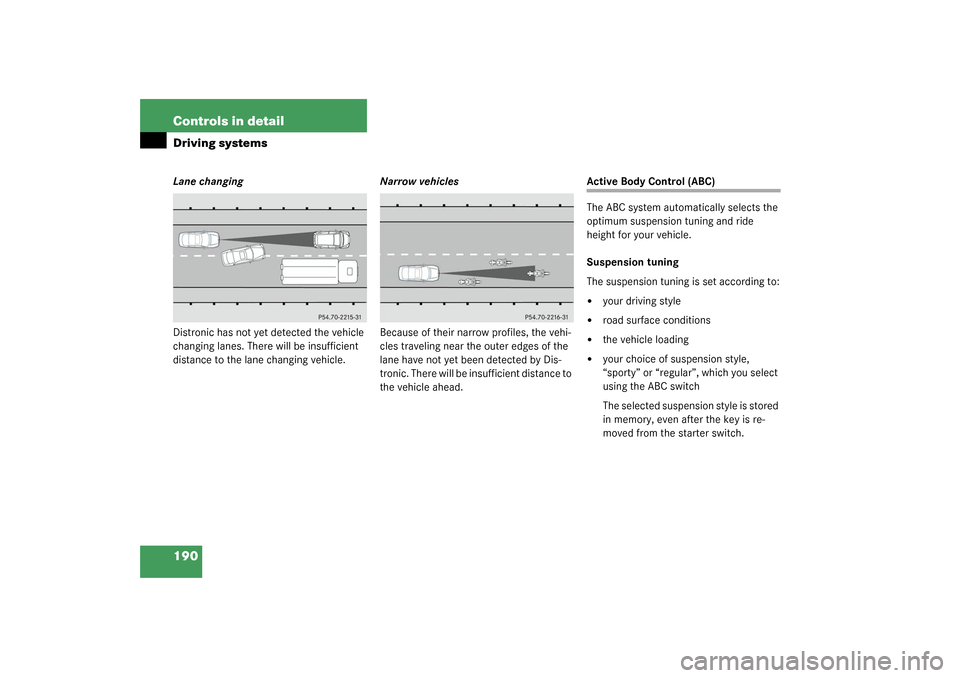
190 Controls in detailDriving systemsLane changing
Distronic has not yet detected the vehicle
changing lanes. There will be insufficient
distance to the lane changing vehicle.Narrow vehicles
Because of their narrow profiles, the vehi-
cles traveling near the outer edges of the
lane have not yet been detected by Dis-
tronic. There will be insufficient distance to
the vehicle ahead.
Active Body Control (ABC)
The ABC system automatically selects the
optimum suspension tuning and ride
height for your vehicle.
Suspension tuning
The suspension tuning is set according to:�
your driving style
�
road surface conditions
�
the vehicle loading
�
your choice of suspension style,
“sporty” or “regular”, which you select
using the ABC switch
The selected suspension style is stored
in memory, even after the key is re-
moved from the starter switch.
Page 191 of 384

191 Controls in detail
Driving systems
1ABC switch
2Indicator lamp�
Start the engine.
Suspension for sporty driving
The setting for sporty driving is selected
when indicator lamp2 is illuminated.
�
Press ABC switch1 to change from
regular suspension to sporty driving
suspension.
Indicator lamp2 comes on.Suspension for regular driving
The setting for regular driving is selected
when indicator lamp2 is off.
�
Press ABC switch1 to change from
sporty driving suspension to regular
suspension.
Indicator lamp2 goes out.
Vehicle level control
Your vehicle automatically adjusts its ride
height to
�
reduce fuel consumption
�
increase vehicle safety
The vehicle chassis ride height is raised or
lowered according to the selected level
setting and to the vehicle speed:
�
W ith incre as ing s pee d, rid e hei ght i s re -
duced by up to a maximum of
0.95 inches (24 mm).
�
With decreasing speed, the ride height
is again raised to the selected vehicle
level.Select the level 1 and 2 settings only when
required by current driving conditions.
Otherwise
�
fuel consumption may increase
�
handling may be impairediThese height adjustments are so small
that you may not notice any change.Warning!
G
To help avoid personal injury, keep hands
and feet away from wheel housing area, and
stay away from under the vehicle when low-
ering the vehicle chassis.