Page 304 of 384

304 Practical hintsReplacing bulbsReplacing bulbs for front lamps
1Housing cover for high beam flasher
bulb, parking and standing lamp2Electrical connector for high beam
flasher housing bulb
3Parking and standing lamp
4Bulb socket for turn signal lamp
5Low beam and high beam (Bi-Xenon)
housing cover
High beam flasher bulb
�
Switch off the lights.
�
Open the hood (
�page 237).
�
Press ends of housing cover1 tab to-
gether and remove cover.
�
Press connector2 downward.
�
Remove connector2 with the bulb.
�
Insert the new bulb so that the base lo-
cates in the recess on the holder.
�
From below, press connector2 with
bulb upward onto the reflector.
�
Align housing cover1 and click into
place.
Front turn signal bulb
�
Switch off the lights.
�
Open the hood (
�page 237).
�
Twist bulb socket4 counterclockwise
and pull out.
�
Push bulb into socket, turn counter-
clockwise and remove.
�
Insert new bulb in socket, push in and
twist clockwise.
�
Reinsert bulb socket in lamp and twist
clockwise.
Warning!
G
Do not remove the cover for the Bi-Xenon
headlamp. Because of high voltage in xenon
lamps, it is dangerous to replace the bulb or
repair the lamp and its components. We rec-
ommend that you have such work done by a
qualified technician at an authorized Mer-
cedes-Benz Center.
Page 305 of 384
.
�
Press ends of housing cover1 tab to-
gether and remove cover.
�
Pull out the")
305 Practical hints
Replacing bulbs
Parking and standing lamp bulb�
Switch off the lights.
�
Open the hood (
�page 237).
�
Press ends of housing cover1 tab to-
gether and remove cover.
�
Pull out the bulb socket with the bulb.
�
Pull the bulb out of the bulb socket.
�
Insert a new bulb in the socket.
�
Reinstall the bulb socket.
�
Align housing cover and click into
place.Side marker lamp bulb
�
Switch off the lights.
�
Carefully slide lamp towards rear.
�
Remove front end first.
�
Twist bulb socket counterclockwise
and pull out.
�
Pull bulb out of the bulb socket.
�
Insert new bulb in socket.
�
Reinstall bulb socket, push in and twist
clockwise.
�
To reinstall lamp, set rear end in
bumper and let front end snap into
place.
Replacing bulbs for rear lamps
Tail lamp assemblies
1Backup lamp (black socket)
2Turn signal lamp (white socket)
3Tail, standing and parking lamp (red
socket)
4Driver’s side: tail, parking and rear fog
lamp
Passenger’s side: tail and parking lamp
(red socket)
Page 306 of 384
306 Practical hintsReplacing bulbs�
Switch off the lights.
�
Open trunk.
�
Turn lock counterclockwise and move
the trim to the side.
�
Turn bulb socket counterclockwise and
pull out.
�
Gently twist bulb counterclockwise and
pull out of bulb holder.
�
Insert new bulb into the holder and turn
it clockwise.
�
Reinstall bulb socket.
The bulb socket should audibly click.
�
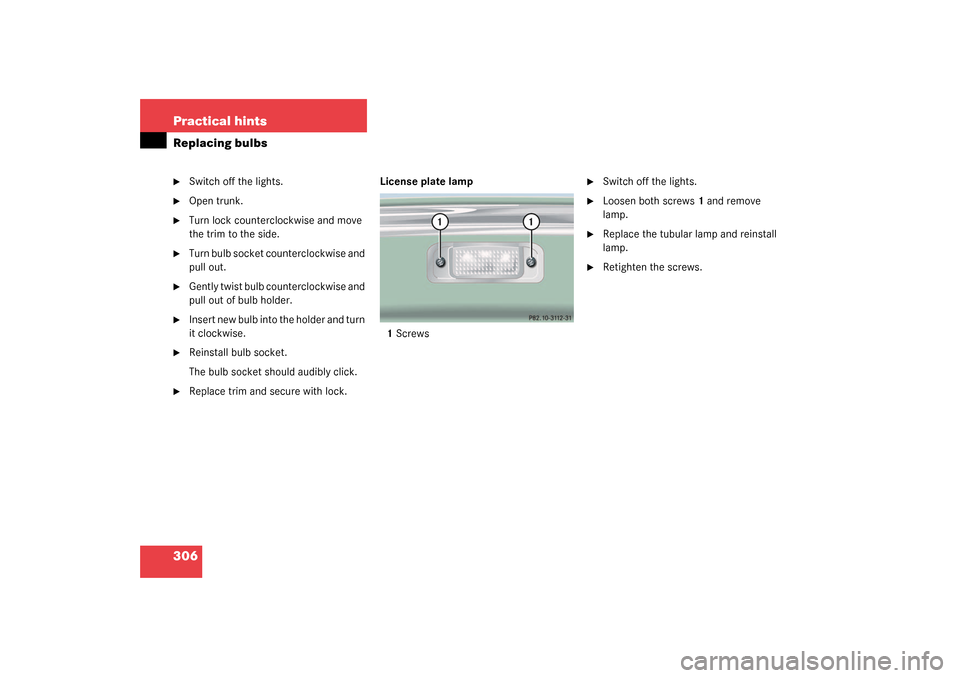
Replace trim and secure with lock. License plate lamp
1Screws
�
Switch off the lights.
�
Loosen both screws1 and remove
lamp.
�
Replace the tubular lamp and reinstall
lamp.
�
Retighten the screws.
Page 317 of 384
.
�
Make sure that the two vehicles do not
touch.
�
Turn off all electric")
317 Practical hints
Jump starting
The battery is located on the right side of
the trunk under the battery cover
(�page 313).
�
Make sure that the two vehicles do not
touch.
�
Turn off all electrical consumers.
�
Apply parking brake.
�
Shift gear selector lever to positionP.
�
Open the trunk lid.
�
Remove battery cover.
�
Connect positive terminals 1 and3 of
the batteries with the jumper cable.
Clamp cable to charged battery3 first.1Positive terminal of discharged battery
2Negative terminal of discharged bat-
tery
3Positive terminal of charged battery
4Negative terminal of charged battery
�
Start engine of the vehicle with the
charged battery and run at idle speed.
�
Connect negative terminals 2 and4 of
the batteries with the jumper cable.
Clamp cable to charged battery4 first.
�
Start the engine of the disabled vehi-
cle.
You can now turn on the electrical con-
sumers. Do not turn on the lights under
any circumstances.
�
Remove the jumper cables first from
negative terminals2 and4 and then
from positive terminals1 and3.
You can now turn on the lights.
�
Have the battery checked at the near-
est authorized Mercedes-Benz Center.
Warning!
G
Keep flames or sparks away from battery.
Do not smoke.
Observe all safety instructions and precau-
tions when handling automotive batteries
(�page 243).
!Never invert the terminal connections.
!Do not tow-start the vehicle.
Page 347 of 384

Active, computer-controlled system
that hydraulically adjusts the suspen-
sion at all four wheels in response to
various driving situations.
ABS
(A
n")
347 Technical terms
ABC
(A
ctive B
ody C
ontrol)
Active, computer-controlled system
that hydraulically adjusts the suspen-
sion at all four wheels in response to
various driving situations.
ABS
(A
ntilock B
rake S
ystem)
Prevents the wheels from locking up
during braking so that the vehicle can
continue to be steered.
Alignment bolt
Metal pin with thread. The centering
pin is an aid used when changing a tire
to align the wheel with the wheel hub.BabySmart
TM
airbag deactivation
system
This system detects if a special system
compatible child restraint seat is in-
stalled on the front passenger seat. The
system will automatically deactivate
the passenger front airbag when such a
seat is properly installed (PASSENGER
AIRBAG OFF indicator lamp in the cen-
ter console lights up). See your autho-
rized Mercedes-Benz Center for
availability.
BabySmart
TM
compatible child seats
Special restraint system for children.
The sensor system for the passenger
seat prevents deployment of the pas-
senger side airbag if a BabySmart
TM
compatible child seat is installed.
BAS
(B
rake A
ssist S
ystem)
System for potentially reducing braking
distances in emergency braking situa-
tions. The system is activated when it
senses an emergency based on how
fast the brake is applied.Bi-Xenon headlamps
Headlamps which use an electric arc as
the light source and produce a more in-
tense light than filament headlamps.
Bi-Xenon headlamps produce low
beam and high beam.
CAC
(C
ustomer A
ssistance C
enter)
Mercedes-Benz customer service cen-
ter, which can help you with any ques-
tions about your vehicle and provide
assistance in the event of a break-
down.
CAN system
(C
ontroller A
rea N
etwork)
Data bus network serving to control ve-
hicle functions such as door locking or
windshield wiping.
Cockpit
All instruments, switches, buttons and
indicator/warning lamps in the passen-
ger compartment needed for vehicle
operation and monitoring.