Page 197 of 384
197 Controls in detail
Loading
Loading
Roof rack* Preparing roof rack installation
�
Open trim at the trim strips in the roof.
�
Secure the roof rack according to man-
ufacturer’s instructions for installation.
Loading instructions
The total load weight including vehicle oc-
cupants and luggage/cargo should not ex-
ceed the vehicle capacity weight indicated
on the certification tag which can be found
on the left door pillar.
Warning!
G
Use only roof racks approved by
Mercedes-Benz for your vehicle model to
avoid damage to the vehicle. Follow manu-
facturer’s installation instructions.
!Load the roof rack in such a way that
the vehicle cannot be damaged while
driving.
Make sure that�
you can fully raise the sliding /
pop-up roof
�
you can fully open the trunk
Page 198 of 384
198 Controls in detailLoading
Cargo tie-down hooks
Six hooks are located in the trunk.�
Carefully secure cargo by applying
even load on all hooks with rope of suf-
ficient strength to hold down the cargo.
Warning!
G
Always fasten items being carried as secure-
ly as possible.
In an accident, during hard braking or sud-
den maneuvers, loose items will be thrown
around inside the vehicle and can cause in-
jury to vehicle occupants unless the items
are securely fastened in the vehicle.
To help avoid personal injury during a colli-
sion or sudden maneuver, exercise care
when transporting cargo. Put luggage or car-
go in the trunk if possible. Do not pile lug-
gage or cargo higher than the seat backs.
Do not place anything on the rear-window
shelf.
Never drive vehicle with trunk open. Deadly
carbon monoxide (CO) gases may enter ve-
hicle interior resulting in unconsciousness
and death.
Page 199 of 384
199 Controls in detail
Useful features
Useful features
Interior storage spaces Glove box
1Unlocked position
2Locked position
3Glove box lid releaseOpening the glove box
�
Press button3.
The glove box lid opens downward.
Closing the glove box
�
Push lid up to close.
Warning!
G
To help avoid personal injury during a colli-
sion or sudden maneuver, exercise care
when stowing objects in the vehicle. Put lug-
g a g e o r c a r g o i n t h e t r u n k i f p o s s i b l e . D o n o t
pile luggage or cargo higher than the seat
backs.
Luggage nets cannot secure hard or heavy
objects.
Keep compartment lids closed. This will help
to prevent stored objects from being thrown
about and injuring vehicle occupants during
an accident.
iThe glove box can be locked and un-
locked with the mechanical key.
Page 202 of 384
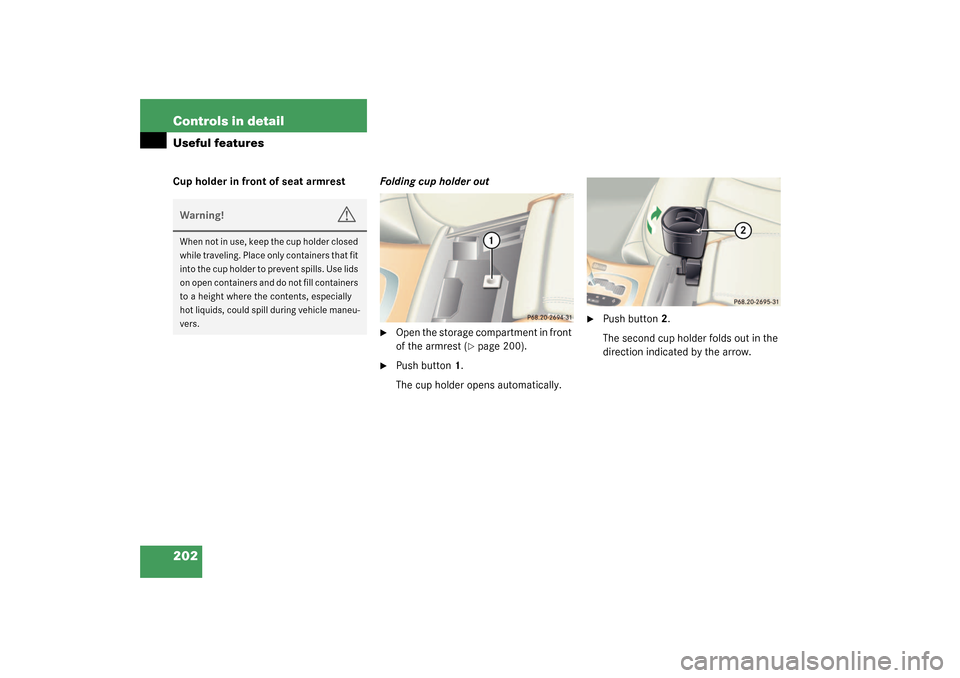
202 Controls in detailUseful featuresCup holder in front of seat armrestFolding cup holder out
�
Open the storage compartment in front
of the armrest (
�page 200).
�
Push button1.
The cup holder opens automatically.
�
Push button2.
The second cup holder folds out in the
direction indicated by the arrow.
Warning!
G
When not in use, keep the cup holder closed
while traveling. Place only containers that fit
into the cup holder to prevent spills. Use lids
on open containers and do not fill containers
to a height where the contents, especially
hot liquids, could spill during vehicle maneu-
vers.
Page 203 of 384
203 Controls in detail
Useful features
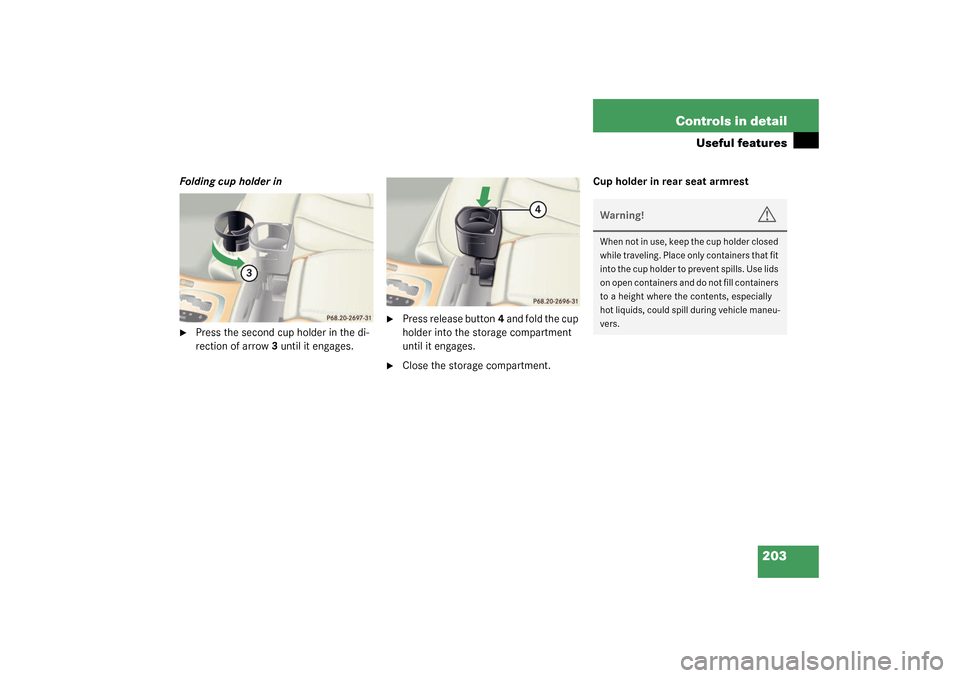
Folding cup holder in�
Press the second cup holder in the di-
rection of arrow3 until it engages.
�
Press release button4 and fold the cup
holder into the storage compartment
until it engages.
�
Close the storage compartment.Cup holder in rear seat armrest
Warning!
G
When not in use, keep the cup holder closed
while traveling. Place only containers that fit
into the cup holder to prevent spills. Use lids
on open containers and do not fill containers
to a height where the contents, especially
hot liquids, could spill during vehicle maneu-
vers.
Page 205 of 384
 up and out of the recep-
tacle and place it in a storage compart-
ment.
�
Install")
205 Controls in detail
Useful features
Removing the auxiliary cup holder�
Pull the auxiliary cup holder3
(�page 204) up and out of the recep-
tacle and place it in a storage compart-
ment.
�
Install cover1 (
�page 204) on the
opening. Press cover down until it
snaps in place.Parcel net in front passenger footwell
A small convenience parcel net is located
in the front passenger footwell. It is for
small and light items, such as road maps,
mail, etc.
Warning!
G
When not in use, remove the auxiliary cup
holder. Place only containers that fit into the
auxiliary cup holder to prevent spills. Use
lids on open containers and do not fill con-
tainers to a height where the contents, es-
pecially hot liquids, could spill during vehicle
maneuvers.iWhen you move the seat forward, the
auxiliary cup holder turns to the side.
When you move the seat back, turn the
auxiliary cup holder back until it stops
in its original position.
Warning!
G
Do not place heavy or fragile objects, or ob-
jects having sharp edges, in the parcel net.
In an accident, during hard braking or sud-
den maneuvers, they could be thrown
around inside the vehicle and cause injury to
vehicle occupants.
Page 206 of 384
.�
Hang the parc")
206 Controls in detailUseful featuresParcel net in trunk
You can hang a parcel net in the trunk. The
hooks and the parcel net in the trunk can
hold a load of up to 29.8 lbs (13.5 kg).�
Hang the parcel net on hooks1 on the
left and right sides of the trunk.
Ashtrays
Center console ashtray
Opening ashtray�
Briefly touch cover plate.
The ashtray opens automatically.Removing ashtray insert
�
Prevent vehicle from moving by setting
the parking brake. Move the selector
lever to positionN.
Now you have more room to remove
the insert.
�
Push sliding button1 to the right.
The ashtray is disengaged and slides
out a short way out.
�
Remove insert from ashtray frame.
Reinstalling the ashtray insert
�
Install insert by pushing back into
frame until it engages again.
!The parcel net cannot protect or suffi-
ciently secure goods in the event of an
accident.
Warning!
G
Remove front ashtray only with vehicle
standing still. Set the parking brake to se-
cure vehicle from movement. Move gear se-
lector lever to positionN. With gear selector
lever in positionN, turn off the engine.
Page 207 of 384

207 Controls in detail
Useful features
Rear seat ashtray
Opening ashtray�
Pull at top of cover to open ashtray.
Removing ashtray insert
�
Press latch1 to disengage ashtray in-
sert and remove it.
Reinstalling the ashtray insert
�
Install ashtray insert.
�
Close the ashtray.
Cigarette lighter
1Cigarette lighter�
Make sure the ignition is switched on.
All the lamps in the instrument cluster
should light up.
�
Push in cigarette lighter1.
The lighter will pop out automatically
when hot.
Warning!
G
Never touch the heating element or sides of
the lighter; they are extremely hot. Hold the
knob only.
When leaving the vehicle, always remove the
key from the starter switch, take the
KEYLESS-GO* card with you and lock the ve-
hicle. Do not leave children unattended in
the vehicle, or with access to an unlocked
vehicle. Unsupervised use of vehicle equip-
ment may cause an accident and / or seri-
ous personal injury.iThe lighter socket can be used to ac-
commodate electrical accessories up
to a maximum 85 W.