Page 150 of 384

150 Controls in detailAutomatic transmissionUpshifting�
Press the button located on the right
side of the steering wheel.
or
�
Briefly press the selector lever to the
right in the D+direction.
The transmission shifts to the next
higher gear.
Warm up the engine smoothly. Do not
place full load on the engine until the oper-
ating temperature has been reached. Shift
into reverse gear only when the vehicle is
stopped.Downshifting
�
Press the button located on the left
side of the steering wheel.
or
�
Briefly press the selector lever to the
right in the D-direction.
The transmission shifts to the next low-
er gear.
Warm up the engine smoothly. Do not
place full load on the engine until the oper-
ating temperature has been reached. Shift
into reverse gear only when the vehicle is
stopped.Deactivating steering wheel gearshift
control
�
Press the program mode selector
switch repeatedly until the
S or
C for au-
tomatic shift program appears in the
tachometer display.
Automatic gear shifting is activated.
!Avoid spinning of a drive wheel for an
extended period when driving off on
slippery surface. This may cause seri-
ous damage to the drivetrain which is
not covered by the Mercedes-Benz
Limited Warranty.
Warning!
G
On slippery road surfaces, never downshift
in order to obtain braking action. This could
result in drive wheel slip and reduced vehi-
cle control. Your vehicle’s ABS will not pre-
vent this type of loss of control.
iAt each engine start, the transmission
will go into the last automatic shift pro-
gram mode selected (S or C). Program
modeM is not stored and will not be re-
called when engine is restarted.
Page 151 of 384
 and for setting the rear view
mirrors (
�page 38) is found in the “Get-
ting started” secti")
151 Controls in detail
Good visibility
Good visibility
Information on the windshield wipers
(�page 47) and for setting the rear view
mirrors (
�page 38) is found in the “Get-
ting started” section.
Rear view mirror
Automatic antiglare rear view mirror
The reflection brightness of the exterior
rear view mirror on the driver’s side and
the inside rear view mirror will respond au-
tomatically to glare when�
the ignition is switched on, and
�
incoming light from headlamps falls on
the sensor in the inside rear view mir-
ror.
The rear view mirror will not react if
�
reverse gear is engaged
�
the interior lighting is turned on
Warning!
G
The automatic antiglare function does not
react if incoming light is not aimed directly
at sensors in the inside rear view mirror.
The inside rear view mirror and the exterior
rear view mirror on the driver’s side do not
react, for example, if the rear window sun-
shade is in raised position.
Glare can endanger you and others.Warning!
G
In the case of an accident liquid electrolyte
may escape from the mirror housing if the
mirror glass breaks.
Electrolyte has an irritating effect. Do not al-
low the liquid to come into contact with
eyes, skin, clothing, or respiratory system.
In case it does, immediately flush affected
area with water, and seek medical help if
necessary.
Warning!
G
Exercise care when using the passenger
side exterior rear view mirror. The mirror
surface is convex (outwardly curved surface
for a wider field of view). Objects in mirror
are closer than they appear. Check your in-
side rear view mirror or glance over your
shoulder before changing lanes.!Electrolyte drops coming into contact
with the vehicle paint finish can be
completely removed only while in the
liquid state by applying plenty of water.
Page 155 of 384
155 Controls in detail
Good visibility
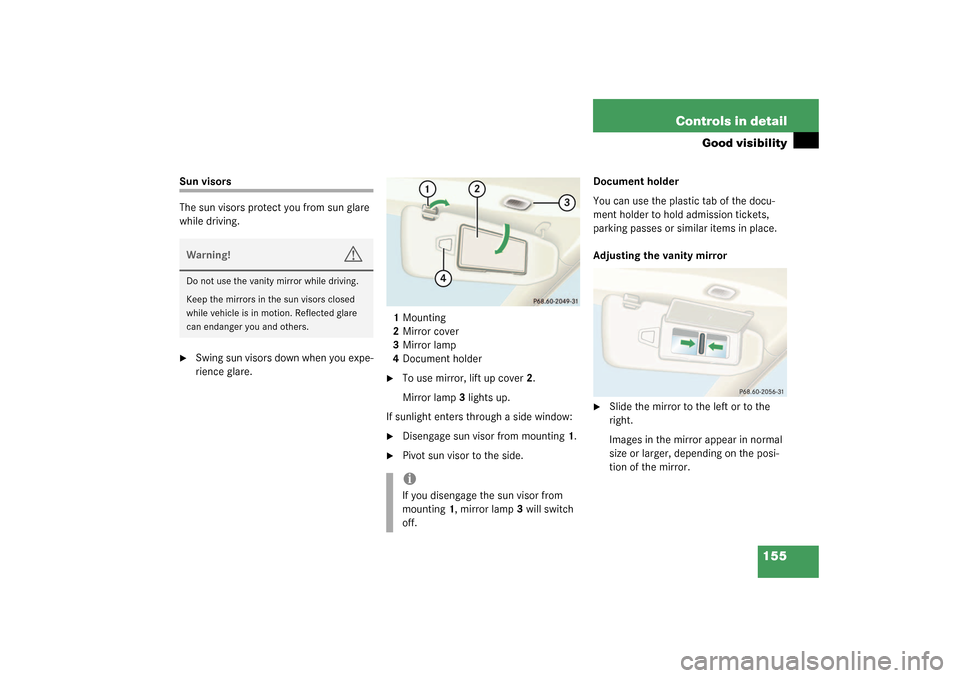
Sun visors
The sun visors protect you from sun glare
while driving.�
Swing sun visors down when you expe-
rience glare.1Mounting
2Mirror cover
3Mirror lamp
4Document holder
�
To use mirror, lift up cover2.
Mirror lamp3 lights up.
If sunlight enters through a side window:
�
Disengage sun visor from mounting1.
�
Pivot sun visor to the side.Document holder
You can use the plastic tab of the docu-
ment holder to hold admission tickets,
parking passes or similar items in place.
Adjusting the vanity mirror
�
Slide the mirror to the left or to the
right.
Images in the mirror appear in normal
size or larger, depending on the posi-
tion of the mirror.
Warning!
G
Do not use the vanity mirror while driving.
Keep the mirrors in the sun visors closed
while vehicle is in motion. Reflected glare
can endanger you and others.
iIf you disengage the sun visor from
mounting1, mirror lamp3 will switch
off.
Page 156 of 384
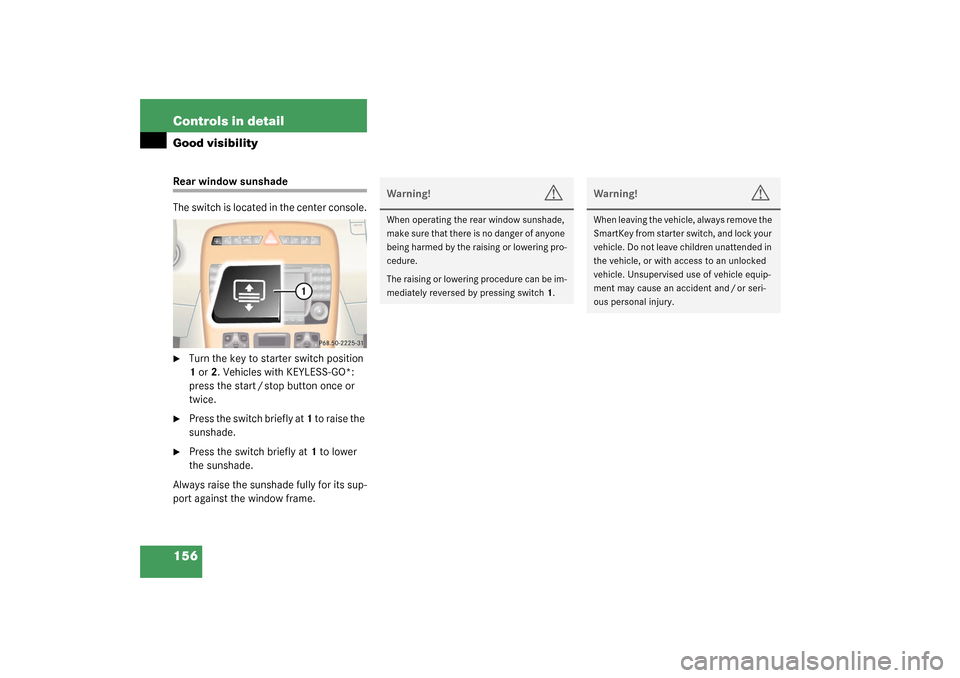
156 Controls in detailGood visibilityRear window sunshade
The switch is located in the center console.�
Turn the key to starter switch position
1 or 2. Vehicles with KEYLESS-GO*:
press the start / stop button once or
twice.
�
Press the switch briefly at 1 to raise the
sunshade.
�
Press the switch briefly at 1 to lower
the sunshade.
Always raise the sunshade fully for its sup-
port against the window frame.
Warning!
G
When operating the rear window sunshade,
ma ke s ur e th at t h ere is no dan ge r o f an y on e
being harmed by the raising or lowering pro-
cedure.
The raising or lowering procedure can be im-
mediately reversed by pressing switch1.
Warning!
G
When leaving the vehicle, always remove the
SmartKey from starter switch, and lock your
vehicle. Do not leave children unattended in
the vehicle, or with access to an unlocked
vehicle. Unsupervised use of vehicle equip-
ment may cause an accident and / or seri-
ous personal injury.
Page 158 of 384

158 Controls in detailAutomatic climate control
Item
1
Center air vent, left, adjustable
2
Fixed air vent, left
3
Air volume control for left center air
vent
4
Air temperature control for center
air vents
5
Air volume control for right center
air vent
6
Fixed air vent, right
7
Center air vent, right, adjustable
8
Side defroster vent, left and right,
fixed
9
Side air vent, left and right, adjust-
able
10
Air volume control for side air vents
11
Door air vent, left and right
12
Automatic climate control panel
Warning!
G
When operating the automatic climate con-
trol, the air that enters the passenger com-
partment through the air vents in the
footwell can be very hot or very cold (de-
pending on the set temperature). This may
cause burn or frostbite to unprotected skin
in the immediate area of the air vents. Al-
ways keep sufficient distance between un-
protected parts of the body and the footwell
air vents. If necessary, change the air flow
using the air distribution controls to direct
the air away from the footwell air vents
(�page 161).
iFor draft-free ventilation, move the slid-
ers for the center air vents to the mid-
dle position.
Page 159 of 384

159 Controls in detail
Automatic climate control
Automatic climate control panel
The automatic climate control is operation-
al whenever the engine is running. You can
operate the climate control system in ei-
ther the automatic or manual mode. The
system cools or heats the interior depend-
ing on the selected interior temperature
and the current outside temperature.
Nearly all dust particles, pollutants and
odors are filtered out before outside air en-
ters the passenger compartment through
the air distribution system.
The air conditioning will not engage (no
cooling) if the AC
OFF
mode is selected
(
�page 166).
Item
1
Windshield defroster
2
Rear window defroster
3
Display
4
Residual engine heat utilization
5
Automatic climate control on / off
6
Air distribution, right
7
AC cooling on / off
8
Temperature control, right
9
Air volume (automatic, manual)
10
Temperature control, left
11
Air recirculation
12
Air distribution, left
13
Activated charcoal filter
Warning!
G
Follow the recommended settings for heat-
ing and cooling given on the following pag-
es. Otherwise the windows could fog up,
impairing visibility and endangering you and
others.
Page 163 of 384

163 Controls in detail
Automatic climate control
Air recirculation mode
Switch to air recirculation mode to prevent
unpleasant odors from entering the vehicle
from the outside. This setting cuts off the
intake of outside air and recirculates the
air in the passenger compartment.
Activating�
Press button
,
(�page 159).
The indicator lamp on the button lights
up.
Warning!
G
When the outside temperature is below
41°F (5°C), only switch to air recirculation
mode for short periods to prevent window
fogging.iIf you keep button
,
pressed, the
side windows and the sliding / pop-up
roof will be closed.
Warning!
G
Never operate the side windows and the
sliding/pop-up roof if there is the possibility
of anyone being harmed by the closing pro-
cedure.
In the event that the procedure causes po-
tential danger, the closing of the side win-
dows can be immediately halted by
releasing the
,
button or by pressing
the respective window switch. The closing of
the sliding/pop-up roof can be immediately
halted by releasing the
,
button or by
moving the sliding/pop-up roof switch in the
overhead control panel in any direction.
iThe air recirculation mode is activated
automatically:�
at high outside temperatures
�
if the concentration of carbon mon-
oxide and nitrogen oxide in the out-
side air increases beyond a
predetermined level, for example in
a tunnel.
Please note that the charcoal filter
must be activated (
�page 164) for the
air recirculation mode to be activated
automatically.
If you have turned off the air condition-
ing (
�page 166) or the outside
temperature is below 41°F (5°C), the
air recirculation mode will not switch
on automatically.
Page 164 of 384
.
The indicator lamp on the button goes
out.
The air recirculation mode is deactivated
automatically:
�
after")
164 Controls in detailAutomatic climate controlDeactivating�
Press button
,
(�page 159).
The indicator lamp on the button goes
out.
The air recirculation mode is deactivated
automatically:
�
after five minutes if the outside temper-
ature is below approximately 41°F
(5 °C)
�
after five minutes if the air conditioning
is turned off
�
after 30 minutes if the outside temper-
ature is above approximately 41°F
(5 °C)At outside temperatures above 79°F
(26 °C) the system will not automatically
switch back to outside air. A quantity of
outside air is added after approximately
30 minutes.
Charcoal filter
An activated charcoal filter markedly re-
duces bad odors and removes pollutants
from air entering the passenger compart-
ment.
Activating�
Press button
e
(�page 159).
The indicator lamp on the button lights
up.
Deactivating
�
Press button
e
(�page 159).
The indicator lamp on the button goes
out.
iIf you keep button
,
pressed, the
side windows and the sliding / pop-up
roof will be returned to their previous
position.
iIf you keep button
e
pressed, the
side windows and the sliding / pop-up
roof will be closed.
Warning!
G
Never operate the side windows and the
sliding/pop-up roof if there is the possibility
of anyone being harmed by the closing pro-
cedure.
In the event that the procedure causes po-
tential danger, the procedure can be imme-
diately halted by releasing the
e
button
or by pressing the respective window
switch. The closing of the sliding/pop-up
roof can be immediately halted by releasing
the
e
button or by moving the slid-
ing/pop-up roof switch in the overhead con-
trol panel in any direction.