Page 141 of 376

141 Controls in detail
Automatic transmission*
Gear selector lever position
Effect
P
Park position
Selector position when the vehicle
is parked. Only place selector lever
in positionP when vehicle is
stopped. The park position is not in-
tended to serve as a brake when
the vehicle is parked. Rather, the
driver should always set the park-
ing brake in addition to placing the
selector lever in positionP to se-
cure the vehicle.
The key can only be removed from
the starter switch with the selector
lever in positionP. With the key re-
moved the selector lever is locked
in positionP.
Effect
R
Reverse gear
Place selector lever in positionR
only when vehicle is stopped.
N
Neutral
No power is transmitted from the
engine to the drive axle. When the
brakes are released, the vehicle
can be moved freely (pushed or
towed).
To avoid damage to the transmis-
sion, never engageN while driving.
If ESP is deactivated or malfunc-
tioning:
Only move selector lever toN if the
vehicle is in danger of skidding (e.g.
on icy roads).
D
Drive
The transmission shifts automati-
cally. All five forward gears are
available.
!Coasting the vehicle, or driving for any
other reason with selector lever inN
can result in transmission damage that
is not covered by the Mercedes-Benz
Limited Warranty.Warning!
G
Getting out of your vehicle with the selector
lever not fully engaged in positionP is dan-
gerous. Also, positionP alone is not intend-
ed to or capable of preventing your vehicle
from moving, possibly hitting people or ob-
jects.
Always set the parking brake in addition to
shifting to positionP (
�page 51).
When parked on an incline, turn the front
wheels towards the road curb.
Page 142 of 376

142 Controls in detailAutomatic transmission*
Program mode selector switch
1Program mode selector switch
S Standard For regular driving
W Winter For winter driving
�
Press the program mode selector
switch repeatedly until the letter of the
desired shift program appears in the
multifunction display (
�page 111).
Select
Wfor winter driving:
�
The vehicle starts out in second
gear (both forward and reverse) for
gentler starts. This does not apply if
full throttle is applied or gear
range1 is selected.
�
Traction and driving stability are im-
proved on icy roads.
�
Upshifts occur earlier even when
you give more gas. The engine then
operates at lower rpms and the
wheels are less likely to spin.
�
The power transmission ratio for se-
lector lever positionR changes de-
pending on the program mode
selected (
W or
S).
Warning!
G
When leaving the vehicle, always remove the
key from the starter switch, take it with you
and lock the vehicle. Do not leave children
unattended in the vehicle, or with access to
an unlocked vehicle. Children could move
the selector lever from positionP, which
could result in an accident and/or serious
injury.
!Never change the program mode when
the selector lever is out of positionP. It
could result in a change of driving char-
acteristics for which you may not be
prepared.
Page 144 of 376
 and for setting the rear view
mirrors (
�page 39) is found in the “Get-
ting started” section")
144 Controls in detailGood visibility
Good visibilityInformation on the windshield wipers
(�page 48) and for setting the rear view
mirrors (
�page 39) is found in the “Get-
ting started” section.
Rear view mirror
Inside rear view mirror, antiglare
position
Tilt the mirror to the antiglare night posi-
tion using the lever at its lower edge.
Automatic antiglare rear view mirror*
The reflection brightness of the exterior
rear view mirror on the driver’s side and
the inside rear view mirror will respond au-
tomatically to glare when�
the ignition is switched on, and
�
incoming light from headlamps falls on
the sensor in the inside rear view mir-
ror.The rear view mirror will not react if
�
reverse gear is engaged
�
the interior lighting is turned onWarning!
G
The automatic antiglare function does not
react if incoming light is not aimed directly
at sensors in the inside rear view mirror.
The inside rear view mirror and the exterior
rear view mirror on the driver’s side do not
react, for example, if the rear window sun-
shade is in raised position.
Glare can endanger you and others.
Warning!
G
In the case of an accident liquid electrolyte
may escape from the mirror housing if the
mirror glass breaks.
Electrolyte has an irritating effect. Do not al-
low the liquid to come into contact with
eyes, skin, clothing, or respiratory system.
In case it does, immediately flush affected
area with water, and seek medical help if
necessary.Warning!
G
Exercise care when using the passenger
side exterior rear view mirror. The mirror
surface is convex (outwardly curved surface
for a wider field of view). Objects in mirror
are closer than they appear. Check your in-
side rear view mirror or glance over your
shoulder before changing lanes.
Page 146 of 376
146 Controls in detailGood visibilityHeadlamp cleaning system*
The switch is located on the left side of the
dashboard.
1Headlamp washer switch�
Switch on ignition.
�
Press switch1.
The headlamps are cleaned with a
high-pressure water jet.
Information on filling up the washer
reservoir can be found in the “Operation”
section (
�page 241).
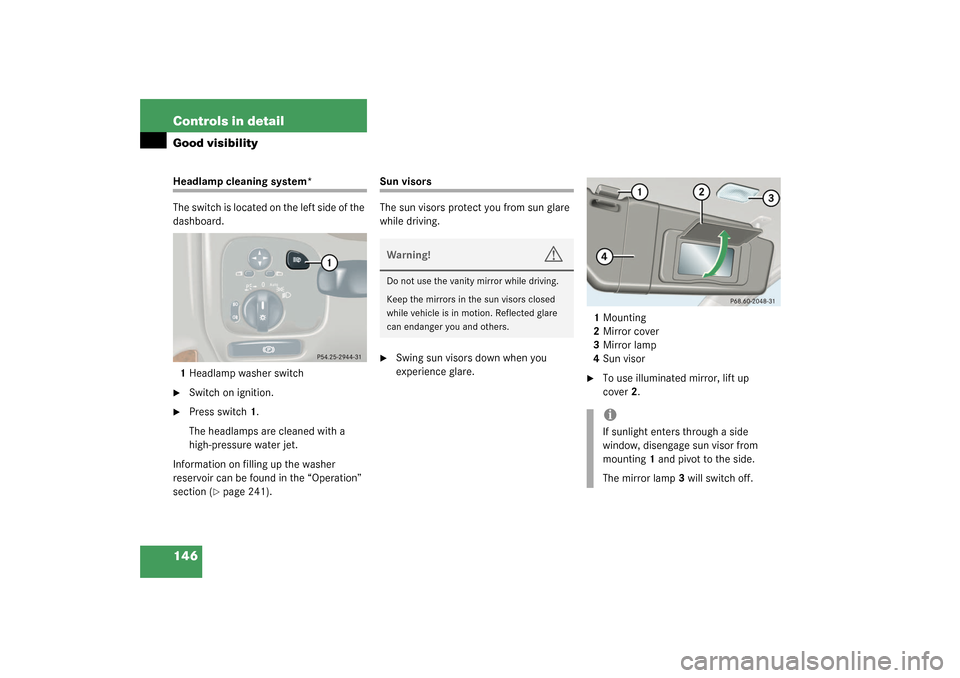
Sun visors
The sun visors protect you from sun glare
while driving.�
Swing sun visors down when you
experience glare.1Mounting
2Mirror cover
3Mirror lamp
4Sun visor
�
To use illuminated mirror, lift up
cover2.
Warning!
G
Do not use the vanity mirror while driving.
Keep the mirrors in the sun visors closed
while vehicle is in motion. Reflected glare
can endanger you and others.
iIf sunlight enters through a side
window, disengage sun visor from
mounting1 and pivot to the side.
The mirror lamp3 will switch off.
Page 147 of 376

147 Controls in detail
Good visibility
Rear window sunshade*
The switch is located in the center console.�
Turn the key to starter switch
position1 or2.
�
Press the switch briefly at1 to raise the
sunshade.
�
Press the switch briefly at2 to lower
the sunshade.
Always raise the sunshade fully for its sup-
port against the window frame.
Warning!
G
When operating the rear window sunshade,
ma ke s ur e th a t th er e is no da nge r o f an y o ne
being harmed by the raising or lowering pro-
cedure.
The raising or lowering procedure can be im-
mediately halted by briefly pressing the up-
per or lower half of the switch.
Briefly press upper or lower half of the
switch again to raise or lower the rear win-
dow sunshade completely.
Warning!
G
When leaving the vehicle, always remove the
SmartKey from starter switch, and lock your
vehicle. Do not leave children unattended in
the vehicle, or with access to an unlocked
vehicle. Unsupervised use of vehicle equip-
ment can cause an accident and/or serious
personal injury.
Page 150 of 376

150 Controls in detailClimate controlThe climate control is operational whenev-
er the engine is running. You can operate
the climate control system in either the au-
tomatic or manual mode. The system cools
or heats the interior depending on the se-
lected interior temperature and the cur-
rent outside temperature.
Nearly all dust particles, pollutants and
odors are filtered out before outside air en-
ters the passenger compartment through
the air distribution system.
The air conditioning will not engage (no
cooling) if theAC
OFF
mode is selected
(
�page 154).
Setting the temperature
Use the temperature controls2 and3
(�page 149) to separately adjust the air
temperature on each side of the passenger
compartment. You should raise or lower
the temperature setting in small incre-
ments, preferably starting at 72°F (22°C).
Increasing
�
Turn the control slightly to the right.
The climate control system will corre-
spondingly adjust the interior air tem-
perature.
Decreasing
�
Turn the control slightly to the left.
The climate control system will corre-
spondingly adjust the interior air tem-
perature.
Warning!
G
Follow the recommended settings for heat-
ing and cooling given on the following pag-
es. Otherwise the windows could fog up,
impairing visibility and endangering you and
others.iIf the vehicle interior is hot, ventilate
the interior before driving off.
Keep the air intake grille in front of the
windshield free of snow and debris.
Do not obstruct air flow by placing ob-
jects on the air flow-through exhaust
slots below the rear window.
Page 152 of 376

152 Controls in detailClimate controlDeactivating�
Press button
P
.
The indicator lamp on the button goes
out. Defrosting is turned off.
Air recirculation mode
Switch to air recirculation mode to prevent
unpleasant odors from entering the vehicle
from the outside. This setting cuts off the
intake of outside air and recirculates the
air in the passenger compartment.Activating
�
Press button
O
.
The indicator lamp on the button
comes on.
Deactivating
�
Press button
O
.
The indicator lamp on the button goes
out.The air recirculation mode is deactivated
automatically:
�
after five minutes if the outside temper-
ature is below approximately 41°F
(5°C)
�
after five minutes if the air conditioning
is turned off
�
after 30 minutes if the outside temper-
ature is above approximately 41°F
(5°C)
At outside temperatures above 79°F
(26°C) the system will not automatically
switch back to outside air. A quantity of
outside air is added after approximately
30 minutes.
Warning!
G
When the outside temperature is
below 41°F (5°C), only switch to air
recirculation mode for short periods to
prevent window fogging.
iIf you keep button
O
pressed the
side windows and sliding/pop-up roof*
will be closed.
The air recirculation mode is activated
automatically at high outside tempera-
tures.
If you have turned off the air condition-
ing (
�page 154) or the outside
temperature is below 41°F (5°C), the
air recirculation mode will not switch
on automatically.
iIf you keep button
O
pressed the
side windows and sliding/pop-up roof*
will be returned to their previous posi-
tion.
Page 153 of 376

153 Controls in detail
Climate control
Rear window defroster
The rear window defroster uses a large
amount of power. To keep the battery
drain to a minimum, switch off the defrost-
er as soon as the rear window is clear. The
defroster is automatically deactivated af-
ter approximately 6 to 17 minutes of oper-
ation depending on the outside
temperature.
Activating�
Press button
F
.
The indicator lamp on the button lights
up.
Deactivating
�
Press button
F
again.
The indicator lamp on the button goes
out.Deactivating the climate control
system
Deactivating�
Set the air volume control
(�page 149) to position 0.
Reactivating
�
Set the air volume control
(�page 149) to any speed.
Warning!
G
Any accumulation of snow and ice should be
removed from the rear window before driv-
ing. Visibility could otherwise be impaired,
endangering you and others.!If the rear window defroster switches
off too soon and the indicator lamp
starts blinking, this means that too
many electrical consumers are operat-
ing simultaneously and there is insuffi-
cient voltage in the battery. The system
responds automatically by deactivating
the rear window defroster.
As soon as the battery has sufficient
voltage, the rear window defroster au-
tomatically turns itself back on.