Page 190 of 376

190 Controls in detailSliding/pop-up roof*
Sliding/pop-up roof*Opening and closing the sliding/pop-up roof
The sliding/pop-up roof can be opened
and closed electrically. The switch for the
sliding/pop-up roof is on the overhead
control panel.
1Push back to slide roof open
2Push forward to slide roof closed
3Push up to raise roof at rear
4Pull down to lower roof at rearWith the roof closed or tilted open, a
screen can be slid into the roof opening to
guard against sun rays. When sliding the
roof open, the screen will also retract.
�
Turn the key in the starter switch to
position1 or2.
Opening and closing the sliding/pop-up
roof
�
To open, close, raise or lower the slid-
ing/pop-up roof, move the switch to re-
sistance point in the required direction.
Release the switch when the roof has
reached the required position.
Opening and closing the sliding/pop-up
roof automatically
�
Move the switch past resistance point
in the direction required and release.
The sliding/pop-up roof opens or clos-
es completely.
Warning!
G
When closing the sliding/pop-up roof, make
s ure th at th ere is no da nge r o f a ny o ne bei ng
harmed by the closing procedure.
The closing procedure of the sliding/pop-up
roof can be immediately reversed by either
moving the switch in any direction, or press-
ing button
Œ
on the key and holding it.
When leaving the vehicle, always remove the
key from starter switch, take it with you, and
lock your vehicle. Do not leave children
unattended in the vehicle, or with access to
an unlocked vehicle. Unsupervised use of
vehicle equipment can cause an accident
and/or serious personal injury.
Page 191 of 376

191 Controls in detail
Sliding/pop-up roof*
Stopping the sliding / pop-up roof�
Move the switch in any direction.
If the movement of the sliding/pop-up
roof is blocked during the closing pro-
cedure, the roof will stop and reopen
slightly.Opening and closing the sliding/pop-up
roof with the SmartKey
The power windows will also be opened or
closed when the sliding/pop-up roof is op-
erated with the key (
�page 188).
�
Aim transmitter eye at the front door
handle.
iYou can also open or close the slid-
ing/pop-up roof using the�
SmartKey, see below
�
button
O
in the control panel of
the climate control (
�page 149) or
automatic climate control
(
�page 157)
�
button
e
in the control panel of
the automatic climate control
(
�page 157)
!To avoid damaging the seals, do not
transport any objects with sharp edges
which can stick out of the slid-
ing/pop-up roof.
Open the sliding/pop-up roof only if
the roof is clear of snow or ice.
The sliding/pop-up roof can be opened
or closed manually should an electrical
malfunction occur (
�page 289).
Warning!
G
Never operate the windows or slid-
ing/pop-up roof if there is the possibility of
anyone being harmed by the opening or
closing procedure.
In case the procedure causes potential
danger, the procedure can be immediately
halted by releasing the remote control
button. To reverse direction of movement,
press buttonŒ for opening or‹ for
closing.
Page 193 of 376

193 Controls in detail
Driving systems
Driving systems
The cruise control driving system of your
vehicle is described on the following pag-
es.
The BAS, ABS and ESP driving systems are
described in the “Safety and Security” sec-
tion (
�page 73).
Cruise control
Cruise control automatically maintains the
speed you set for your vehicle.
Use of cruise control is recommended for
driving at a constant speed for extended
periods of time. You can set any speed
over 20 mph (30 km/h).
The cruise control function is operated by
means of the cruise control lever.
The cruise control lever is the uppermost
lever found on the left-hand side of the
steering column (
�page 24).
Warning!
G
Cruise control is a convenience system de-
signed to assist the driver during vehicle op-
eration. The driver is and must remain at all
times responsible for the vehicle speed and
for safe brake operation.
Only use cruise control if the road, traffic
and weather conditions make it advisable to
travel at a steady speed.�
The use of cruise control can be danger-
ous on winding roads or in heavy traffic
because conditions do not allow safe
driving at a steady speed.
�
The use of cruise control can be danger-
ous on slippery roads. Rapid changes in
tire traction can result in wheel spin and
loss of control.
�
Deactivate cruise control when driving
in fog.
The “Resume” function should only be oper-
ated if the driver is fully aware of the previ-
ously set speed and wishes to resume this
particular preset speed.
Page 195 of 376
�
Briefly push the cruise control lever to
position4.
The cruise control will resume the last
previously set speed")
195 Controls in detail
Driving systems
Setting stored speed (“Resume”
function)�
Briefly push the cruise control lever to
position4.
The cruise control will resume the last
previously set speed.
�
Remove your foot from the accelerator
pedal.Setting a higher speed
�
Lift the cruise control lever to
position1 and hold it up until the de-
sired speed is reached.
�
Release the cruise control lever.
The new speed is set.
Setting a lower speed
�
Depress the cruise control lever to
position2 and hold it down until the
desired speed is reached.
�
Release the cruise control lever.
The new speed is set.Fine adjustment in 1 mph (1 km/h)
increments
Faster
�
Briefly tip the cruise control lever in the
direction of arrow1.
Slower
�
Briefly tip the cruise control lever in the
direction of arrow2.
Warning!
G
The speed stored in memory should only be
set again if prevailing road conditions per-
mit. Possible acceleration or deceleration
differences arising from returning to preset
speed can cause an accident and/or serious
personal injury to you and others.
iDepressing the accelerator pedal does
not deactivate cruise control. After
brief acceleration (e.g. for passing),
cruise control will resume the last
speed set.
iVehicles with automatic transmission:
When you use the cruise control lever
to decelerate, the transmission will au-
tomatically downshift if the engine’s
braking power does not brake the vehi-
cle sufficiently.
Page 196 of 376
196 Controls in detailLoading
LoadingRoof rack*
Only mount the approved roof rack to the
fastening bolts (see arrows) located under
the door weatherstrips.
Ski sack*
Unfolding and loading�
Fold armrest down (arrow).
�
Swing cover1 down.
Warning!
G
Use only those roof racks approved by
Mercedes-Benz for your vehicle model to
avoid damage to the vehicle. Follow manu-
facturer’s installation instructions.
!Be sure to stack a load on the roof rack
so that the vehicle cannot be damaged
while driving.
Make sure that�
you can fully raise the
sliding/pop-up roof*.
�
you can fully open the trunk.
��
Page 197 of 376
197 Controls in detail
Loading
�
Open hook and loop strap2.
�
Pull ski sack into passenger compart-
ment and unfold.
�
Open flap in trunk by pulling handle3.
�
From trunk, slide skis into ski sack.Warning!
G
The ski sack is designed for up to four pairs
of skis. Do not load the ski sack with other
objects.
Always fasten the ski sack securely. In an
accident, an unfastened ski sack can cause
injury to vehicle occupants.
��
Page 199 of 376
199 Controls in detail
Loading
�
Close ski sack compartment cover1.
Removal of ski sack
For removal of the ski sack we recommend
that you contact an authorized
Mercedes-Benz Center.
Split rear bench seat*
The two sections can be folded down sep-
arately to enlarge the cargo area.
Warning!
G
Never drive vehicle with trunk lid open while
the ski sack is removed. Deadly carbon
monoxide (CO) gases may enter vehicle in-
terior, resulting in unconsciousness and
death.iTo prevent unauthorized persons from
access to the trunk, always close the
cover.
Warning!
G
When expanding the luggage area, always
fold the seat cushions fully forward.
Unless you are transporting cargo, the back-
rests must remain properly locked in the up-
right position.
In an accident, during hard braking or sud-
den maneuvers, loose items will be thrown
around inside the vehicle, and cause injury
to vehicle occupants unless the items are
securely fastened in the vehicle.
Page 201 of 376
201 Controls in detail
Loading
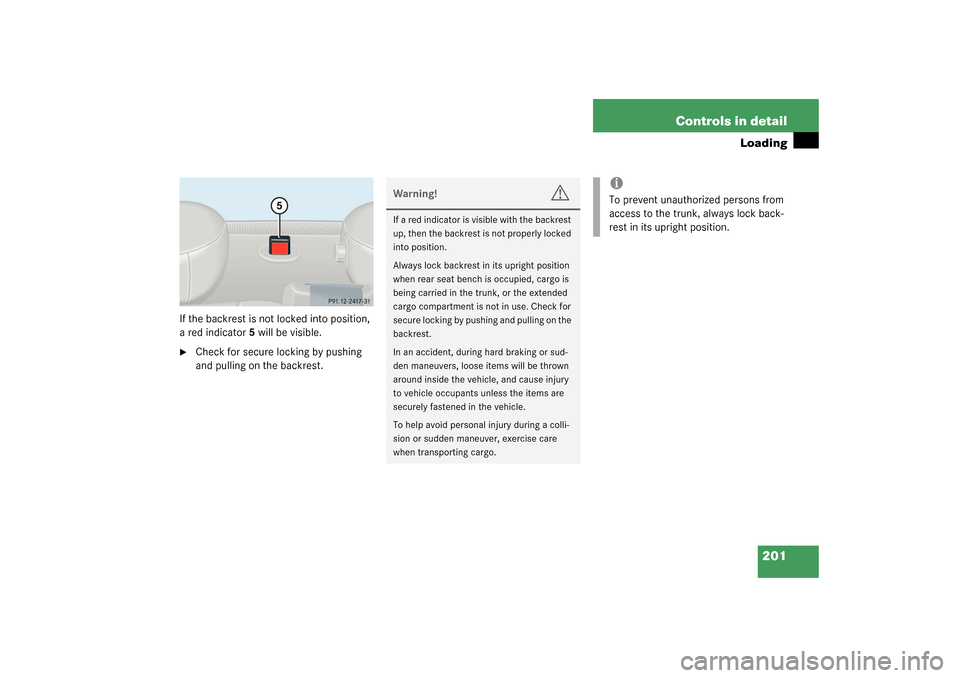
If the backrest is not locked into position,
a red indicator5 will be visible.�
Check for secure locking by pushing
and pulling on the backrest.
Warning!
G
If a red indicator is visible with the backrest
up, then the backrest is not properly locked
into position.
Always lock backrest in its upright position
when rear seat bench is occupied, cargo is
being carried in the trunk, or the extended
cargo compartment is not in use. Check for
secure locking by pushing and pulling on the
backrest.
In an accident, during hard braking or sud-
den maneuvers, loose items will be thrown
around inside the vehicle, and cause injury
to vehicle occupants unless the items are
securely fastened in the vehicle.
To help avoid personal injury during a colli-
sion or sudden maneuver, exercise care
when transporting cargo.
iTo prevent unauthorized persons from
access to the trunk, always lock back-
rest in its upright position.