Page 168 of 370

174 Controls in detailAudio systemCD changer* operating mode
General notes
Should excessively high temperatures oc-
cur while in CD mode,
CD TEMP HIGH
will
appear on the display and muting will take
pl ace . The uni t wil l then s witch ba ck to the
last operating mode used until the temper-
ature has decreased to a safe operating
level.
Should excessively low temperatures oc-
cur while in CD mode,
CD TEMP LOW
will ap-
pear on the display, but the CD will
continue to play.
Handle CDs carefully to prevent interfer-
ence during playback. Avoid fingerprints
and dust on CDs. Do not write on CDs or
apply any label or other material to them.
Use only original CDs. Using copied CDs
may create problems during playback.Clean CDs from time to time with a com-
mercially available cleaning cloth. No sol-
vents, anti-static sprays, etc. should be
used for cleaning. Replace the CD in its
case after use. Protect CDs from heat and
direct sunlight.
Only use CDs, which bear the label shown
and that conform to the compact disc dig-
ital audio standard (IEC 60908).
Use of CDs which do not meet this stan-
dard may cause damage to the CD chang-
er. Do not play single-CDs (80 mm) with an
adapter.Operational readiness of CD changer
If a CD changer has been installed in the
system, it can be operated from the front
control panel of the radio. A loaded maga-
zine must be installed for CD playing.
Loading/unloading the CD magazine
�
Slide the changer door to the right and
press the eject button
g
.
�
The magazine will be ejected.Warning!
G
The CD changer* is a Class 1 laser product.
There is a danger of invisible laser radiation
if the cover is opened or damaged.
Do not remove the cover. The CD changer*
does not contain any parts which can be ser-
viced by the user. For safety reasons, have
any service work which may be necessary
performed only by qualified personnel.
��
S203 MY03_A.book Page 174 Tuesday, January 28, 2003 2:22 PM
Page 178 of 370

184 Controls in detailPower windows
Power windowsOpening and closing the windows
The side windows can be opened and
closed electrically. The switches for all the
side windows are on the driver’s door. The
switches for the respective windows are
on the front passenger and the rear doors.
1Left front window
2Right front window
3Switch for rear door window override
(
�page 71)
4Right rear window
5Left rear window
�
Turn key in the starter switch to
position1 or2.
Opening the windows
�
Press switch to resistance point.
The window will move downwards until
you release the switch.
Warning!
G
When closing the windows, make sure that
there is no danger of anyone being injured
by the closing procedure.
The closing of the door windows can be im-
mediately halted by releasing the switch or,
if switch was pulled past the resistance
point and released, by either pressing or
pulling the respective switch.
If the window encounters an obstruction
that blocks its path in a circumstance where
you pulled the switch past the resistance
point and released it to close the window,
the automatic reversal function will stop the
window and open it slightly.
If the window encounters an obstruction
that blocks its path in a circumstance where
you are closing the window by pulling the
switch and holding it there, or by pressing
and holding button
‹
on the SmartKey,
the automatic reversal function will not op-
erate.
When leaving the vehicle, always remove the
key from starter switch, and lock your vehi-
cle. Do not leave children unattended in the
vehicle, or with access to an unlocked vehi-
cle. Unsupervised use of vehicle equipment
may cause an accident and/or serious
personal injury.
S203 MY03_A.book Page 184 Tuesday, January 28, 2003 2:22 PM
Page 179 of 370

185 Controls in detail
Power windows
Closing the windows�
Pull on switch.
The window will move upwards until
you release the switch.
If you pull and hold the switch up when
closing the window, and upward move-
ment of the window is blocked by some ob-
struction including but not limited to arms,
hands, fingers etc., the automatic reversal
will not operate.
Fully opening windows
�
Press switch past resistance point and
release.
The window opens completely.Fully closing windows
�
Pull switch past resistance point and
release.
The window closes completely.
If the upward movement of the window is
blocked during the closing procedure, the
window will stop and open slightly.Stopping windows
�
Press or pull respective switch again.
Warning!
G
Driver’s door only:
If within five seconds the switch1 is again
pulled past the resistance point and re-
leased, the automatic reversal will not
operate.
iYou can also open or close the win-
dows using the:�
SmartKey (summer opening/con-
venience feature), see below
�
O
button in the control panel of
the climate control (
�page 145) or
automatic climate control
(
�page 153)
�
e
button in the control panel of
the automatic climate control
(
�page 153)
S203 MY03_A.book Page 185 Tuesday, January 28, 2003 2:22 PM
Page 182 of 370

188 Controls in detailSliding/pop-up roof*Stopping the sliding / pop-up roof�
Move the switch in any direction.
If the movement of the sliding/pop-up
roof is blocked during the closing pro-
cedure, the roof will stop and reopen
slightly.
Opening and closing the sliding/pop-up
roof with the SmartKey
The power windows will also be opened or
closed when the sliding/pop-up roof is op-
erated with the key.
�
Aim transmitter eye at the front door
handle.
iYou can also open or close the slid-
ing/pop-up roof using the:�
SmartKey (summer opening/con-
venience feature) (
�page 188)
�
button
O
in the control panel of
the climate control (
�page 145) or
automatic climate control
(
�page 153)
�
button
e
in the control panel of
the automatic climate control
(
�page 153)
!To avoid damaging the seals, do not
transport any objects with sharp edges
which can stick out of the slid-
ing/pop-up roof.
The sliding/pop-up roof can be opened
or closed manually should an electrical
malfunction occur (
�page 290).
Warning!
G
Never operate the windows or slid-
ing/pop-up roof if there is the possibility of
anyone being harmed by the opening or
closing procedure.
In case the procedure causes potential dan-
ger, the procedure can be immediately halt-
ed by releasing the remote control button.
To reverse direction of movement,
pressŒ for opening or ‹ for closing.
S203 MY03_A.book Page 188 Tuesday, January 28, 2003 2:22 PM
Page 191 of 370

197 Controls in detail
Loading
Storage compartment under cargo compartment floor
To open cargo compartment floor�
Press handle1 on the recess.
�
Lift compartment cover.To close cargo compartment floor
�
Lower the cover and lock by applying
light pressure to the handle1.
Retractable luggage cover and
partition net
The twin-reel roller blind comprises a lug-
gage cover and a partition net. It is mount-
ed on the backrest of the rear seat and can
also be used with backrest folded down.Partition net
Partition net with rear seats folded up
1Tab
2Eyelets on roof
�
Pull out upper blind (safety net) by
tabs1.
�
Engage it into eyelets on the roof2.
iThe compartment can be used to store
small, light or flat objects.
Warning!
G
If items are stored in the compartment,
make sure compartment is securely closed.
In an accident, during hard braking or sud-
den maneuvers, they could be thrown
around inside the vehicle, and cause injury
to vehicle occupants.
Warning!
G
To help avoid personal injury during a colli-
sion or sudden maneuver, always use parti-
tion net when transporting cargo.
S203 MY03_A.book Page 197 Tuesday, January 28, 2003 2:22 PM
Page 199 of 370
205 Controls in detail
Useful features
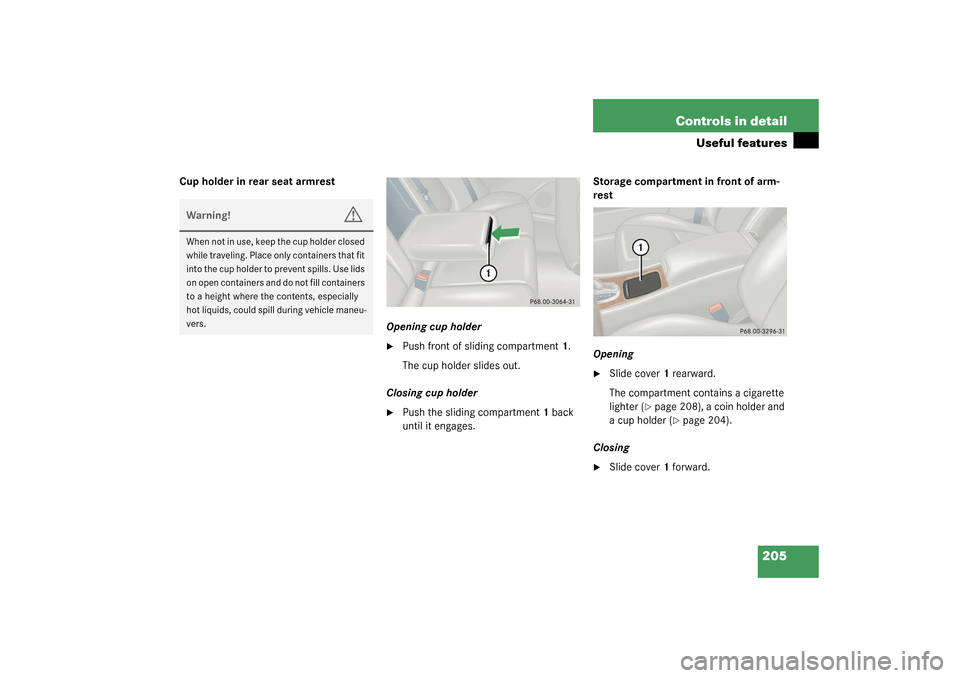
Cup holder in rear seat armrest
Opening cup holder
�
Push front of sliding compartment1.
The cup holder slides out.
Closing cup holder
�
Push the sliding compartment1 back
until it engages.Storage compartment in front of arm-
rest
Opening
�
Slide cover1 rearward.
The compartment contains a cigarette
lighter (
�page 208), a coin holder and
a cup holder (
�page 204).
Closing
�
Slide cover1 forward.
Warning!
G
When not in use, keep the cup holder closed
while traveling. Place only containers that fit
into the cup holder to prevent spills. Use lids
on open containers and do not fill containers
to a height where the contents, especially
hot liquids, could spill during vehicle maneu-
vers.
S203 MY03_A.book Page 205 Tuesday, January 28, 2003 2:22 PM
Page 200 of 370

206 Controls in detailUseful featuresArmrest storage spaces
Opening compartment in armrest�
Lift armrest by handle1.
Opening compartment under armrest
�
Lift armrest by handle2.
Closing
�
Lower armrest until it engages in lock.Changing inclination of armrest
�
Pull up on armrest.
Lowering armrest
�
Pull handle2 to lower armrest.Parcel net in front passenger footwell
A small convenience parcel net is located
in the front passenger footwell. It is for
small and light items, such as road maps,
mail, etc.iThe storage compartment can be heat-
ed or cooled.
The compartment can get very warm
due to its confined space. When storing
heat sensitive objects in the compart-
ment, close the air vent (
�page 150)
while heating the passenger compart-
ment.
Warning!
G
Do not place heavy or fragile objects, or ob-
jects having sharp edges, in the parcel net.
In an accident, during hard braking or sud-
den maneuvers, they could be thrown
around inside the vehicle, and cause injury
to vehicle occupants.
S203 MY03_A.book Page 206 Tuesday, January 28, 2003 2:22 PM
Page 202 of 370

208 Controls in detailUseful featuresCigarette lighter
1Cigarette lighter
2Cover�
Turn key in the starter switch to
position1 or2.
�
Slide cover2 rearward.
�
Push in cigarette lighter1.
The cigarette lighter will pop out auto-
matically when hot.
Electrical outlet
An electrical outlet is located on the left
side of the cargo compartment.�
Turn the key in the starter switch to
position1 or2.
�
Flip up cover and insert electrical plug
(cigarette lighter type).
Warning!
G
Never touch the heating element or sides of
the lighter; they are extremely hot. Hold the
knob only.
When leaving the vehicle, always remove the
key from the starter switch, and lock your
vehicle. Do not leave children unattended in
the vehicle, or with access to an unlocked
vehicle. Unsupervised use of vehicle equip-
ment may cause an accident and/or serious
personal injury.iThe lighter socket can be used to ac-
commodate electrical accessories up
to a maximum 85 W.
iThe electrical outlet can be used to ac-
commodate electrical consumers (e.g.
air pump, auxiliary lamps) up to a max-
imum of 180 W.
S203 MY03_A.book Page 208 Tuesday, January 28, 2003 2:22 PM