Page 99 of 370

105 Controls in detail
Instrument cluster
Turn the SmartKey in the starter switch to
position1 or2.�
Call up the trip odometer and main
odometer by pressing button
è
or
ÿ
on the multifunction steering
wheel (�page 108).
�
Press button
j
or
k
until the
coolant temperature display appears.During severe operating conditions and
stop-and-go city traffic, the coolant tem-
perature may rise close to 248°F (120°C).
The engine should not be operated with
the coolant temperature above 248°F
(120°C). Doing so may cause serious en-
gine damage which is not covered by the
Mercedes-Benz Limited Warranty.
Trip odometer�
Make sure you are viewing the trip
odometer and main odometer
(�page 107) in the multifunction dis-
play.
�
Press and hold the reset knob on the in-
strument cluster (
�page 22) until the
trip odometer is reset.
Tachometer
The red marking on the tachometer de-
notes excessive engine speed.
To help protect the engine, the fuel supply
is interrupted if the engine is operated
within the red marking.
iExcessive coolant temperatures trigger
a warning in the multifunction display.
!Avoid driving at excessive engine
speeds, as it may result in serious en-
gine damage that is not covered by the
Mercedes-Benz Limited Warranty.
S203 MY03_A.book Page 105 Tuesday, January 28, 2003 2:22 PM
Page 105 of 370
111 Controls in detail
Control system
Menus, submenus and functions
Menu 1
Menu 2
Menu 3
Menu 4
Menu 5
Menu 6
Menu 7
Standard display
AUDIO
NAVI*
Malfunction
memory
Settings
Trip computer
Telephone*
Commands/submenusCoolant tempera-
ture display
Select radio station
Activate route
guidance
Call up malfunc-
tion messages
Reset to factory
settings
Fuel consumption
statistics after
start
Load phone
book
Digital speedometer
Operate CD play-
er*
Instrument clus-
ter submenu
Fuel consumption
statistics since
the last reset
Search for
name in
phone book
Call up FSS
Operate cassette
player
Lighting sub-
menu
Call up range
Check engine oil lev-
el
Vehicle sub-
menuConvenience
submenu
S203 MY03_A.book Page 111 Tuesday, January 28, 2003 2:22 PM
Page 110 of 370

116 Controls in detailControl systemSettings menu
In the
SETTINGS
menu there are two func-
tions:
�
The function
RESET TO FACTORY SET-
TINGS
, with which you can reset all the
settings to the original factory settings.
�
A collection of submenus with which
you can make individual settings for
your vehicle.
�
Press button
è
or
ÿ
repeatedly
until the
SETTINGS
menu is seen in the
display.Resetting all settings
You can reset all the functions of all sub-
menus to the factory settings.
�
Press the reset knob in the instrument
cluster for approximately three sec-
onds.
In the display you will see the request
to press the reset knob again to con-
firm.
�
Press the reset knob again.
The functions of all the submenus will
reset to factory settings.Submenus in the Settings menu
�
Press button
k
or
j
.
In the display you see the collection of
the submenus.
�
Press button
ç
.
The selection marker moves to the next
submenu.
The submenus are arranged by hierarchy.
Scroll down with theç
button, scroll up
with the
æ
button.
Move within the submenus with the
k
or
j
button to the individual functions.
The settings themselves are made with
buttonæ
or
ç
.
iThe settings you have changed will not
be reset unless you confirm the action
by pressing the reset knob a second
time.
S203 MY03_A.book Page 116 Tuesday, January 28, 2003 2:22 PM
Page 111 of 370

117 Controls in detail
Control system
Resetting the functions of a submenu
For each submenu you can reset all the
functions to the factory settings.�
Move to a function in the submenu.
�
Press the reset knob in the instrument
cluster for approximately three sec-
onds.
In the display you will see the request
to press the reset knob again to con-
firm.
�
Press the reset knob again.
All functions of the submenu will reset
to factory settings.
The table below shows what settings can
be changed within the various menus. De-
tailed instructions on making individual
settings can be found on the following pag-
es.
INSTRUMENT CLUSTER
LIGHTING
VEHICLE
CONVENIENCE
Set time (hours)
Set daytime running lamp mode
(USA only)
Set station selection mode
(radio)
Activate easy-entry/exit feature
Set time (minutes)
Set locator lighting
Set automatic locking
Set key dependency
Select time display mode
Exterior lamps delayed shut-off
Set parking position for exterior
rear view mirror
Select temperature display
mode
Interior lighting delayed shut-off
Select speedometer display
modeSelect languageSelect display (speed display or
outside temperature)
S203 MY03_A.book Page 117 Tuesday, January 28, 2003 2:22 PM
Page 115 of 370

121 Controls in detail
Control system
Lighting submenu
Access the
LIGHTING
submenu via the
SET-
TINGS
menu. Use the
LIGHTING
submenu
to change the lamp and lighting settings on
your vehicle. The following functions are
available:Setting daytime running lamp mode
(USA only)
�
Move the selection marker with
the
æ
or
ç
button to the
LIGHT-
ING
submenu.
�
Press button
j
or
k
repeatedly
until you see this message in the dis-
play:
LAMP CIRCUIT HEADLAMP MODE
.
The selection marker is on the current
setting.
�
Press
æ
or
ç
to select manual
or daytime running lamp (constant)
mode. This function is not available in
countries where daytime running
lamps are mandatory.With daytime running lamp mode se-
lected and the exterior lamp switch at
position0, the following lamps will
come on automatically when the en-
gine is turned on:
�
Parking lamps and low beam head-
lamps
�
License plate lamps (in low ambient
light conditions)
Function
Page
Set daytime running lamp mode
(USA only)
see
below
Set locator lighting
122
Exterior lamps delayed
switch-off
122
Interior lighting delayed shut-off
124
iIf you turn the exterior lamp switch to
another position, the corresponding
lamp(s) will switch on.
For safety reasons, resetting the LIGHTING
submenu to factory settings
(
�page 117) will not reset the daytime
running lamp mode.
In the display you will then see the mes-
sage:
LIGHTING – CANNOT BE COM-
PLETELY RESET TO FACTORY SETTINGS
WHILE DRIVING!
.
S203 MY03_A.book Page 121 Tuesday, January 28, 2003 2:22 PM
Page 122 of 370

128 Controls in detailControl systemSetting parking position for exterior rear
view mirror
Use the
MIRROR SETTING WHEN PARKING
function to select whether the passen-
ger-side exterior rear view mirror should be
turned downward during parking maneu-
vers, when reverse gear is engaged. For
additional information, see “Activating ex-
terior rear view mirror parking position”
(
�page 142).
�
Move the selection marker with
the
æ
or
ç
button to the
CONVE-
NIENCE
submenu.
�
Press button
j
or
k
repeatedly
until you see this message in the dis-
play:
MIRROR SETTING WHEN PARKING
.The selection marker is on the current
setting.
�
Press
æ
or
ç
to switch function
ON or
OFF
.
Trip computer menu
Use the trip computer menu to call up sta-
tistical data on your vehicle. The following
information is available:Function
Page
Fuel consumption statistics after
start
see
below
Fuel consumption statistics
since last reset
129
Call up range (distance to empty)
130
S203 MY03_A.book Page 128 Tuesday, January 28, 2003 2:22 PM
Page 123 of 370

129 Controls in detail
Control system
Fuel consumption statistics after start�
Press button
ÿ
or
è
repeatedly
until you see the first function of the
Trip computer menu.
�
Press button
j
or
k
repeatedly
until you see this message in the multi-
function display:
AFTER START
.
1Distance driven since start
2Time elapsed since start
3Average fuel consumption since start
4Average speed since startFuel consumption since last reset
�
Press button
ÿ
or
è
repeatedly
until you see the first function of the
Trip computer menu.
�
Press button
j
or
k
repeatedly
until you see this message in the dis-
play:
AFTER RESET
.
1Distance driven since last reset
2Time elapsed since last reset
3Average fuel consumption since last
reset
4Average speed since last reset
iAll statistics stored since the last en-
gine start will be reset approximately
four hours after the key in the starter
switch is turned to position0 or re-
moved from the starter switch.
Resetting will not occur if you turn the
key back to position1 or2 within this
time period.
S203 MY03_A.book Page 129 Tuesday, January 28, 2003 2:22 PM
Page 124 of 370
130 Controls in detailControl systemResetting fuel consumption statistics�
Press button
ÿ
or
è
repeatedly
until you see the first function of the
Trip computer menu.
�
Press button
j
or
k
repeatedly
until you see the reading that you want
to reset in the display.
�
Press and hold the reset knob in the in-
strument cluster (
�page 22) until the
value is reset to
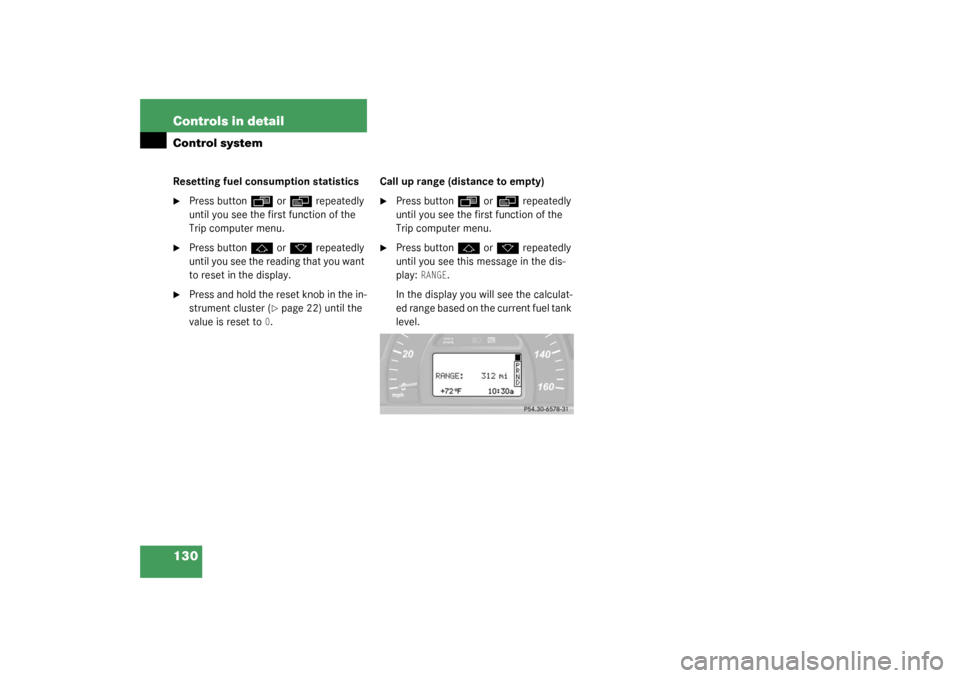
0.Call up range (distance to empty)
�
Press button
ÿ
or
è
repeatedly
until you see the first function of the
Trip computer menu.
�
Press button
j
or
k
repeatedly
until you see this message in the dis-
play:
RANGE
.
In the display you will see the calculat-
ed range based on the current fuel tank
level.
S203 MY03_A.book Page 130 Tuesday, January 28, 2003 2:22 PM