Page 79 of 356

79 Safety and Security
Anti-theft systems
Disarming the alarm system
The alarm system is disarmed when you
unlock your vehicle with the SmartKey. The
turn signal lamps blink once to indicate
that the alarm system is deactivated.
Canceling the alarm
To cancel the alarm:�
Insert the key in the starter switch.
or
�
Press the
Œ
or
‹
button.
Tow-away alarm*
Once the tow-away alarm is armed, a visual
and audible alarm will be triggered when
someone attempts to raise the vehicle.Arming tow-away alarm
When you lock your vehicle, the tow-away
alarm is automatically armed after about
30 seconds.
When you unlock your vehicle, the
tow-away protection disarms automatical-
ly.
iThe alarm system will rearm automati-
cally after approximately 40 seconds if
a door or the trunk is not opened.
iThe tow-away protection alarm is trig-
gered, for example, if the vehicle is lift-
ed on one side.
If the alarm stays on for more than
20 seconds, an emergency call is initi-
ated automatically by the Tele Aid sys-
tem provided Tele Aid service was
subscribed to and properly activated,
and that necessary cellular service and
GPS coverage are available.
Page 80 of 356
80 Safety and SecurityAnti-theft systemsDisarming tow-away alarm
To prevent triggering the tow-away alarm
feature, switch off the tow-away alarm be-
fore towing the vehicle, or when parking on
a surface subject to movement, such as a
ferry or auto train.
1Tow-away alarm off switch
2Indicator lamp
The switch is located on the center con-
sole.�
Turn off the ignition and remove the
key.
�
Press upper half1 of the switch.
Indicator lamp2 in the switch lights up
briefly.
�
Lock your vehicle with the key.
The tow-away alarm remains disarmed un-
til you lock your vehicle again.iYou cannot disarm the tow-away alarm
if the ignition is turned on.
Page 130 of 356
.
Gearshift leverDo not exce")
130 Controls in detailManual transmission
Manual transmissionInformation for driving with a manual
transmission is found in the “Getting start-
ed” section (
�page 41).
Gearshift leverDo not exceed the maximum speed in the
individual gears. Refer to tachometer
(�page 22) for engine speeds.
Warning!
G
For vehicles equipped with a manual trans-
mission, getting out of your vehicle with the
gearshift lever not engaged in 1st or reverse
gear and parking brake engaged is danger-
ous. Also, when parked on an incline, an en-
gaged 1st or reverse gear alone may not
prevent your vehicle from moving, possibly
hitting people or objects
Always set the parking brake in addition to
engaging 1st or reverse gear (
�page 51).
When parked on an incline, turn the front
wheel towards the road curb.
Warning!
G
On slippery road surfaces, never downshift
in order to obtain braking action. This could
result in drive wheel slip and reduced vehi-
cle control. Your vehicle’s ABS will not pre-
vent this type of loss of control.Warning!
G
When leaving the vehicle, always remove the
key from the starter switch and lock the ve-
hicle. Do not leave children unattended in
the vehicle, or with access to an unlocked
vehicle. Children could move the gearshift
lever, which could result in an accident
and/or serious injury.
Page 135 of 356

135 Controls in detail
Automatic transmission*
Gear selector lever position
Effect
P
Park position
Selector position when the vehicle is
parked. Only place selector lever in
positionP when vehicle is stopped.
The park position is not intended to
serve as a brake when the vehicle is
parked. Rather, the driver should al-
ways set the parking brake in addi-
tion to placing the selector lever in
positionP to secure the vehicle.
The key can only be removed from
the starter switch with the selector
lever in positionP. With the key re-
moved the selector lever is locked in
positionP.
R
Reverse gear
Place selector lever in positionR only
when vehicle is stopped.
Effect
N
Neutral
No power is transmitted from the en-
gine to the drive axle. When the
brakes are released, the vehicle can
be moved freely (pushed or towed).
To avoid damage to the transmission,
never engageN while driving.
If ESP is deactivated or malfunction-
ing:
Only move selector lever toN if the
vehicle is in danger of skidding (e.g.
on icy roads).
D
Drive
The transmission shifts automatical-
ly. All five forward gears are avail-
able.
!Coasting the vehicle, or driving for any
other reason with selector lever inN
can result in transmission damage that
is not covered by the Mercedes-Benz
Limited Warranty.Warning!
G
Getting out of your vehicle with the selector
lever not fully engaged in positionP is dan-
gerous. Also, positionP alone is not intend-
ed to or capable of preventing your vehicle
from moving, possibly hitting people or ob-
jects.
Always set the parking brake in addition to
shifting to positionP (
�page 51).
When parked on an incline, turn the front
wheels towards the road curb.
Page 164 of 356
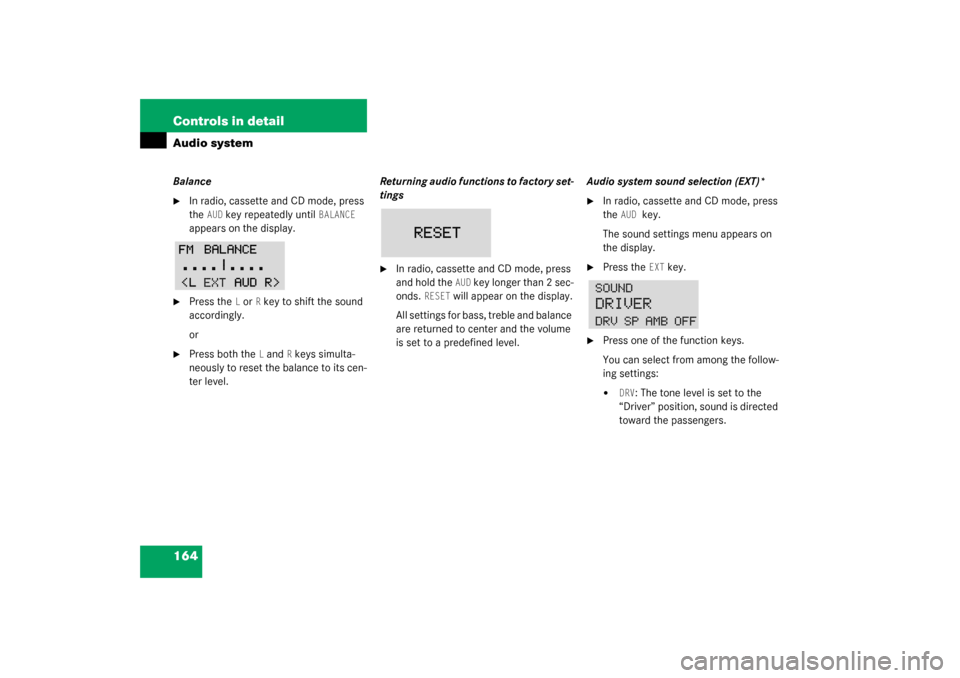
164 Controls in detailAudio systemBalance�
In radio, cassette and CD mode, press
the
AUD
key repeatedly until
BALANCE
appears on the display.
�
Press the
L or
R key to shift the sound
accordingly.
or
�
Press both the
L and
R keys simulta-
neously to reset the balance to its cen-
ter level.Returning audio functions to factory set-
tings
�
In radio, cassette and CD mode, press
and hold the
AUD
key longer than 2 sec-
onds.
RESET
will appear on the display.
All settings for bass, treble and balance
are returned to center and the volume
is set to a predefined level.Audio system sound selection (EXT)*
�
In radio, cassette and CD mode, press
the
AUD
key.
The sound settings menu appears on
the display.
�
Press the
EXT
key.
�
Press one of the function keys.
You can select from among the follow-
ing settings:�
DRV
: The tone level is set to the
“Driver” position, sound is directed
toward the passengers.
Page 192 of 356

192 Controls in detailLoading
LoadingRoof rack*
Mount the roof rack only between the fas-
tening points1 and in the recess of the
rubber strip2.
Luggage cover
Removal�
Take off securing straps1.
�
Pull cover towards rear2.
Installation
�
Place cover into holder.
�
Attach securing straps to trunk lid.
Split folding rear bench seat
The two sections can be folded down sep-
arately to enlarge the trunk.
Warning!
G
Use only those roof racks approved by
Mercedes-Benz for your vehicle model to
avoid damage to the vehicle. Follow manu-
facturer’s installation instructions.
!Do not place anything on the luggage
cover below the rear window.
Warning!
G
When expanding the luggage compartment,
always fold the seat cushions fully forward.
Unless you are transporting cargo, the back-
rests must remain properly locked in the up-
right position.
In an accident, during hard braking or sud-
den maneuvers, loose items will be thrown
around inside the vehicle, and cause injury
to vehicle occupants unless the items are
securely fastened in the vehicle.
Page 194 of 356

194 Controls in detailLoadingLoading instructions
The total load weight including vehicle oc-
cupants and luggage/cargo should not ex-
ceed the vehicle capacity weight indicated
on the certification tag which can be found
on the left door pillar.
The handling characteristics of a fully load-
ed vehicle depend greatly on the load dis-
tribution. It is therefore recommended to
load the vehicle according to the illustra-
tions shown, with the heaviest items being
placed towards the front of the vehicle.
Always place items being carried against
front or rear seat backrests, and fasten
them as securely as possible.The heaviest portion of the cargo should al-
ways be kept as low as possible since it in-
fluences the handling characteristics of
the vehicle.
Warning!
G
Always fasten items being carried as secure-
ly as possible.
In an accident, during hard braking or sud-
den maneuvers, loose items will be thrown
around inside the vehicle and can cause in-
jury to vehicle occupants unless the items
are securely fastened in the vehicle.
To help avoid personal injury during a colli-
sion or sudden maneuver, exercise care
when transporting cargo.
Never drive vehicle with trunk lid open.
Deadly carbon monoxide (CO) gases may
enter vehicle interior resulting in uncon-
sciousness and death.
Page 195 of 356

195 Controls in detail
Useful features
Useful features
Interior storage spaces Glove box
1Glove box
2Glove box lid release
Opening the glove box
�
Pull lid release2.
The glove box lid opens downward.
Closing the glove box
�
Push lid up to close.Locking the glove box
�
Insert mechanical key into the glove
box lock and turn it to position4.
Unlocking the glove box
�
Turn mechanical key in the glove box
lock to position3.
Warning!
G
To help avoid personal injury during a colli-
sion or sudden maneuver, exercise care
when stowing objects in the vehicle. Put lug-
g a g e o r c a r g o i n t h e t r u n k i f p o s s i b l e . D o n o t
pile luggage or cargo higher than the seat
backs. Do not place anything on the luggage
cover below the rear window.
Luggage nets cannot secure hard or heavy
objects.
Keep compartment lids closed. This will help
to prevent stored objects from being thrown
about and injuring vehicle occupants during
an accident.
iPrior to closing the glove box, close the
compartment for glasses first.