Page 278 of 370
284 Practical hintsWhere will I find ...?Minispare wheel bolts
1Wheel bolt for light alloy rims
2Wheel bolt for Minispare wheel or other
steel rims
!Wheel bolts2 must be used when
mounting the Minispare wheel. The use
of any wheel bolts other than wheel
bolts 2 for the Minispare can cause
physical damage to the vehicle.
Warning!
G
Be sure to use the original length wheel
bolts when remounting the original wheel af-
ter it has been repaired.
S203 MY03_A.book Page 284 Tuesday, January 28, 2003 2:22 PM
Page 294 of 370

300 Practical hintsFlat tire
Flat tirePreparing the vehicle�
Park the vehicle as far as possible from
moving traffic on a hard surface.
�
Turn on the hazard warning flashers.
�
Engage the steering wheel lock in the
straight ahead position and set the
parking brake.
�
Move the selector lever toP (manual
transmission to first or reverse gear).
�
Have any passenger exit the vehicle at
a safe distance from the roadway.
Mounting the spare wheel�
Prepare the vehicle as described under
"Preparing the vehicle" on this page.
�
Take the spare wheel out of the trunk
as described on (
�page 281) (full size
tire spare wheel) or (�page 282)
(Minispare wheel).
Lifting the vehicle
�
Prevent the vehicle from rolling away
by blocking wheels with wheel chocks
(not included) or other sizable objects.
When changing wheel on a level surface:
�
Place one chock in front of and one be-
hind the wheel that is diagonally oppo-
site to the wheel being changed.When changing wheel on a hill:
�
Place chocks on the downhill side
blocking both wheels of the other axle.
�
Take the two-piece wheel wrench and
the jack out of the cargo compartment
(�page 279). Assemble wheel wrench.
Warning!
G
The jack is designed exclusively for jacking
up the vehicle at the jack take-up brackets
built into both sides of the vehicle. To help
avoid personal injury, use the jack only to lift
the vehicle during a wheel change. Never
get beneath the vehicle while it is supported
by the jack. Keep hands and feet away from
the area under the lifted vehicle. Always
firmly set parking brake and block wheels
before raising vehicle with jack.
Do not disengage parking brake while the
vehicle is raised. Be certain that the jack is
S203 MY03_A.book Page 300 Tuesday, January 28, 2003 2:22 PM
Page 296 of 370

302 Practical hintsFlat tireRemoving the wheel
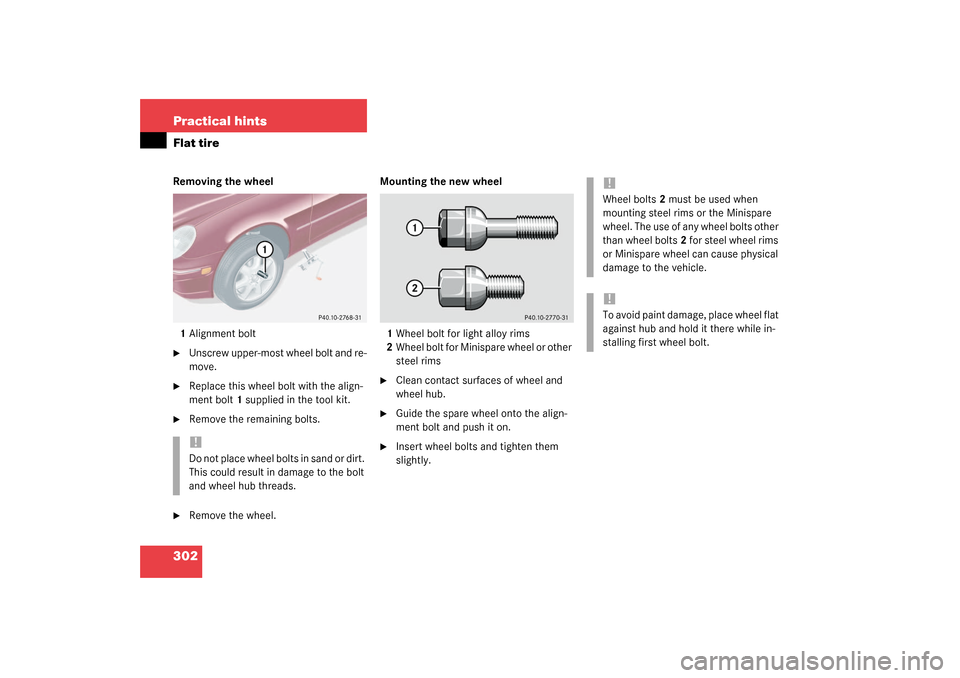
1Alignment bolt�
Unscrew upper-most wheel bolt and re-
move.
�
Replace this wheel bolt with the align-
ment bolt1 supplied in the tool kit.
�
Remove the remaining bolts.
�
Remove the wheel.Mounting the new wheel
1Wheel bolt for light alloy rims
2Wheel bolt for Minispare wheel or other
steel rims
�
Clean contact surfaces of wheel and
wheel hub.
�
Guide the spare wheel onto the align-
ment bolt and push it on.
�
Insert wheel bolts and tighten them
slightly.
!Do not place wheel bolts in sand or dirt.
This could result in damage to the bolt
and wheel hub threads.
!Wheel bolts2 must be used when
mounting steel rims or the Minispare
wheel. The use of any wheel bolts other
than wheel bolts2 for steel wheel rims
or Minispare wheel can cause physical
damage to the vehicle.!To avoid paint damage, place wheel flat
against hub and hold it there while in-
stalling first wheel bolt.
S203 MY03_A.book Page 302 Tuesday, January 28, 2003 2:22 PM
Page 297 of 370

303 Practical hints
Flat tire
�
Unscrew the alignment bolt, install last
wheel bolt and tighten slightly.Minispare wheel
In the case of a flat tire, you may tempo-
rarily use the Minispare wheel when ob-
serving the following restrictions:
�
Do not exceed a vehicle speed of
50 mph (80km/h).
�
Drive to the nearest tire repair facility
to have the flat tire repaired or re-
placed as appropriate.
�
Do not operate vehicle with more than
one spare wheel mounted.
Warning!
G
Always replace wheel bolts that are dam-
aged or rusted.
Never apply oil or grease to wheel bolts.
Damaged wheel hub threads should be re-
paired immediately. Do not continue to drive
under these circumstances! Contact an au-
thorized Mercedes-Benz Center or call
Roadside Assistance.
Incorrect mounting bolts or improperly
tightened mounting bolts can cause the
wheel to come off. This could cause an acci-
dent. Be sure to use the correct mounting
bolts.
Warning!
G
Use only genuine equipment
Mercedes-Benz wheel bolts. They are identi-
fied by the Mercedes star. Other wheel bolts
may come loose.
Do not tighten the wheel bolts when the ve-
hicle is raised. Otherwise the vehicle could
tip over.
Warning!
G
The dimensions of the Minispare wheel are
different from those of the road wheels. As
a result, the vehicle handling characteristics
change when driving with a Minispare wheel
mounted.
The spare wheel should only be used tempo-
rarily, and replaced with a regular road
wheel as quick as possible.
S203 MY03_A.book Page 303 Tuesday, January 28, 2003 2:22 PM
Page 318 of 370
324 Technical dataRims and TiresSpare wheel
Your vehicle is equipped with either a
spare wheel with full size tire or a Mini-
spare wheel.
Spare wheel with full size tire
Minispare wheelRim (steel)
7J x16 H2
Wheel offset
1.46 in (37 mm)
All season tire
(radial-ply tire)
205/55 R16 91 H
Rim (steel)
3.5B x16 H2
Wheel offset
0.67 in (17 mm)
Tire
T 125/90 R 16 B98
1
1Must not be used with snow chains.
S203 MY03_A.book Page 324 Tuesday, January 28, 2003 2:22 PM
Page 341 of 370

347 Index
Gear shifting malfunctions 140
Kickdown 140
Manual shifting 136
One-touch gearshifting 136
Program mode selector switch 139
Selector lever position 135
Starting with 44
Transmission fluid 237
Winter program mode 139
Auxiliary fuse box 315
B
BabySmart
TM
Airbag deactivation system 67
Compatible child seats 67
Self-test 67
BabySmart
TM airbag deactivation
system 339
BabySmartTM compatible child
seats 339
Backrest
Folding forward 199
Folding rearward 200
Backrest tilt 33
Backup lamps 293, 298
Bulbs 293BAS 75, 339
Messages in display 262
Batteries, electronic key
Checking 86
Batteries, SmartKey
Changing 287
Check lamp 85
Checking 86
Battery discharged
Jump starting 308
Battery, vehicle 239, 305
Charging 306
Disconnecting 306
Messages in display 278
Reconnecting 307
Reinstalling 306
Removing 306
Bi-Xenon headlamps* 339
Bi-Xenon type
Front lamp bulbs 295
Block heater 245
Blocking
Rear door window operation 71
Bolts
For Minispare wheel 284
For spare wheel 282Brake assist system (BAS) 339
Brake fluid 233, 330
Brake lamp bulbs 293
Brake lamp, high mounted 293
Brake pads
Message in display 263
Brakes 224
Break-in period 222
Bulbs, replacing 292
Additional turn signals 292
Backup lamps 293
Brake lamps 293
Fog lamps 292
Front lamps 292
High beam 292
High mounted brake lamp 293
License plate lamps 293, 298
Low beam 292
Parking lamps 292, 293, 295, 296
Rear fog lamp 293
Rear fog lamps 297
Side marker lamps 292, 297
Standing lamps 292, 293, 295, 296
Tail lamp assemblies 293, 297
Turn signal lamps 292, 293
S203 MY03_A.book Page 347 Tuesday, January 28, 2003 2:22 PM
Page 346 of 370

352 Index
Checking level 235
Consumption 235
Display messages 270
Filler neck 236
Messages in display 237, 270
Viscosity 340
Engine oil level see Oil level 233
ESP 23, 75, 340
Four wheel electronic traction system
with ESP 78
Messages in display 268
Switching off 77
Switching on 77
Warning lamp 254
ETD 340
Safety guidelines 59
ETD (Emergency tensioning device) 64
Ethanol fuel
At the gas station 232
Switching fuels 332
Exterior lamp switch 98
Exterior lamps
Delayed shut-off 122
Exterior rear view mirrors
Adjusting 39
Parking position for 128F
Fahrenheit
Setting temperature units 119
Fastening the seat belts 40
Fine adjustment
Cruise control 192
First aid kit 279
Flat tire 300
Lowering the vehicle 304
Mounting the spare wheel 300
Preparing the vehicle 300
Spare wheel 281
Flexible fuel vehicles 329, 332
At the gas station 232
Switching fuels 332
Flexible Service System (FSS) 246
Flexible service system (FSS) 340
Fog lamp, rear 100, 293
Fog lamps
Replacing bulbs 292
Fog lamps, front 100
Messages in display 274
Replacing bulbs 293
Switching on 100
Four wheel electronic traction system
(4MATIC) with ESP 784MATIC 78
Front airbags 60
Front lamps
Bi-Xenon type 295
Halogen-type 294
Messages in display 272–275
Replacing bulbs 292, 294
Switching on 98
Front seat head restraints
Installing 91
Manual seat 91
Power seat* 91
Removing 91
Front seats
Heater 94
FSS 340
FSS (Flexible Service System) 246
Fuel 233
Additives 332
Cruising range 333
E85 (Ethanol fuel) 333
Fuel reserve warning lamp 258
Gasoline additives 332
Premium unleaded gasoline 233,
329, 331
Requirements 331
S203 MY03_A.book Page 352 Tuesday, January 28, 2003 2:22 PM
Page 351 of 370

357 Index
Manual seat
Adjusting 33
Adjusting backrest tilt 33
Adjusting head restraint height 33
Adjusting head restraint tilt 34
Adjusting seat cushion tilt 33
Adjusting seat height 33
Front seat head restraints 91
Seat fore and aft adjustment 33
Manual transmission 134
Shifting into reverse 134
Starting with 44
MAXCOOL maximum cooling 156
MB Tex upholstery
Cleaning 252
Mechanical key 285
Memory function 95
Recalling positions from memory 96
Storing exterior rear view mirror park-
ing position 97
Storing key dependent settings 96
Menu
Control system 341
Menus 108
AUDIO 112
In control system 110, 111Malfunction memory 115
NAVI 114
Settings menu 116
Standard display 112
Submenus 109
TEL* 131
Trip computer 128
Microphone
Hands-free microphone 27
Miles/kilometers in speedometer
Setting 119
Minispare wheel 282, 303, 324
Bolts 284
Mirrors
Activating exterior rear view mirror
parking position 142
Adjusting 38
Automatic antiglare for rear view
mirror 141
Exterior rear view mirror 39
Exterior rear view mirror parking
positions 128
Inside rear view mirror 38
Storing exterior rear view mirror park-
ing position 97
MON 233MON (Motor Octane Number) 341
Mph or km/h in speedometer 119
Multicontour seat* 93
Multifunction display 107, 341
Selecting language 120
Standard display 111
Multifunction display messages
ABS 261
BAS 262
Battery 278
Brake fluid 264
Brake pads 263
Check engine 258
Coolant 266
Coolant level 265
Display 278
Doors 268
Engine 258
Engine oil level 270
ESP 268
Fuel reserve tank 271
Hood 271
Key 271
Lamps 272–275
Parking brake 275
Steering gear oil level 276
S203 MY03_A.book Page 357 Tuesday, January 28, 2003 2:22 PM