Page 15 of 370
21 At a glance
Cockpit
Item
Page
1
Combination switch�
Turn signals
47
�
Windshield wipers
48
�
High beam
47
2
Cruise control lever
190
3
Instrument cluster
22,
104
4
Multifunction steering
wheel
24,
108
5
Lever for voice control
system*, see separate
operating instructions
6
Overhead control panel
27
7
Opening glove box
203
8
Glove box
203
Item
Page
9
Center console
25
10
Starter switch
31, 44
11
Horn
12
Steering wheel adjustment
handle (manual)
37
13
Steering wheel adjustment
stalk (electrical)*
37
14
Hood lock release
234
15
Parking brake pedal
46
16
Door control panel
28
17
Parking brake release
51
18
Exterior lamp switch
47, 98
19
Exterior rear view mirror
adjustment
38, 97
20
Headlamp washer switch
143
S203 MY03_A.book Page 21 Tuesday, January 28, 2003 2:22 PM
Page 17 of 370

23 At a glance
Instrument cluster
Item
Page
1
Left turn signal indicator
lamp
2
Speedometer
3
Right turn signal indicator
lamp
4
Fuel gauge with:Fuel reserve warning lamp
258
5
<
Seat belt nonusage
warning lamp
258
1
Supplemental re-
straint system indi-
cator lamp
56,
256
6
Multifunction display
with:Trip odometer
105
Main odometer
Item
Page
Selector lever position
44,
138
Program mode
139
Outside temperature
display
106
Digital clock
118
7
?
Engine malfunction
indicator lamp
258
v
Electronic Stability
Program (ESP)
warning lamp
75,
254
A
High beam head-
lamp indicator
47,
101
E
Indicator lamp with-
out function
1
1The indicator lamp illuminates briefly when you
turn the key in the starter switch to position2.
DTRIndicator lamp with-
out function
1
Item
Page
8
-
Antilock Brake Sys-
tem (ABS) malfunc-
tion indicator lamp
73,
255
;
Brake warning
lamp, except Cana-
da
46,
257
3
Brake warning
lamp, Canada only
9
Tachometer
10
Reset knob:�
Resetting trip odome-
ter
105
�
Resetting individual
settings
116
�
Instrument cluster illu-
mination
104
S203 MY03_A.book Page 23 Tuesday, January 28, 2003 2:22 PM
Page 19 of 370
25 At a glance
Center console
Center console
Upper part
Item
Page
1
Seat heater*, driver’s side
94
2
Rear window
wiper/washer
49
3
ESP control switch
77
4
Hazard warning flasher
switch – switching on/off
101
5
Central locking switch
89
6
Anti-theft alarm system in-
dicator lamp
79
Tow-away alarm switch
80
Item
Page
7
Seat heater*, passenger
side
94
8
Indicator lamp
7
67
9
Audio system,
or
161
COMAND* (see separate
operating instructions)
10
Climate control
144
Automatic climate control*
152
Rear window defroster
149,
158
S203 MY03_A.book Page 25 Tuesday, January 28, 2003 2:22 PM
Page 23 of 370
29 Getting started
Unlocking
Adjusting
Driving
Parking and locking
S203 MY03_A.book Page 29 Tuesday, January 28, 2003 2:22 PM
Page 24 of 370
30 Getting startedUnlockingThe “Getting started” section provides an
overview of the vehicle’s most basic func-
tions. First-time Mercedes-Benz owners
should pay special attention to the infor-
mation given here.
If you are already familiar with the basic
functions described here, the “Controls in
detail” section will help you with further in-
formation. The corresponding page refer-
ences are at the end of each segment.
UnlockingUnlocking with the SmartKeySmartKey with remote control1‹
Lock button
2
Œ
Unlock button
3
Â
Panic button (
�page 72)
�
Press unlock button
Œ
on the key.
All turn signal lamps blink once. The
locking knobs in the doors move up.
�
Get in the vehicle and insert the key in
the starter switch.
More information can be found in the
“Controls in detail” section (
�page 84).
iCanada only:
Only vehicles equipped with an
anti-theft alarm system* have
SmartKeys with integrated panic
button*3.
S203 MY03_A.book Page 30 Tuesday, January 28, 2003 2:22 PM
Page 25 of 370

31 Getting started
Unlocking
Starter switch positionsStarter switch0For removing key
The steering is locked when the key is
removed from the starter switch. If
necessary, move steering wheel slight-
ly to allow the locking mechanism to
engage.
1Power supply to some electrical con-
sumers, such as seat adjustment
2Ignition (power supply for all electrical
consumers) and driving position
3Starting position
Warning!
G
When leaving the vehicle, always remove the
SmartKey from the starter switch and lock
the vehicle. Do not leave children unattend-
ed in the vehicle, or with access to an un-
locked vehicle. Unsupervised use of vehicle
equipment may cause an accident and/or
serious personal injury.iVehicles with automatic transmission:
The SmartKey can only be removed
from the starter switch with the gear
selector lever in positionP.
!If the key is left in starter switch
position0 for an extended period of
time, it can no longer be turned in the
starter switch.�
Remove the key from the starter
switch and reinsert.
If the key can still not be turned, the
battery may not be sufficiently
charged.
�
Check the battery and charge it if
necessary (
�page 305)
�
Get a jump start (
�page 308).
To prevent accelerated battery dis-
charge and a possible dead battery, al-
ways remove the key from the starter
switch.
S203 MY03_A.book Page 31 Tuesday, January 28, 2003 2:22 PM
Page 26 of 370

32 Getting startedAdjusting
AdjustingSeats
The seats can be adjusted either manually
or electrically, depending on the vehicle’s
equipment.Warning!
G
All seat, head restraint, steering wheel, and
rear view mirror adjustments, as well as fas-
tening of seat belts, must be done before
the vehicle is put into motion.Warning!
G
Do not adjust the driver’s seat while driving.
Adjusting the seat while driving could cause
the driver to lose control of the vehicle.
Never ride in a moving vehicle with the seat
back reclined. Sitting in an excessively re-
clined position can be dangerous. You could
slide under the seat belt in a collision. If you
slide under it, the belt would apply force at
the abdomen or neck. That could cause
serious or fatal injuries. The seat back and
seat belts provide the best restraint when
the wearer is in an upright position and belts
are properly positioned on the body. Your
seat must be adjusted so that you can cor-
rectly fasten your seat belt (
�page 40).
Never place hands under the seat or near
any moving parts while a seat is being ad-
justed.
Warning!
G
When leaving the vehicle, always remove the
key from the starter switch, and lock your
vehicle.
The power seats* can also be operated with
the driver’s or front passenger door open.
Do not leave children unattended in the ve-
hicle, or with access to an unlocked vehicle.
Unsupervised use of vehicle equipment may
cause an accident and/or serious personal
injury.
Warning!
G
Children 12 years old and under must never
ride in the front seat, except in a
Mercedes-Benz authorized BabySmart
TM
compatible child seat, which operates with
the BabySmart
TM system installed in the ve-
hicle to deactivate the passenger side front
airbag when it is properly installed. Other-
wise they will be struck by the airbag when
it inflates in a crash. If this happens, serious
or fatal injury will result.
According to accident statistics, children
are safer when properly restrained in the
rear seating positions than in the front seat-
ing positions. Infants and small children
must ride in back seats and be seated in an
appropriate infant or child restraint system,
which is properly secured with the vehicle's
seat belt and top tether strap, or secured via
lower anchors and top tether strap, fully in
accordance with the child seat manufactur-
er’s instructions.
S203 MY03_A.book Page 32 Tuesday, January 28, 2003 2:22 PM
Page 30 of 370
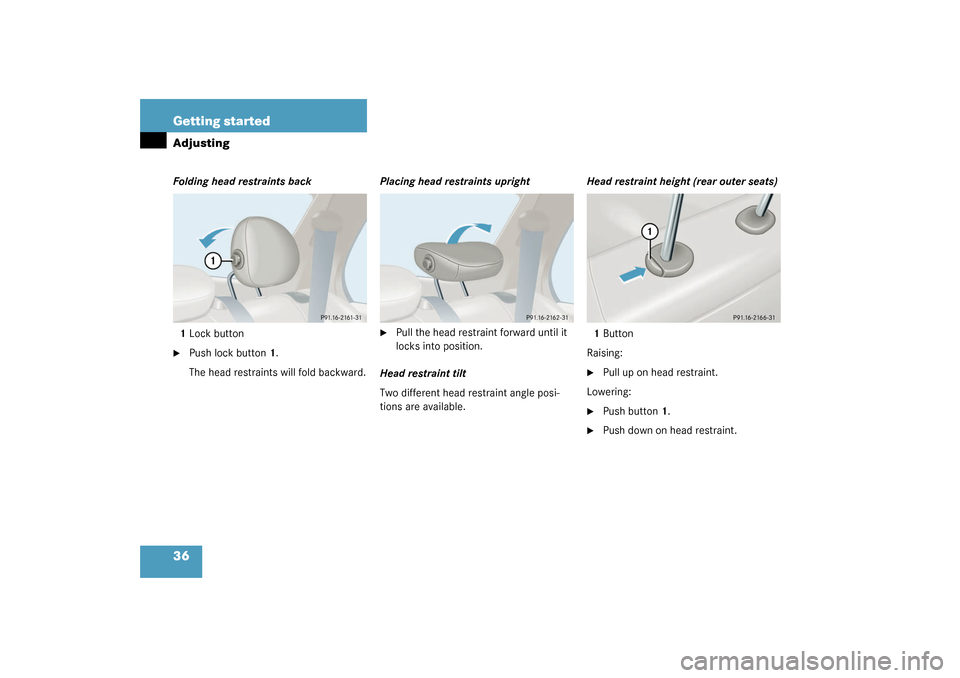
36 Getting startedAdjustingFolding head restraints back
1Lock button�
Push lock button1.
The head restraints will fold backward.Placing head restraints upright
�
Pull the head restraint forward until it
locks into position.
Head restraint tilt
Two different head restraint angle posi-
tions are available.Head restraint height (rear outer seats)
1Button
Raising:
�
Pull up on head restraint.
Lowering:
�
Push button1.
�
Push down on head restraint.
S203 MY03_A.book Page 36 Tuesday, January 28, 2003 2:22 PM