Page 188 of 356
�
Press and hold button
Œ
after un-
locking the vehicle.
The panorama sliding/pop-up roof tilts
and the windows be")
188 Controls in detailPanorama sliding/pop-up roof*Opening (Summer opening feature)�
Press and hold button
Œ
after un-
locking the vehicle.
The panorama sliding/pop-up roof tilts
and the windows begin to open after
approximately one second.
�
With the windows fully open, press and
hold button
Œ
again.
The panorama sliding/pop-up roof be-
gins to slide open after approximately
one second.
�
Release transmit button to interrupt
procedure. Closing (Convenience feature)
�
Press and hold button
‹
after lock-
ing the vehicle.
The windows and panorama slid-
ing/pop-up roof begin to close after
approximately one second.
�
Release transmit button to interrupt
procedure.
Ensure that all side windows and the pan-
orama sliding/pop-up roof are properly
closed before leaving the vehicle. Synchronizing the panorama
sliding / pop-up roof
The panorama sliding/pop-up roof must be
resynchronized each time after the battery
has been disconnected, the panorama slid-
ing/pop-up roof has been closed manually
or the panorama sliding/pop-up roof does
not open smoothly or malfunctions
(�page 279).
Page 192 of 356

192 Controls in detailLoading
LoadingRoof rack*
Mount the roof rack only between the fas-
tening points1 and in the recess of the
rubber strip 2.
Luggage cover
Removal�
Take off securing straps 1.
�
Pull cover towards rear 2.
Installation
�
Place cover into holder.
�
Attach securing straps to trunk lid.
Split folding rear bench seat
The two sections can be folded down sep-
arately to enlarge the trunk.
Warning!
G
Use only those roof racks approved by
Mercedes-Benz for your vehicle model to
avoid damage to the vehicle. Follow manu-
facturer’s installation instructions.
!Do not place anything on the luggage
cover below the rear window.
Warning!
G
When expanding the luggage compartment,
always fold the seat cushions fully forward.
Unless you are transporting cargo, the back-
rests must remain properly locked in the up-
right position.
In an accident, during hard braking or sud-
den maneuvers, loose items will be thrown
around inside the vehicle, and cause injury
to vehicle occupants unless the items are
securely fastened in the vehicle.
Page 193 of 356

193
Controls in detail
Loading
Folding the backrest forward�
Pull release handle
1.
�
Fold seat cushion 2 forward.
�
Fully retract and fold down head re-
straints
�
Pull release lever 3 and fold backrest 4
forward.
Folding the backrest rearward
�
Fold the backrest rearward until it en-
gages.
If the backrest is not locked into position,
a red indicator 1 will be visible.
�
Check for secure locking by pushing
and pulling on the backrest.
�
Fold the seat cushion rearward until it
locks into position.
Warning!
G
If a red indicator is visible with the backrest
up, then the backrest is not properly locked
into position.
Always lock backrest in its upright position
when rear seat bench is occupied, or the ex-
tended cargo compartment is not in use.
Check for secure locking by pushing and
pulling on the backrest.
In an accident, during hard braking or sud-
den maneuvers, loose items will be thrown
around inside the vehicle, and cause injury
to vehicle occupants unless the items are
securely fastened in the vehicle.
To help avoid personal injury during a colli-
sion or sudden maneuver, exercise care
when transporting cargo.
Page 195 of 356

195
Controls in detail
Useful features
Useful features
Interior storage spaces Glove box
1 Glove box
2 Glove box lid release
Opening the glove box
�
Pull lid release 2.
The glove box lid opens downward.
Closing the glove box
�
Push lid up to close. Locking the glove box
�
Insert mechanical key into the glove
box lock and turn it to position
4.
Unlocking the glove box
�
Turn mechanical key in the glove box
lock to position 3.
Warning!
G
To help avoid personal injury during a colli-
sion or sudden maneuver, exercise care
when stowing objects in the vehicle. Put lug-
g a g e o r c a r g o i n t h e t r u n k i f p o s s i b l e . D o n o t
pile luggage or cargo higher than the seat
backs. Do not place anything on the luggage
cover below the rear window.
Luggage nets cannot secure hard or heavy
objects.
Keep compartment lids closed. This will help
to prevent stored objects from being thrown
about and injuring vehicle occupants during
an accident.
iPrior to closing the glove box, close the
compartment for glasses first.
Page 197 of 356
197
Controls in detail
Useful features
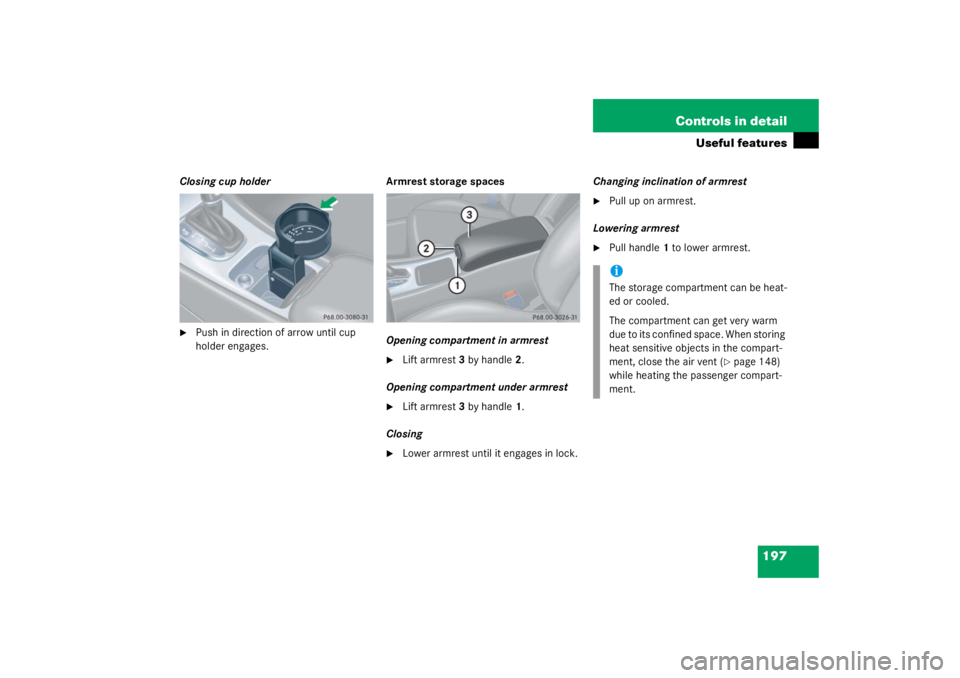
Closing cup holder�
Push in direction of arrow until cup
holder engages.
Armrest storage spaces
Opening compartment in armrest
�
Lift armrest
3 by handle 2.
Opening compartment under armrest
�
Lift armrest 3 by handle 1.
Closing
�
Lower armrest until it engages in lock. Changing inclination of armrest
�
Pull up on armrest.
Lowering armrest
�
Pull handle 1 to lower armrest.iThe storage compartment can be heat-
ed or cooled.
The compartment can get very warm
due to its confined space. When storing
heat sensitive objects in the compart-
ment, close the air vent (
�page 148)
while heating the passenger compart-
ment.
Page 199 of 356

199
Controls in detail
Useful features
Rear seat ashtray
Opening ashtray�
Pull at top of cover
2 to open ashtray.
Removing ashtray insert
�
Press latch 1 to disengage ashtray in-
sert and remove it.
Reinstalling the ashtray insert
�
Install ashtray insert.
�
Close the ashtray.
Cigarette lighter
1 Cigarette lighter
2 Cover�
Turn key in the starter switch to
position 1 or 2.
�
Slide cover 2 rearward.
�
Push in cigarette lighter 1.
The cigarette lighter will pop out auto-
matically when hot.
Warning!
G
Never touch the heating element or sides of
the cigarette lighter; they are extremely hot.
Hold the knob only.
When leaving the vehicle, always remove the
key from the starter switch and lock your ve-
hicle. Do not leave children unattended in
the vehicle, or with access to an unlocked
vehicle. Unsupervised use of vehicle equip-
ment may cause an accident and/or serious
personal injury.iThe cigarette lighter socket can be
used to accommodate electrical acces-
sories up to a maximum 85 W.
Page 201 of 356

The Tele Aid system consists of three
types of response:
�
automatic and manual e")
201
Controls in detail
Useful features
Tele Aid*
The Tele Aid system
(T
elematic A
larm I
dentification on D
e-
mand)
The Tele Aid system consists of three
types of response:
�
automatic and manual emergency
�
roadside assistance and
�
information
The Tele Aid system is operational provid-
ing that the vehicle’s battery is charged,
properly connected, not damaged and cel-
lular and GPS coverage is available.
The speaker volume of a Tele Aid call can
be adjusted when using the volume control
on the multifunction steering wheel. To
raise, press button
æ
and to lower,
press button
ç
.
�
To activate, press the SOS button, the
Roadside Assistance button
•
or
the Information button
¡
, depend-
ing on the type of response required. Shortly after the completion of your Ac-
quaintance Call, you will receive a user ID
and password via first call mail. By visiting
www.mbusa.com and selecting “Tele Aid”
(USA only), you will have access to account
information, remote door unlock and
more.
!The initial activation of the Tele Aid sys-
tem may only be performed by com-
pleting the subscriber agreement and
placing an acquaintance call using the
SOS button. Failure to
complete either
of these steps will result in a system
that is not activated. If the system is
not activated, the indicator lamp in the
SOS button stays on after turning key
in starter switch to position 2 and the
message
TELE AID – NOT ACTIVATED
will be shown in the multifunction dis-
play for approx. 10 seconds.
If you have any questions regarding ac-
tivation, please call the Response Cen-
ter at 1-800-756-9018 (in the USA) or
1-888-923-8367 (in Canada).
iThe SOS button is located above the in-
side rear view mirror.
The Roadside Assistance button
•
and the Information button
¡
are
located below the center armrest cov-
er.
!The Tele Aid system utilizes the cellular
network for communication and the
GPS (Global Positioning System) satel-
lites for vehicle location. If either of
these signals are unavailable, the
Tele Aid system may not function and if
this occurs, assistance must be sum-
moned by other means.
Page 208 of 356
, and the
reserve key is not handy:�
Contact the Mercedes-Benz")
208 Controls in detailUseful features
Remote door unlock
In case you have locked your vehicle unin-
tentionally (e.g. key inside vehicle), and the
reserve key is not handy:�
Contact the Mercedes-Benz Response
Center at 1-800-756-9018 (in the USA)
or 1-888-923-8367 (in Canada).
You will be asked to provide your pass-
word which you provided when you
completed the subscriber agreement.
�
Then return to your vehicle and pull the
trunk lid recessed handle for minimum
of 20 seconds until the “SOS” button is
flashing.
The message
EMERGENCY CALL –
CALL CONNECTED appears in the multi-
function display.
As an alternative, you may unlock the vehi-
cle via Internet using the ID and password
sent to you shortly after the completion of
your acquaintance call. T h e R e s p o n s e C e n t e r w i l l t h e n u nl o c k y o u r
vehicle with the remo
te door unlocking
feature.
iWhen a Tele Aid call has been initiated,
the audio system or the COMAND* sys-
tem audio is muted and the selected
mode (radio, tape or CD) pauses. The
optional cellular phone (if installed)
switches off. If you must use this
phone, the vehicle must be parked. Dis-
connect the coiled cord and place the
call. The COMAND* navigation system
(if engaged) will continue to run. The
display in the instrument cluster is
available for use and spoken com-
mands are only available by pressing
the RPT button on the COMAND* unit.
A pop-up window will appear in the CO-
MAND* display to indicate that a
Tele Aid call is in progress.
iThe remote door unlock feature is avail-
able if the relevant cellular phone net-
work is available.
The “SOS” button will flash and the
message
EMERGENCY CALL –
CALL CONNECTED
will appear in the mul-
tifunction display to indicate receipt of
the door unlock command.
Once the vehicle is unlocked, a Re-
sponse Center specialist will attempt
to establish voice contact with the ve-
hicle occupants.
If the trunk lid recessed handle was
pulled for more than 20 seconds be-
fore door unlock authorization was re-
ceived by the Response Center, you
must wait 15 minutes before pulling
the trunk lid recessed handle again.