Page 273 of 356

273
Practical hints
Where will I find ...?
Spare wheel bolts
1 Wheel bolt for light alloy rims
2 Wheel bolt for light alloy spare wheel
rim size 4
1/2B x15 H2 Refer to “Technical data” section
(
�page 313) for model and spare wheel
rim size information.
Warning!
G
The jack is designed exclusively for jacking
up the vehicle at the jack take-up brackets
built into both sides of the vehicle. To help
avoid personal injury, use the jack only to lift
the vehicle during a wheel change. Never
get beneath the vehicle while it is supported
by the jack. Keep hands and feet away from
the area under the lifted vehicle. Always
firmly set parking brake and block wheels
before raising vehicle with jack.
Do not disengage parking brake while the
vehicle is raised. Be certain that the jack is
always vertical (plumb line) when in use, es-
pecially on hills. Always try to use the jack
on level surface. Make sure that the jack
arm is fully seated in the jack take-up brack-
et. Always lower the vehicle onto sufficient
capacity jack stands before working under
the vehicle.
!Wheel bolts 2 must be used when
mounting spare wheel rim
size 4
1/2Bx15 H2 (
�page 313).
The use of any wheel bolts other than
wheel bolts 2 for spare wheel rim
size 4
1/2B x15 H2 can cause physical
damage to the vehicle.
Warning!
G
Be sure to use the original length wheel
bolts when remounting the original wheel af-
ter it has been repaired.
Page 288 of 356
288 Practical hintsFlat tire
Flat tirePreparing the vehicle�
Park the vehicle as far as possible from
moving traffic on a hard surface.
�
Turn on the hazard warning flashers.
�
Engage the steering wheel lock in the
straight ahead position and set the
parking brake.
�
Move the selector lever toP (manual
transmission to 1st or reverse gear).
�
Have any passenger exit the vehicle at
a safe distance from the roadway.
Mounting the spare wheel Preparing the vehicle
Prepare the vehicle as described under
“Preparing the vehicle” on this page.
�
Take the spare wheel out of the trunk
(�page 271).
Lifting the vehicle
�
Prevent the vehicle from rolling away
by blocking wheels with wheel chocks
(not included) or other sizable objects.
When changing wheel on a level surface:
�
Place one chock in front of and one be-
hind the wheel that is diagonally oppo-
site to the wheel being changed.
Warning!
G
The dimensions of the spare wheel are dif-
ferent from those of the road wheels. As a
result, the vehicle handling characteristics
change when driving with a spare wheel
mounted. Adapt your driving style accord-
ingly.
The spare wheel is for temporary use only.
When driving with spare wheel mounted, en-
sure proper tire pressure and do not exceed
vehicle speed of 50 mph (80 km/h).
Drive to the nearest Mercedes-Benz Center
as soon as possible to have the spare wheel
replaced with a regular road wheel.
Never operate the vehicle with more than
one spare wheel mounted.
��
Page 290 of 356
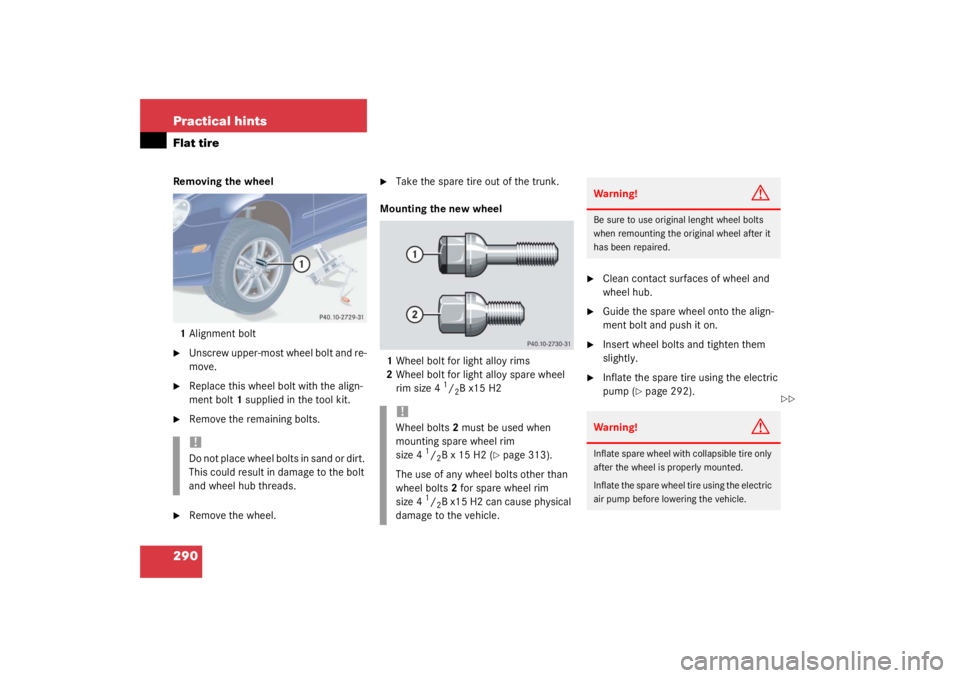
290 Practical hintsFlat tireRemoving the wheel1 Alignment bolt�
Unscrew upper-most wheel bolt and re-
move.
�
Replace this wheel bolt with the align-
ment bolt 1 supplied in the tool kit.
�
Remove the remaining bolts.
�
Remove the wheel.
�
Take the spare tire out of the trunk.
Mounting the new wheel
1 Wheel bolt for light alloy rims
2 Wheel bolt for light alloy spare wheel
rim size 4
1/2B x15 H2
�
Clean contact surfaces of wheel and
wheel hub.
�
Guide the spare wheel onto the align-
ment bolt and push it on.
�
Insert wheel bolts and tighten them
slightly.
�
Inflate the spare tire using the electric
pump (
�page 292).
!Do not place wheel bolts in sand or dirt.
This could result in damage to the bolt
and wheel hub threads.
!Wheel bolts 2 must be used when
mounting spare wheel rim
size 4
1/2B x 15 H2 (
�page 313).
The use of any wheel bolts other than
wheel bolts 2 for spare wheel rim
size 4
1/2B x15 H2 can cause physical
damage to the vehicle.
Warning!
G
Be sure to use original lenght wheel bolts
when remounting the original wheel after it
has been repaired.Warning!
G
Inflate spare wheel with collapsible tire only
after the wheel is properly mounted.
Inflate the spare wheel tire using the electric
air pump before lowering the vehicle.
��
Page 292 of 356
292 Practical hintsFlat tire�
Before storing the jack in the trunk, it
should be fully collapsed, with handle
folded in.Inflating the spare tire
�
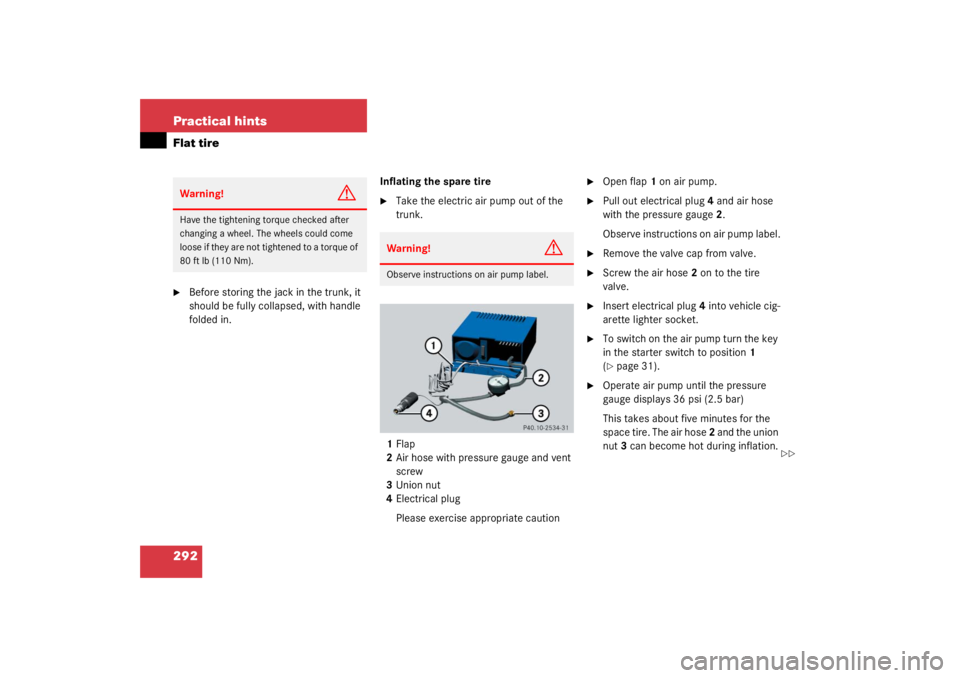
Take the electric air pump out of the
trunk.
1 Flap
2 Air hose with pressure gauge and vent
screw
3 Union nut
4 Electrical plug
Please exercise appropriate caution
�
Open flap 1 on air pump.
�
Pull out electrical plug 4 and air hose
with the pressure gauge 2.
Observe instructions on air pump label.
�
Remove the valve cap from valve.
�
Screw the air hose 2 on to the tire
valve.
�
Insert electrical plug 4 into vehicle cig-
arette lighter socket.
�
To switch on the air pump turn the key
in the starter switch to position 1
(�page 31).
�
Operate air pump until the pressure
gauge displays 36 psi (2.5 bar)
This takes about five minutes for the
space tire. The air hose 2 and the union
nut 3 can become hot during inflation.
Warning!
G
Have the tightening torque checked after
changing a wheel. The wheels could come
loose if they are not tightened to a torque of
80 ft lb (110 Nm).
Warning!
G
Observe instructions on air pump label.
��
Page 313 of 356
313
Technical data
Rims and Tires
Spare wheel
C230Kompressor
C 320
Rim (light alloy)
4 1/2B x15 H2
4 1/2B x16 H2
Wheel offset
0.47 in (12 mm)
0.47 in (12 mm)
Collapsible Tire
165 - 15 89P
1
165/70 - 16 92P
1
1Must not be used with snow chains.
Page 328 of 356

328 Technical termsCollapsible tireAn especially compact spare tire that
must be inflated with a provided air
pump before using. It should only be
used to bring the vehicle to the nearest
service station.
COMAND* (C
ockpit M
anagement and D
ata Sys-
tem)
Information and operating center for
vehicle sound and communications
systems, including the radio and navi-
gation system, as well as for other op-
tional equipment (CD changer,
telephone, etc.).
Control system The control system is used to call up
vehicle information and to change
component settings. Information and
messages appear in the multifunction
display. The driver uses the buttons on
the multifunction steering wheel to
navigate through the system and to ad-
just settings. Cruise control
Driving convenience system for auto-
matically maintaining the vehicle speed
set by the driver.
Engine number The number set by the manufacturer
and placed on the cylinder block to
uniquely identify each engine pro-
duced.
Engine oil viscosity Measurement for the inner friction (vis-
cosity) of the oil at different tempera-
tures. The higher the temperature an
oil can tolerate without becoming thin,
or the lower the temperature it can tol-
erate without becoming viscous, the
better the viscosity.
ESP (E
lectronic S
tability Pr
ogram)
Improves vehicle handling and direc-
tional stability. ETD
(E
mergency T
ensioning D
evice)
Device which deploys in certain frontal
and rear collisions exceeding the sys-
tem's threshold to tighten the seat
belts.
->SRS
FSS (F
lexible S
ervice S
ystem)
Service indicator in the multifunction
display that informs the driver when
the next vehicle maintenance service is
due.
Gear range Number of gears which are available to
the automatic transmission for shifting.
The automatic gear shifting process
can be adapted to specific operating
conditions using the selector lever.
Page 335 of 356

335
Index
Program mode selector switch 136
Selector lever position 132
Starting with 45
Transmission fluid 229
Winter program mode 136
Auxiliary fuse box 304
B
BabySmart
TM
Airbag deactivation system 67
Compatible child seats 67, 327
Self-test 68
BabySmart
TM airbag deactivation system
327
Backrest Folding forward 193
Folding rearward 193
BAS 74, 327 Messages in display 254
Batteries, SmartKey Changing 276
Check lamp 83
Checking 84
Battery discharged Jump starting 297 Battery, vehicle 231, 294
Charging 295
Disconnecting 295
Messages in display 270
Reconnecting 295
Reinstalling 295
Removing 295
Bi-Xenon headlamps* 327
Bi-Xenon type Front lamp bulbs 283
Block heater 237
Bolts For spare wheel 273
Brake assist system (BAS) 327
Brake fluid 225, 319
Brake lamp bulbs 281
Brake lamp, high mounted 281
Brake pads Message in display 256
Brakes 216 Warning lamp 249
Break-in period 214
Bulbs, replacing 280 Additional turn signals 280
Brake lamps 281
Fog lamps 280 Front lamps 280
High beam 280
High mounted brake lamp 281
License plate lamps 281, 286
Low beam 280
Parking lamps 280, 281, 283, 284
Rear fog lamp 281
Rear fog lamps 285
Side marker lamps 280, 285
Standing lamps 280, 281, 283, 284
Tail lamp assemblies 281, 285
Turn signal lamps 280, 281
Button Audio system 162
C
CAC (Customer Assistance Center) 327
Calling up Range (distance to empty) 126
Service indicator 239
CAN system 327
Capacities Fuels, coolants, lubricants, etc. 317
Cargo compartment Lighting 101
Casette mode Playing cassettes 168
Page 339 of 356

339
Index
Electronic Stability Program
see ESP 23, 75, 328
Emergency call Telephone 179
Emergency call system* 201
Emergency calls Initiating an emergency call 204
With Tele Aid* 202
Emergency operation (Limp Home Mode) 137
Emergency operations Closing sliding/pop-up roof 278
Locking the vehicle 275
Opening sliding/pop-up roof 278
Remote door unlock 208
Unlocking the vehicle 274
Emergency release Trunk lid 86
Emergency tensioning device see ETD 64, 328
Emission control 223
Emission control label 308
Ending A call (telephone) 128
Engine
Compartment 226 Message in display 250
Starting with automatic transmission
45
Starting with manual transmission 44
Starting with the key 45
Technical data 310
Turning off with the key 52
Engine cleaning 242
Engine compartment 226 Fuse box in 303
Hood 226
Engine malfunction indicator lamp 23, 250
Engine number 328
Engine oil 227, 319 Adding 228
Additives 319
Checking level 227
Consumption 227
Display messages 262
Filler neck 228
Messages in display 229, 262
Viscosity 328
Engine oil level see Oil level 225
ESP 23, 75, 328 Messages in display 260
Switching off 76 Switching on 77
Warning lamp 246
ETD 328 Safety guidelines 60
ETD (Emergency tensioning device) 64
Exterior lamp switch 96
Exterior lamps Delayed shut-off 120
Exterior rear view mirror Activating parking position 140
Exterior rear view mirrors Adjusting 40
Parking position for 124
F
Fahrenheit Setting temperature units 117
Fastening the seat belts 41
Fine adjustment Cruise control 191
First aid kit 271
Flat tire 288 Inflating the spare tire 292
Lowering the vehicle 291
Mounting the spare wheel 288
Preparing the vehicle 288
Spare wheel 271
