Page 37 of 225
29 Audio
Radio operation
You can select between FM-, AM- and WB-
Band.
AM Band�
Press c until “AM” is displayed in
the upper left hand corner of the dis-
play.
The AM station last tuned to will begin
to play. The frequency will appear in
the display.Weather Band WB
�
In the AM or FM main radio menu, turn
the right-hand rotary/push-button v
to highlight WB and press to confirm.
The channel last tuned to will appear in
the display.
Changing the Radio band
P82.85-9078-31
Frequency band
FM
AM
Frequency range
87.7 - 107.9 FM
530 - 1710 AM
P82.85-9079-31
iIf a weather band station cannot be re-
ceived on this channel, an automatic
search run of all 7 channels will take
place. As soon as a weather band stati-
on is received, the search stops and the
channel appears in the display. The au-
tomatic search will perform two cycles
through the 7 channels.
Message “No WB”
A weather band station cannot be recei-
ved on any of the 7 channels.
Page 39 of 225
31 Audio
Radio operation
Seek tuning at the multifunction stee-
ring wheel
If the multifunctional display shows the
station frequency, then:�
Press F or G to select a higher/
lower frequency preset.Manual tuning (FM, AM)
�
Press g or h on the rocker
switch longer than 2 seconds.
The menu fields will appear in light grey
lettering.FM Band
The frequency displayed will change in in-
crements of 0.2 MHz.
AM Band
Tuning will take place in increments of
10 kHz.
iThe up/down arrows have different
functions depending on which mode the
seek function in the multifunction dis-
play is programmed to.
The two available options are Memory
Scan or Frequency Scan (Station
search). Refer to the vehicle operator’s
manual on how to program this option.
P82.85-9081-31
iActivating the AM Band (
�page 29).
Page 44 of 225
36 AudioRadio operationSaving stations manually (AM)�
Activate the AM Band (
�page 29).
Save a station in the same way as descri-
bed for the FM Band (
�page 34)
�
in the AM main radio menu
�
on the memory listOn the memory list
�
Press the right-hand rotary/push-
button v to confirm “AM Presets”.
The AM preset memory will appear.Saving stations automatically (FM, AM)
1Function is active
If the FM/AM main radio menu is display-
ed
�
Turn the right-hand rotary/push-button
v to highlight “Auto Presets” and
press the button longer than
2 seconds.
Message 1 will appear.
P82.85-9087-31
iThe standard AM presets are not affec-
ted by the Auto presets. This is a se-
cond option for storing a station range
you are currently receiving.
P82.85-9088-31
P82.85-9089-31
1
Page 48 of 225
40 AudioRadio operation1No audio source has been switched on
2The radio is switched on
3Frequency band and the memory pre-
set, if applicable
4Frequency of the station selected5“SP” (memory) - appears if “Memory”
instead of “Station search” or “Freq.”
(depending on model) has been selec-
ted in the “Vehicle” submenu. Refer to
“Control system” in chapter “Controls
in detail” in your vehicle's operating in-
structions for further information.
�
Press # at the COMAND control
unit to switch on COMAND.
�
Press c at the COMAND control
unit to switch to radio operation.
�
Repeatedly press key E or H at
the multifunction steering wheel until
display 2 appears.
Multifunction display
Page 49 of 225
41 Audio
Radio operation
�
Repeatedly press F or G at the
multifunction steering wheel until the
desired station frequency appears.
�
Press E or H at the multifunc-
tion steering wheel to display the next
or previous system.
Page 52 of 225

44 AudioCD operation
CD playback locations are�
the CD drive in the COMAND operating
unit
You can play audio CDs or read data
from the navigation CD.
�
the CD changer with 6 magazine slots.
The status line in the main CD menu
(
�page 50) indicates which component is
being used for CD playback.Tips on caring for your CDs
�
Only touch the CD on the sides.
�
Avoid touching the CD surface with
your fingers.
�
Clean the CD with a dry, lint-free cloth.
Wipe them from the inside to the outer
edge. Never wipe the CD in a circular
motion.
�
Do not use rubbing alcohol or solvents
to clean the CDs.
�
Do not expose the CDs to heat or direct
sunlight.
�
Do not write or put stickers on CD.
General information on CD operationHealth hazard
G
The CD drive and CD changer are Class 1 la-
ser products. There is a danger of invisible
laser radiation when you open or damage
the cover.
Do not remove the cover. The CD drive and
the CD changer do not contain any parts
which can be serviced by the user. For safe-
ty reasons, have any necessary service work
performed by an authorized Mercedes-Benz
Center.
!Use only CDs with a diameter of 12 cm,
do not use 8-cm CDs.
An 8-cm CD adapter may cause damage
to the CD changer and should not be
used.
iYou can name a CD (
�page 55). This
name then will appear on the display
during CD playback.
Page 53 of 225

45 Audio
CD operation
Loading a CD into the CD drive
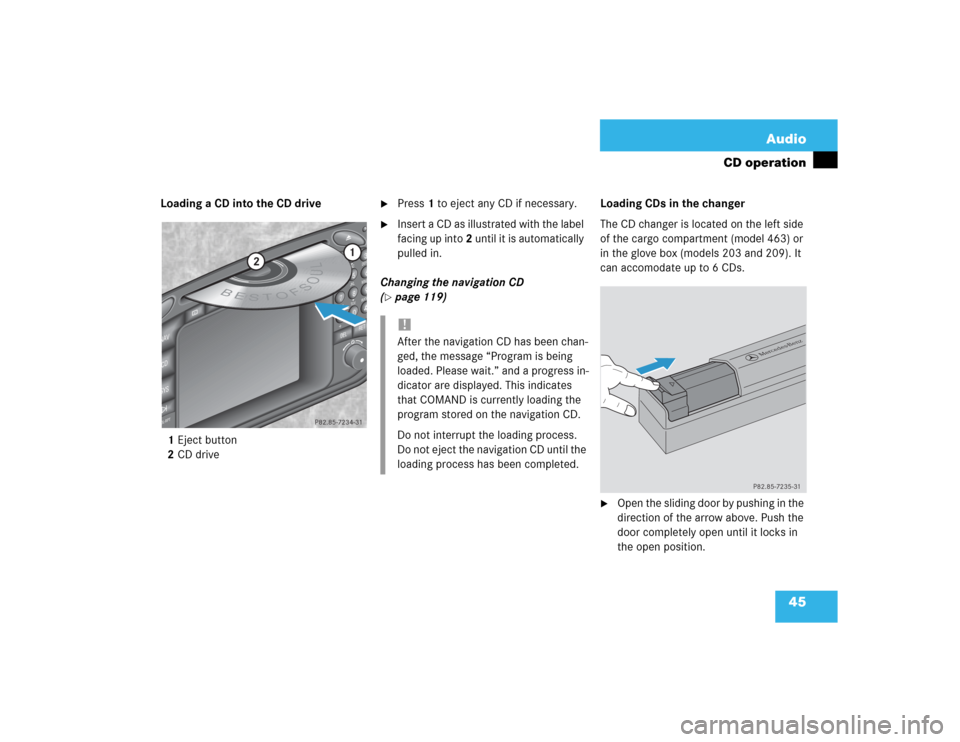
1Eject button
2CD drive
�
Press 1 to eject any CD if necessary.
�
Insert a CD as illustrated with the label
facing up into 2 until it is automatically
pulled in.
Changing the navigation CD
(
�page 119)Loading CDs in the changer
The CD changer is located on the left side
of the cargo compartment (model 463) or
in the glove box (models 203 and 209). It
can accomodate up to 6 CDs.
�
Open the sliding door by pushing in the
direction of the arrow above. Push the
door completely open until it locks in
the open position.
ABCJKLT
U
V
GHI
PQRS+
DEFMNOWXY
2
1
3
5
4
6
8
7
9
0
D
E
L
NA
V
MAP
CDSYSVOL-RPT
-
+
R
E
T
B
E
S
T
O
FSOUL
1
2
P82.85-7234-31
!After the navigation CD has been chan-
ged, the message “Program is being
loaded. Please wait.” and a progress in-
dicator are displayed. This indicates
that COMAND is currently loading the
program stored on the navigation CD.
Do not interrupt the loading process.
Do not eject the navigation CD until the
loading process has been completed.
P82.85-7235-31
Page 62 of 225
54 AudioCD operation�
Turn the right-hand rotary/push-button
v to highlight “CD Select” in the main
CD menu and press to confirm.
The “CD Select” menu will appear.
�
Turn the right-hand rotary/push-button
v to highlight the desired CD and
press to confirm.
The message “Loading CD ...” will ap-
pear in 1. Playback will then begin with
track 1, the main CD menu will appear.
Fast forward
�
Press h longer than 2 seconds and
keep it depressed.
The message “Forward S” will appear.
The display shows the current position
via the time indicator display.Fast reverse
�
Press g longer than 2 seconds and
keep it depressed.
The message “T Reverse” will appear.
Ending the function
�
Releaseg or h.
Playback will resume.
iIf magazine slots are empty, it is not
possible to select them with the right-
hand rotary/push-button v.
If you select an empty magazine slot
with a number key, e.g. 4 the message
“No CD” is displayed.
Fast forward/reverse
P82.85-9104-31