2003 LINCOLN BLACKWOOD Motorcraft part
[x] Cancel search: Motorcraft partPage 208 of 280
WASHING THE EXTERIOR
Wash your vehicle regularly with cool or lukewarm water and a neutral
Ph shampoo, such as Motorcraft Detail Wash (ZC-3–A), which is available
from your dealer.
•Never use strong household detergents or soap, such as dish washing
or laundry liquid. These products can discolor and spot painted
surfaces.
•Never wash a vehicle that is“hot to the touch”or during exposure to
strong, direct sunlight.
•Always use a clean sponge or carwash mitt with plenty of water for
best results.
•Dry the vehicle with a chamois or soft terry cloth towel in order to
eliminate water spotting.
•It is especially important to wash the vehicle regularly during the
winter months, as dirt and road salt are difficult to remove and cause
damage to the vehicle.
•Immediately remove items such as gasoline, diesel fuel, bird droppings
and insect deposits because they can cause damage to the vehicle’s
paintwork and trim over time.
•Remove any exterior accessories, such as antennas, before entering a
car wash.
•Suntan lotions and insect repellents can damage any painted
surface; if these substances come in contact with your vehicle,
wash off as soon as possible.
•If your vehicle is equipped with running boards, do not use
rubber, plastic and vinyl protectant products on the running
board surface, as the area may become slippery.
WAXING
Applying a polymer paint sealant to your vehicle every six months will
assist in reducing minor scratches and paint damage.
•Wash the vehicle first.
•Do not use waxes that contain abrasives.
•Do not allow paint sealant to come in contact with any non-body
(low-gloss black) colored trim, such as grained door handles, roof
racks, bumpers, side moldings, mirror housings or the windshield cowl
area. The paint sealant will“gray”or stain the parts over time.
Cleaning
208
Page 209 of 280
PAINT CHIPS
Your dealer has touch-up paint and sprays to match your vehicle’s color.
Take your color code (printed on a sticker in the driver’s door jam) to
your dealer to ensure you get the correct color.
•Remove particles such as bird droppings, tree sap, insect deposits, tar
spots, road salt and industrial fallout before repairing paint chips.
•Always read the instructions before using the products.
ALUMINUM WHEELS AND COVERS
Aluminum wheel rims or covers are coated with a clearcoat paint finish.
In order to maintain their shine:
•Clean weekly with Motorcraft Wheel and Tire Cleaner (ZC-37–A),
which is available from your dealer. Heavy dirt and brake dust
accumulation may require agitation with a sponge. Rinse thoroughly
with a strong stream of water.
•Never apply any cleaning chemical to hot or warm wheel rims or
covers.
•Some automatic car washes may cause damage to the finish on your
wheel rims or covers. Chemical-strength cleaners, or cleaning
chemicals, in combination with brush agitation to remove brake dust
and dirt, could wear away the clearcoat finish over time.
•Do not use hydrofluoric acid-based or high caustic-based wheel
cleaners, steel wool, fuels or strong household detergent.
•To remove tar and grease, use Ford Extra Strength Tar and Road Oil
Removal (B7A-19520–AA), available from your dealer.
ENGINE
Engines are more efficient when they are clean because grease and dirt
buildup keep the engine warmer than normal. When washing:
•Take care when using a power washer to clean the engine. The
high-pressure fluid could penetrate the sealed parts and cause
damage.
•Do not spray a hot engine with cold water to avoid cracking the
engine block or other engine components.
•Spray Motorcraft Engine Shampoo and Degreaser (ZC-20) on all parts
that require cleaning and pressure rinse clean.
•Cover the highlighted areas to prevent water damage when cleaning
the engine.
Cleaning
209
Page 211 of 280
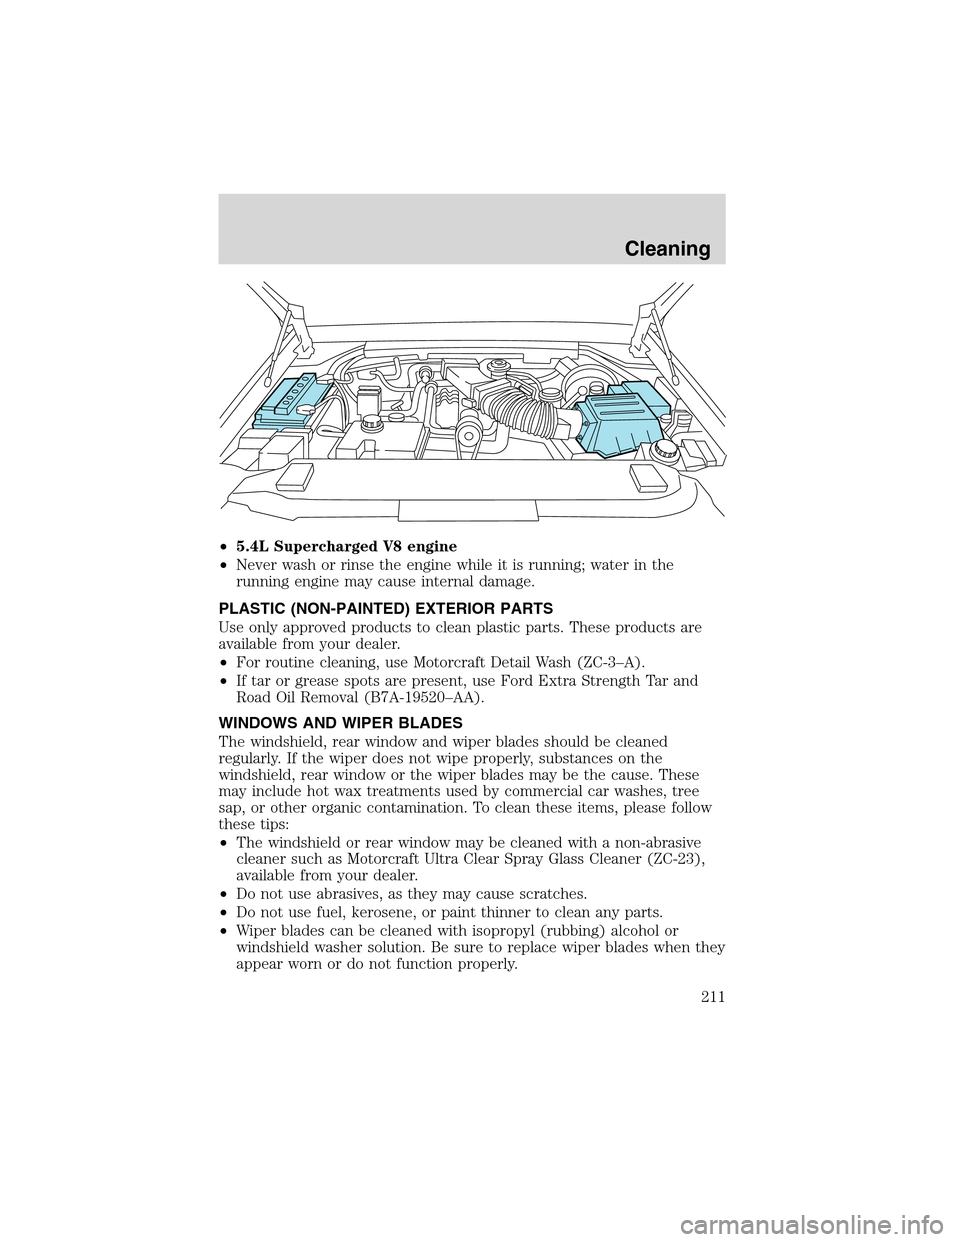
•5.4L Supercharged V8 engine
•Never wash or rinse the engine while it is running; water in the
running engine may cause internal damage.
PLASTIC (NON-PAINTED) EXTERIOR PARTS
Use only approved products to clean plastic parts. These products are
available from your dealer.
•For routine cleaning, use Motorcraft Detail Wash (ZC-3–A).
•If tar or grease spots are present, use Ford Extra Strength Tar and
Road Oil Removal (B7A-19520–AA).
WINDOWS AND WIPER BLADES
The windshield, rear window and wiper blades should be cleaned
regularly. If the wiper does not wipe properly, substances on the
windshield, rear window or the wiper blades may be the cause. These
may include hot wax treatments used by commercial car washes, tree
sap, or other organic contamination. To clean these items, please follow
these tips:
•The windshield or rear window may be cleaned with a non-abrasive
cleaner such as Motorcraft Ultra Clear Spray Glass Cleaner (ZC-23),
available from your dealer.
•Do not use abrasives, as they may cause scratches.
•Do not use fuel, kerosene, or paint thinner to clean any parts.
•Wiper blades can be cleaned with isopropyl (rubbing) alcohol or
windshield washer solution. Be sure to replace wiper blades when they
appear worn or do not function properly.
Cleaning
211
Page 213 of 280
LEATHER SEATS
(IF EQUIPPED, EXCEPT FOR THE KING RANCH SUPERCREW)
Your leather seating surfaces have a clear, protective coating over the
leather.
For King Ranch F-150 SuperCrew leather seats, refer to separate
section in this chapter.
•To clean, use a soft cloth with Motorcraft Deluxe Leather and Vinyl
Cleaner (ZC-11–A). Dry the area with a soft cloth.
•To help maintain its resiliency and color, use the Motorcraft Deluxe
Leather Care Kit (ZC-11–D), available from your authorized dealer.
•Do not use household cleaning products, alcohol solutions, solvents or
cleaners intended for rubber, vinyl and plastics, or oil/petroleum-based
leather conditioners. These products may cause premature wearing of
the clear, protective coating.
LEATHER SEATS FOR THE KING RANCH F-150 SUPERCREW
ONLY (IF EQUIPPED)
Your vehicle is equipped with seating covered in premium, top-grain
leather which is extremely durable, but still requires special care and
maintenance in order to ensure longevity and comfort.
Regular cleaning and conditioning will maintain the appearance of the
leather. Failure to care for the leather can result in drying out and fading
of the material.
CLEANING
For dirt, use a vacuum cleaner then use a clean, damp cloth or soft
brush.
First use a dry cloth then wipe with a damp cloth. Allow the area to dry,
then apply conditioner.
•Clean spills as quickly as possible.
•Test any cleaner or stain remover on an inconspicuous part of the
leather as cleaners may darken the leather. For more specific cleaning
information, contact the King Ranch Saddle Shop at 1–800–282–KING
(5464).
•Do not spill coffee, ketchup, mustard, orange juice or oil-based
products on the leather as they may permanently stain the leather.
•Do not use household cleaning products, alcohol solutions, solvents or
cleaners intended for rubber, vinyl or plastics.
Cleaning
213
Page 216 of 280

SERVICE RECOMMENDATIONS
To help you service your vehicle:
•We highlight do-it-yourself items in the engine compartment for easy
location.
•We provide a scheduled maintenance guide which makes tracking
routine service easy.
If your vehicle requires professional service, your dealership can provide
the necessary parts and service. Check yourWarranty Guide/Owner
Information Guideto find out which parts and services are covered.
Use only recommended fuels, lubricants, fluids and service parts
conforming to specifications. Motorcraft parts are designed and built to
provide the best performance in your vehicle.
PRECAUTIONS WHEN SERVICING YOUR VEHICLE
•Do not work on a hot engine.
•Make sure that nothing gets caught in moving parts.
•Do not work on a vehicle with the engine running in an enclosed
space, unless you are sure you have enough ventilation.
•Keep all open flames and other burning (cigarettes) material away
from the battery and all fuel related parts.
Working with the engine off
•Automatic transmission:
1. Set the parking brake and shift to P (Park).
2. Turn off the engine and remove the key.
3. Block the wheels.
•Manual transmission:
1. Set the parking brake, depress the clutch and place the gearshift in 1
(First).
2. Turn off the engine and remove the key.
3. Block the wheels.
Maintenance and Specifications
216
Page 238 of 280
Fuel Filter
For fuel filter replacement, see your dealer or a qualified service
technician. Refer to the scheduled maintenance guide for the appropriate
intervals for changing the fuel filter.
Replace the fuel filter with an authorized Motorcraft part. The
customer warranty may be void for any damage to the fuel system
if an authorized Motorcraft fuel filter is not used.
ESSENTIALS OF GOOD FUEL ECONOMY
Measuring techniques
Your best source of information about actual fuel economy is you, the
driver. You must gather information as accurately and consistently as
possible. Fuel expense, frequency of fill-ups or fuel gauge readings are
NOT accurate as a measure of fuel economy. We do not recommend
taking fuel economy measurements during the first 1,600 km (1,000 miles)
of driving (engine break-in period). You will get a more accurate
measurement after 3,000 km–5,000 km (2,000 miles-3,000 miles).
Filling the tank
The advertised fuel capacity of the fuel tank on your vehicle is equal to
the rated refill capacity of the fuel tank as listed in theRefill capacities
section of this chapter.
The advertised capacity is the amount of the indicated capacity and the
empty reserve combined. Indicated capacity is the difference in the
amount of fuel in a full tank and a tank when the fuel gauge indicates
empty. Empty reserve is the small amount of fuel remaining in the fuel
tank after the fuel gauge indicates empty.
The amount of usable fuel in the empty reserve varies and should
not be relied upon to increase driving range. When refueling your
vehicle after the fuel gauge indicates empty, you might not be
able to refuel the full amount of the advertised capacity of the
fuel tank due to the empty reserve still present in the tank.
For consistent results when filling the fuel tank:
•Turn the engine/ignition switch to the off position prior to refueling,
an error in the reading will result if the engine is left running.
•Use the same filling rate setting (low—medium—high) each time
the tank is filled.
•Allow no more than 2 automatic click-offs when filling.
Maintenance and Specifications
238
Page 241 of 280
•Using fuel blended with alcohol may lower fuel economy.
•Fuel economy may decrease with lower temperatures during the first
12–16 km (8–10 miles) of driving.
•Driving on flat terrain offers improved fuel economy as compared to
driving on hilly terrain.
•Transmissions give their best fuel economy when operated in the top
cruise gear and with steady pressure on the gas pedal.
•Four-wheel-drive operation (if equipped) is less fuel efficient than
two-wheel-drive operation.
•Close windows for high speed driving.
EPA window sticker
Every new vehicle should have the EPA window sticker. Contact your
dealer if the window sticker is not supplied with your vehicle. The EPA
window sticker should be your guide for the fuel economy comparisons
with other vehicles.
It is important to note the box in the lower left corner of the window
sticker. These numbers represent the Range of L/100 km (MPG)
expected on the vehicle under optimum conditions. Your fuel economy
may vary depending upon the method of operation and conditions.
EMISSION CONTROL SYSTEM
Your vehicle is equipped with various emission control components and a
catalytic converter which will enable your vehicle to comply with
applicable exhaust emission standards. To make sure that the catalytic
converter and other emission control components continue to work
properly:
•Use only the specified fuel listed.
•Avoid running out of fuel.
•Do not turn off the ignition while your vehicle is moving, especially at
high speeds.
•Have the items listed in your scheduled maintenance guide performed
according to the specified schedule.
The scheduled maintenance items listed in the scheduled maintenance
guide are essential to the life and performance of your vehicle and to its
emissions system.
If other than Ford, Motorcraft or Ford-authorized parts are used for
maintenance replacements or for service of components affecting
Maintenance and Specifications
241
Page 250 of 280
AIR FILTER MAINTENANCE
Refer to the scheduled maintenance guide for the appropriate intervals
for changing the air filter element.
When changing the air filter element, use only the Motorcraft air filter
element listed. Refer toMotorcraft Part Numbers.
Note:Do not start your engine with the air cleaner removed and do not
remove it while the engine is running.
Changing the air filter element
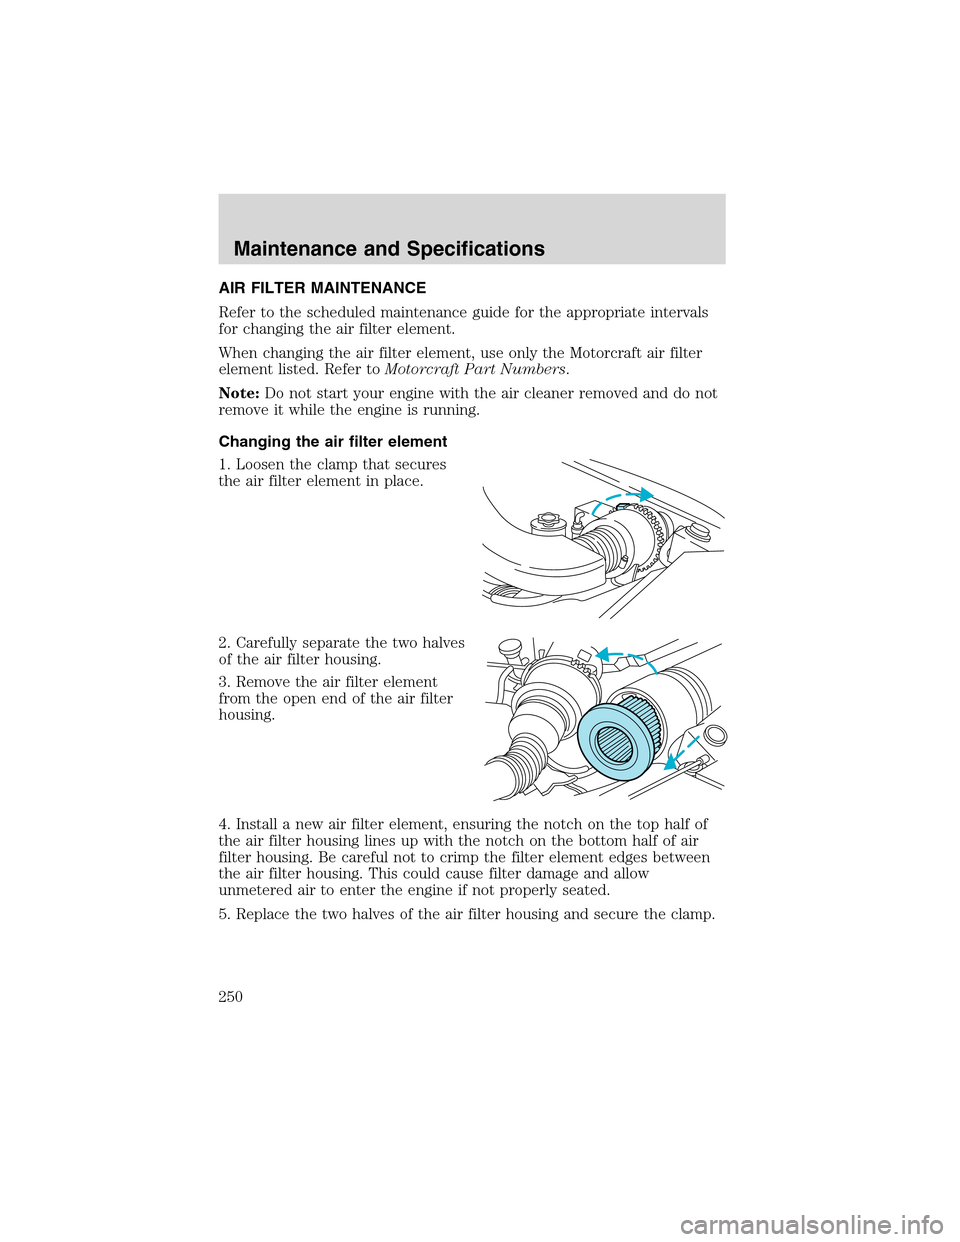
1. Loosen the clamp that secures
the air filter element in place.
2. Carefully separate the two halves
of the air filter housing.
3. Remove the air filter element
from the open end of the air filter
housing.
4. Install a new air filter element, ensuring the notch on the top half of
the air filter housing lines up with the notch on the bottom half of air
filter housing. Be careful not to crimp the filter element edges between
the air filter housing. This could cause filter damage and allow
unmetered air to enter the engine if not properly seated.
5. Replace the two halves of the air filter housing and secure the clamp.
Maintenance and Specifications
250