2003 LINCOLN BLACKWOOD brake light
[x] Cancel search: brake lightPage 157 of 280
Once through water, always try the brakes. Wet brakes do not stop the
vehicle as effectively as dry brakes. Drying can be improved by moving
your vehicle slowly while applying light pressure on the brake pedal.
Be cautious of sudden changes in vehicle speed or direction when you
are driving in mud. Even 4WD vehicles can lose traction in slick mud. As
when you are driving over sand, apply the accelerator slowly and avoid
spinning your wheels. If the vehicle does slide, steer in the direction of
the slide until you regain control of the vehicle.
If the transmission, transfer case or front axle are submerged in water,
their fluids should be checked and changed, if necessary.
Driving through deep water may damage the transmission.
If the front or rear axle is submerged in water, the axle lubricant should
be replaced.
After driving through mud, clean off residue stuck to rotating driveshafts
and tires. Excess mud stuck on tires and rotating driveshafts causes an
imbalance that could damage drive components.
“Tread Lightly”is an educational
program designed to increase public
awareness of land-use regulations
and responsibilities in our nations
wilderness areas. Ford Motor
Company joins the U.S. Forest Service and the Bureau of Land
Management in encouraging you to help preserve our national forest and
other public and private lands by“treading lightly.”
Driving on hilly or sloping terrain
Although natural obstacles may make it necessary to travel diagonally up
or down a hill or steep incline, you should always try to drive straight up
or straight down.Avoid driving crosswise or turning on steep
slopes or hills. A danger lies in losing traction, slipping sideways and
possibly rolling over. Whenever driving on a hill, determine beforehand
the route you will use. Do not drive over the crest of a hill without
seeing what conditions are on the other side. Do not drive in reverse
over a hill without the aid of an observer.
Driving
157
Page 161 of 280
Failure to maintain your vehicle properly may void the warranty, increase
your repair cost, reduce vehicle performance and operational capabilities
and adversely affect driver and passenger safety. Frequent inspection of
vehicle chassis components is recommended if the vehicle is subjected to
heavy off-road usage.
DRIVING THROUGH WATER
If driving through deep or standing water is unavoidable, proceed very
slowly especially if the depth is not known. Never drive through water
that is higher than the bottom of the hubs (for trucks) or the bottom of
the wheel rims (for cars). Traction or brake capability may be limited
and your vehicle may stall. Water may also enter your engine’s air intake
and severely damage your engine.
Once through the water, always dry the brakes by moving your vehicle
slowly while applying light pressure on the brake pedal. Wet brakes do
not stop the vehicle as quickly as dry brakes.Driving through deep
water where the transmission vent tube is submerged may allow
water into the transmission and cause internal transmission
damage.
VEHICLE LOADING
Before loading a vehicle, familiarize yourself with the following terms:
•Base Curb Weight:Weight of the vehicle including any standard
equipment, fluids, lubricants, etc. It does not include occupants or
aftermarket equipment.
•Payload:Combined maximum allowable weight of cargo, occupants
and optional equipment. The payload equals the gross vehicle weight
rating minus base curb weight.
•GVW (Gross Vehicle Weight):Base curb weight plus payload
weight.
•GVWR (Gross Vehicle Weight Rating):Maximum allowable total
weight of the base vehicle, occupants, optional equipment and cargo.
The GVWR is specific to each vehicle and is listed on the Safety
Certification Label on the driver’s door pillar.
•GAWR (Gross Axle Weight Rating):Carrying capacity for each axle
system. The GAWR is specific to each vehicle and is listed on the
Safety Certification Label on the driver’s door pillar.
•GCW (Gross Combined Weight):The combined weight of the
towing vehicle (including occupants and cargo) and the loaded trailer.
Driving
161
Page 178 of 280

The fuses are coded as follows.
Fuse/Relay
LocationFuse Amp
RatingPassenger Compartment Fuse
Panel Description
1 15A Audio
2 5A Powertrain Control Module
(PCM), Cluster
3 20A Cigar lighter, Data link connector
4 5A Power mirror switch, Mirror turn
signal relays
5 15A Speed control module, Reverse
lamp, Climate mode switch,
Daytime Running Lamps (DRL)
relay, Digital Transmission Range
(DTR) sensor
6 5A Cluster, Brake shift interlock
solenoid, GEM
FUSE1 12 22
21323
617 27
718 28
819 29
930
20
31 21 11 10
RELAY
5 RELAY
4 RELAY
3 RELAY
2 RELAY
1
31424
41525
51626
Roadside Emergencies
178
Page 180 of 280
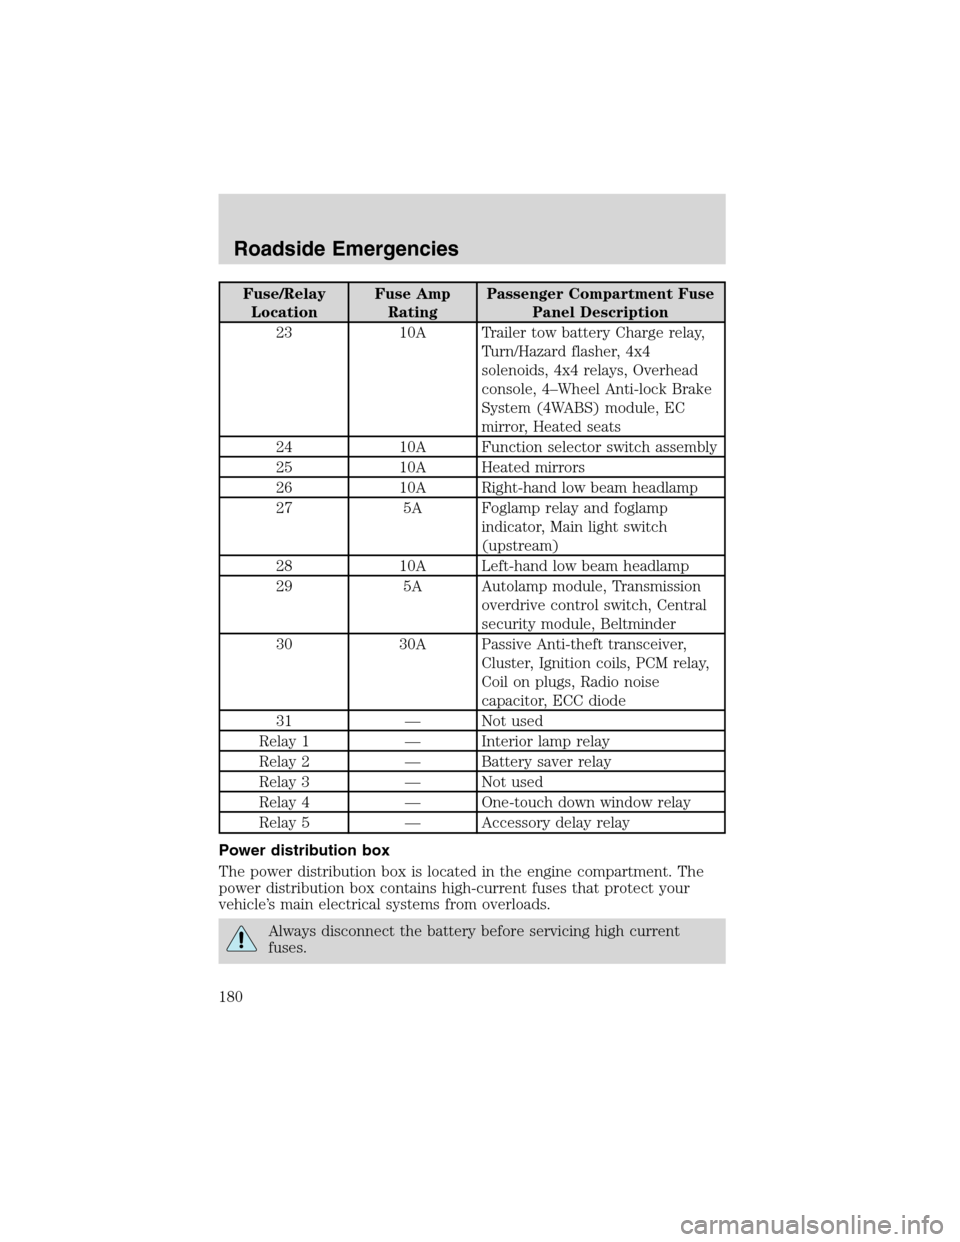
Fuse/Relay
LocationFuse Amp
RatingPassenger Compartment Fuse
Panel Description
23 10A Trailer tow battery Charge relay,
Turn/Hazard flasher, 4x4
solenoids, 4x4 relays, Overhead
console, 4–Wheel Anti-lock Brake
System (4WABS) module, EC
mirror, Heated seats
24 10A Function selector switch assembly
25 10A Heated mirrors
26 10A Right-hand low beam headlamp
27 5A Foglamp relay and foglamp
indicator, Main light switch
(upstream)
28 10A Left-hand low beam headlamp
29 5A Autolamp module, Transmission
overdrive control switch, Central
security module, Beltminder
30 30A Passive Anti-theft transceiver,
Cluster, Ignition coils, PCM relay,
Coil on plugs, Radio noise
capacitor, ECC diode
31—Not used
Relay 1—Interior lamp relay
Relay 2—Battery saver relay
Relay 3—Not used
Relay 4—One-touch down window relay
Relay 5—Accessory delay relay
Power distribution box
The power distribution box is located in the engine compartment. The
power distribution box contains high-current fuses that protect your
vehicle’s main electrical systems from overloads.
Always disconnect the battery before servicing high current
fuses.
Roadside Emergencies
180
Page 183 of 280
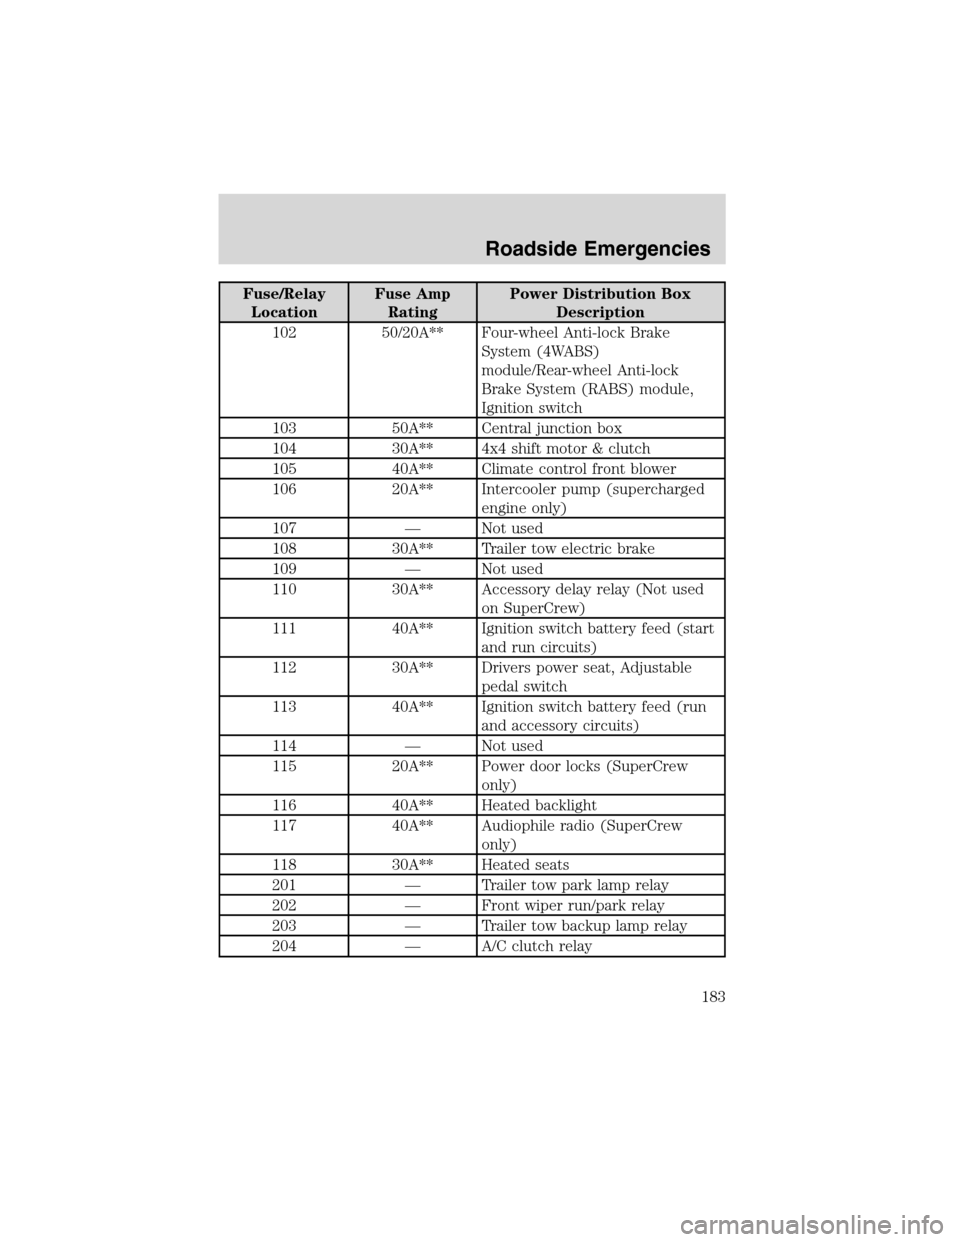
Fuse/Relay
LocationFuse Amp
RatingPower Distribution Box
Description
102 50/20A** Four-wheel Anti-lock Brake
System (4WABS)
module/Rear-wheel Anti-lock
Brake System (RABS) module,
Ignition switch
103 50A** Central junction box
104 30A** 4x4 shift motor & clutch
105 40A** Climate control front blower
106 20A** Intercooler pump (supercharged
engine only)
107—Not used
108 30A** Trailer tow electric brake
109—Not used
110 30A** Accessory delay relay (Not used
on SuperCrew)
111 40A** Ignition switch battery feed (start
and run circuits)
112 30A** Drivers power seat, Adjustable
pedal switch
113 40A** Ignition switch battery feed (run
and accessory circuits)
114—Not used
115 20A** Power door locks (SuperCrew
only)
116 40A** Heated backlight
117 40A** Audiophile radio (SuperCrew
only)
118 30A** Heated seats
201—Trailer tow park lamp relay
202—Front wiper run/park relay
203—Trailer tow backup lamp relay
204—A/C clutch relay
Roadside Emergencies
183
Page 184 of 280

Fuse/Relay
LocationFuse Amp
RatingPower Distribution Box
Description
205—Horn relay
206—Fog lamp relay
207—Front washer pump relay
208—Intercooler pump relay
(supercharged engine only)
209—Front wiper HI/LO relay
301—Fuel pump relay
302—Trailer tow battery charge relay
303—Heated backlight relay
(SuperCrew only)
304—PCM relay
305—Fuel pump HI/LO relay
(supercharged engine only)
306—Inertia switch relay (supercharged
engine only)
401—Not used
501—PCM diode
502—A/C compressor diode
503—Not used
601 CB Power windows, Moonroof
(SuperCrew only)
602—Not used
*Mini fuses **Maxi fuses
CHANGING THE TIRES
If you get a flat tire while driving, do not apply the brake heavily.
Instead, gradually decrease your speed. Hold the steering wheel firmly
and slowly move to a safe place on the side of the road.
Harley-Davidson vehicles are equipped with a spare tire with a different
speed rating than the road tires. It is not recommended that you exceed
112 km/h (70 mph) when the spare tire is in use. Though the spare tire
is rated for 112 km/h (70 mph), always obey the local speed limits.
Roadside Emergencies
184
Page 192 of 280
Preparing your vehicle
When the battery is disconnected or a new battery is installed, the
transmission must relearn its shift strategy. As a result, the transmission
may have firm and/or soft shifts. This operation is considered normal and
will not affect function or durability of the transmission. Over time, the
adaptive learning process will fully update transmission operation.
1.Use only a 12–volt supply to start your vehicle.
2. Do not disconnect the battery of the disabled vehicle as this could
damage the vehicle’s electrical system.
3. Park the booster vehicle close to the hood of the disabled vehicle
making sure the two vehiclesdo nottouch. Set the parking brake on
both vehicles and stay clear of the engine cooling fan and other moving
parts.
4. Check all battery terminals and remove any excessive corrosion before
you attach the battery cables. Ensure that vent caps are tight and level.
5. Turn the heater fan on in both vehicles to protect any electrical
surges. Turn all other accessories off.
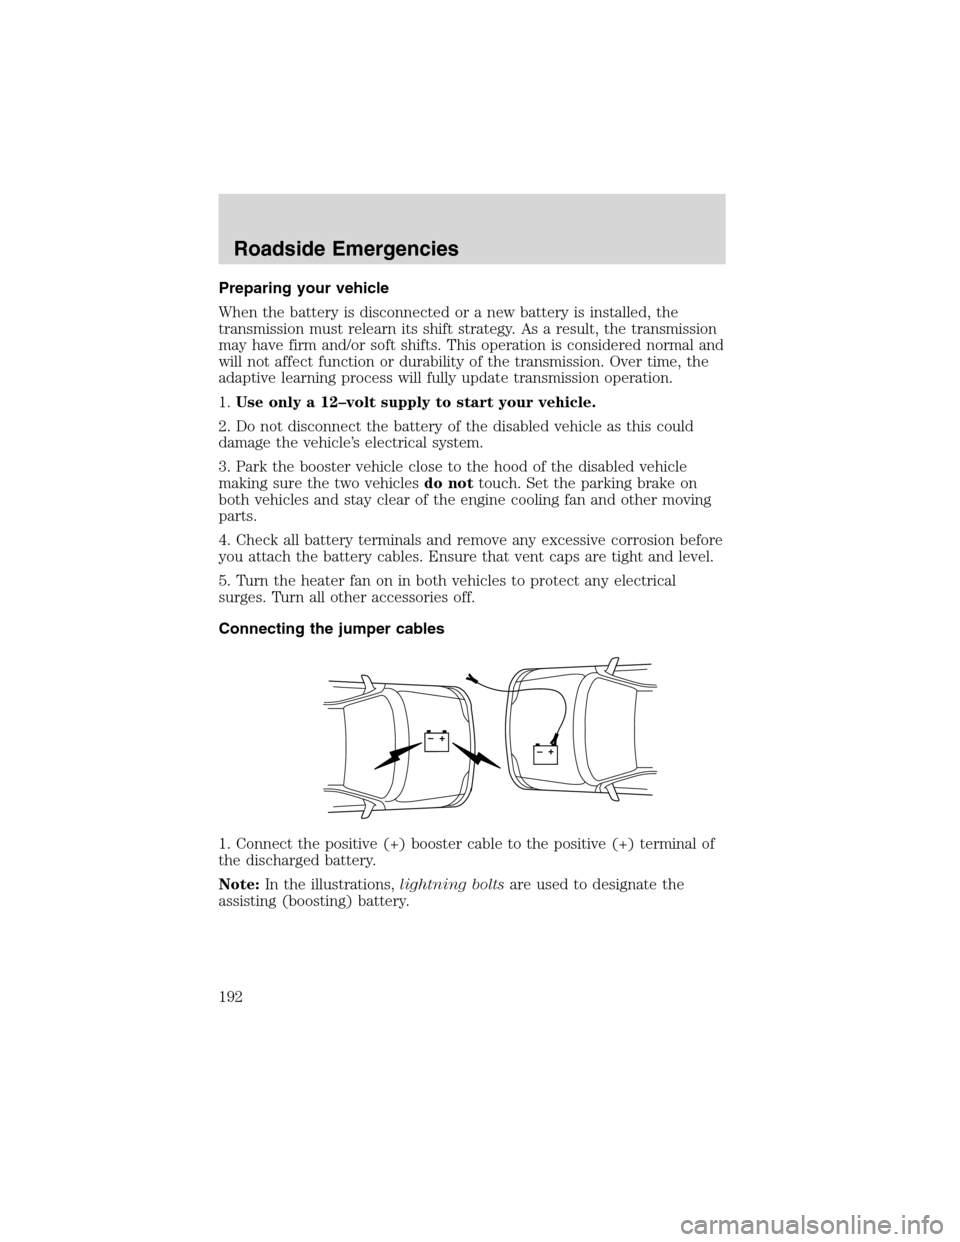
Connecting the jumper cables
1. Connect the positive (+) booster cable to the positive (+) terminal of
the discharged battery.
Note:In the illustrations,lightning boltsare used to designate the
assisting (boosting) battery.
+–+–
Roadside Emergencies
192
Page 209 of 280
PAINT CHIPS
Your dealer has touch-up paint and sprays to match your vehicle’s color.
Take your color code (printed on a sticker in the driver’s door jam) to
your dealer to ensure you get the correct color.
•Remove particles such as bird droppings, tree sap, insect deposits, tar
spots, road salt and industrial fallout before repairing paint chips.
•Always read the instructions before using the products.
ALUMINUM WHEELS AND COVERS
Aluminum wheel rims or covers are coated with a clearcoat paint finish.
In order to maintain their shine:
•Clean weekly with Motorcraft Wheel and Tire Cleaner (ZC-37–A),
which is available from your dealer. Heavy dirt and brake dust
accumulation may require agitation with a sponge. Rinse thoroughly
with a strong stream of water.
•Never apply any cleaning chemical to hot or warm wheel rims or
covers.
•Some automatic car washes may cause damage to the finish on your
wheel rims or covers. Chemical-strength cleaners, or cleaning
chemicals, in combination with brush agitation to remove brake dust
and dirt, could wear away the clearcoat finish over time.
•Do not use hydrofluoric acid-based or high caustic-based wheel
cleaners, steel wool, fuels or strong household detergent.
•To remove tar and grease, use Ford Extra Strength Tar and Road Oil
Removal (B7A-19520–AA), available from your dealer.
ENGINE
Engines are more efficient when they are clean because grease and dirt
buildup keep the engine warmer than normal. When washing:
•Take care when using a power washer to clean the engine. The
high-pressure fluid could penetrate the sealed parts and cause
damage.
•Do not spray a hot engine with cold water to avoid cracking the
engine block or other engine components.
•Spray Motorcraft Engine Shampoo and Degreaser (ZC-20) on all parts
that require cleaning and pressure rinse clean.
•Cover the highlighted areas to prevent water damage when cleaning
the engine.
Cleaning
209