Page 161 of 288
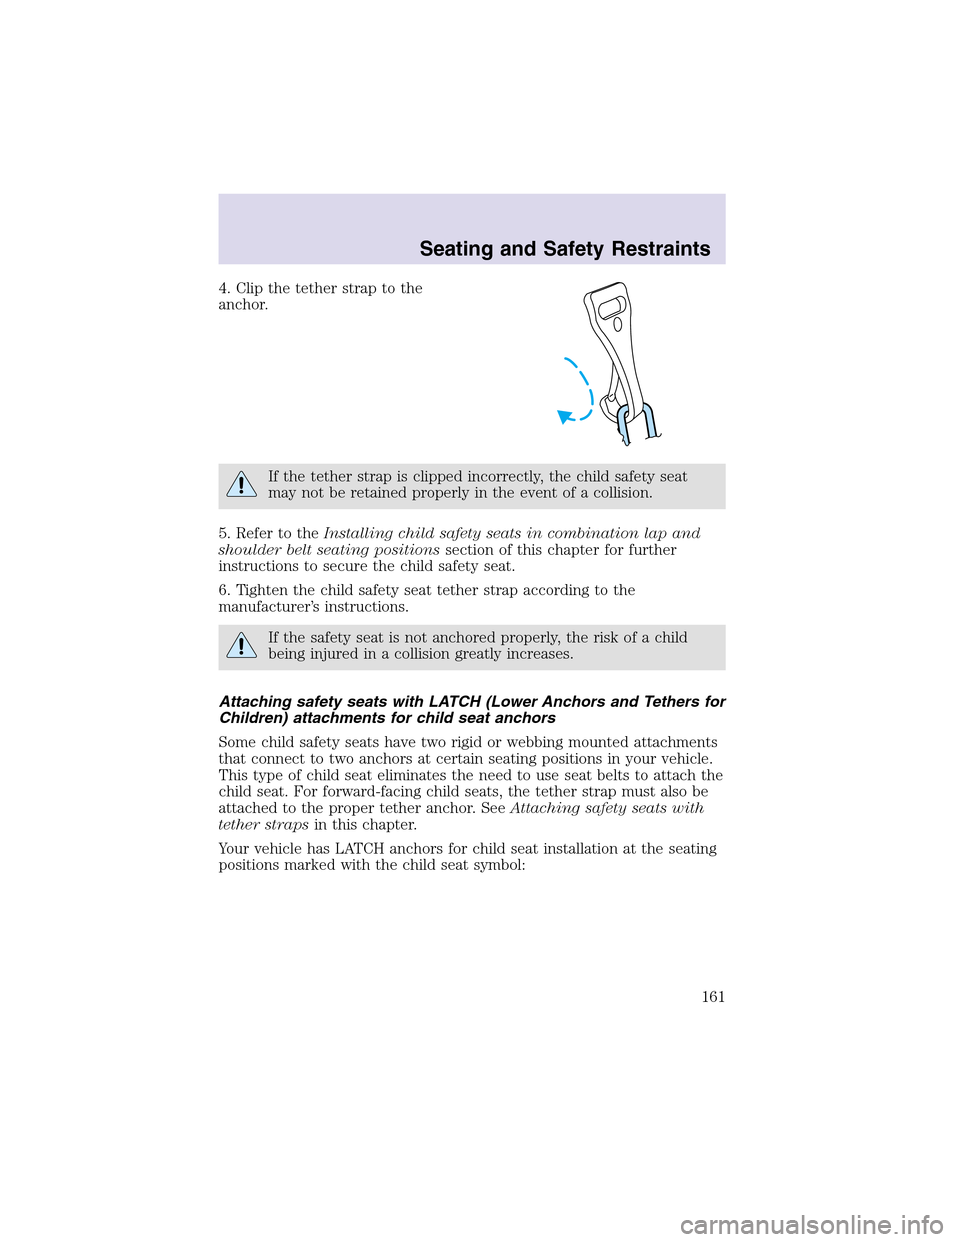
4. Clipthe tether strapto the
anchor.
If the tether strap is clipped incorrectly, the child safety seat
may not be retained properly in the event of a collision.
5. Refer to theInstalling child safety seats in combination lap and
shoulder belt seating positionssection of this chapter for further
instructions to secure the child safety seat.
6. Tighten the child safety seat tether strapaccording to the
manufacturer’s instructions.
If the safety seat is not anchored properly, the risk of a child
being injured in a collision greatly increases.
Attaching safety seats with LATCH (Lower Anchors and Tethers for
Children) attachments for child seat anchors
Some child safety seats have two rigid or webbing mounted attachments
that connect to two anchors at certain seating positions in your vehicle.
This type of child seat eliminates the need to use seat belts to attach the
child seat. For forward-facing child seats, the tether strapmust also be
attached to the proper tether anchor. SeeAttaching safety seats with
tether strapsin this chapter.
Your vehicle has LATCH anchors for child seat installation at the seating
positions marked with the child seat symbol:
Seating and Safety Restraints
161
Page 170 of 288
Always set the parking brake fully and make sure that the
gearshift is securely latched in P (Park).
The parking brake is not recommended to stop a moving vehicle.
However, if the normal brakes fail, the parking brake can be used to stop
your vehicle in an emergency. Since the parking brake applies only the
rear brakes, the vehicle’s stopping distance will increase greatly and the
handling of your vehicle will be adversely affected.
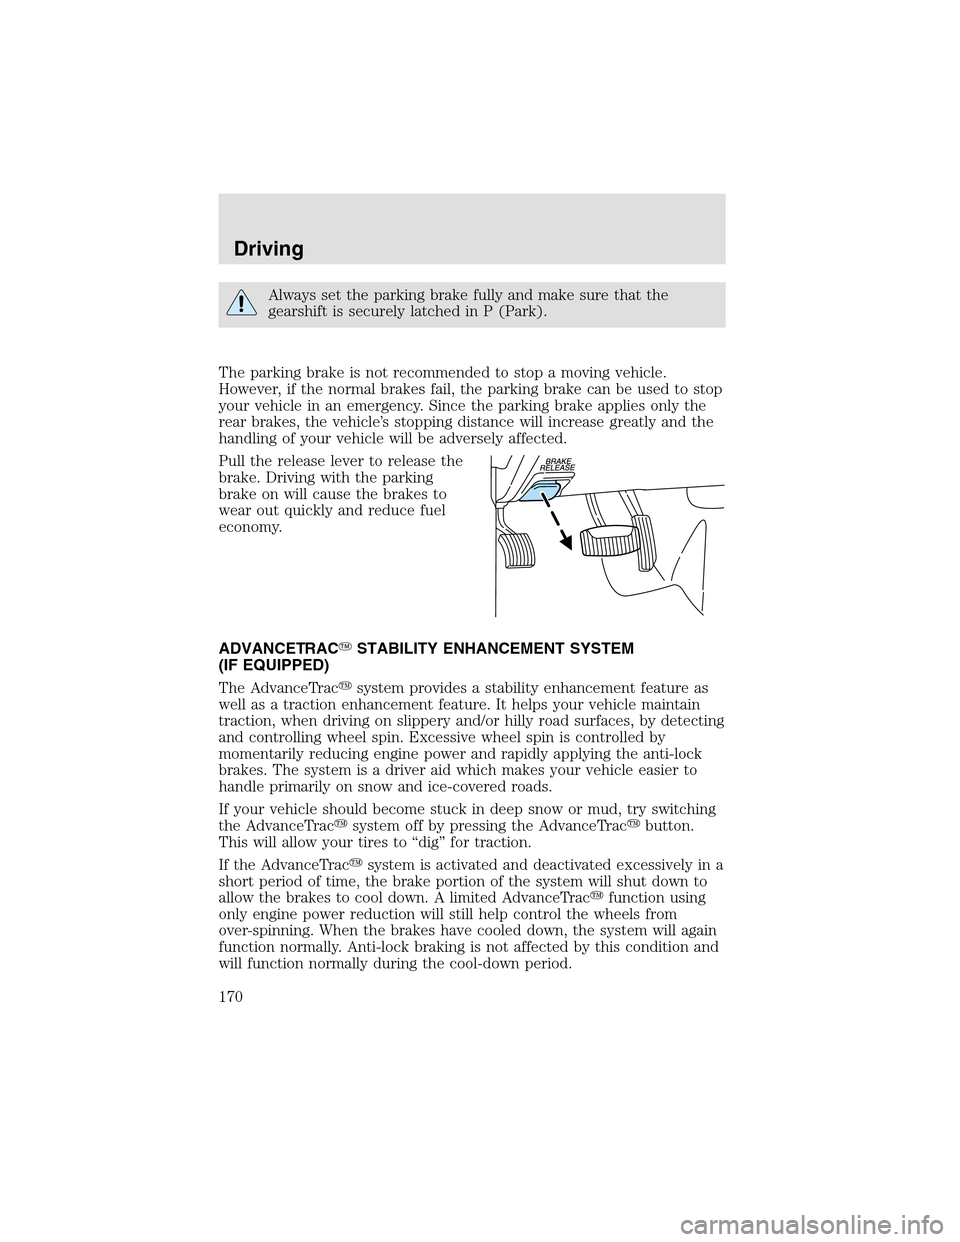
Pull the release lever to release the
brake. Driving with the parking
brake on will cause the brakes to
wear out quickly and reduce fuel
economy.
ADVANCETRAC�STABILITY ENHANCEMENT SYSTEM
(IF EQUIPPED)
The AdvanceTrac�system provides a stability enhancement feature as
well as a traction enhancement feature. It helps your vehicle maintain
traction, when driving on slippery and/or hilly road surfaces, by detecting
and controlling wheel spin. Excessive wheel spin is controlled by
momentarily reducing engine power and rapidly applying the anti-lock
brakes. The system is a driver aid which makes your vehicle easier to
handle primarily on snow and ice-covered roads.
If your vehicle should become stuck in deepsnow or mud, try switching
the AdvanceTrac�system off by pressing the AdvanceTrac�button.
This will allow your tires to “dig” for traction.
If the AdvanceTrac�system is activated and deactivated excessively in a
short period of time, the brake portion of the system will shut down to
allow the brakes to cool down. A limited AdvanceTrac�function using
only engine power reduction will still help control the wheels from
over-spinning. When the brakes have cooled down, the system will again
function normally. Anti-lock braking is not affected by this condition and
will function normally during the cool-down period.
Driving
170
Page 176 of 288
Driving with a 5–speed automatic transmission
Your transmission is equipped with an adaptive learning strategy found in
the vehicle computer. This feature is designed to increase durability, and
provide consistent shift feel over the life of the vehicle. A new vehicle or
transmission may have firm and/or soft shifts. This operation is
considered normal and will not affect function or durability of the
transmission. Over time, the adaptive learning process will fully update
transmission operation. Additionally, whenever the battery is
disconnected or a new battery is installed, the strategy must relearn.
Understanding gearshift positions
Hold the brake pedal down while you move the gearshift lever
from P (Park) to another position. If you do not hold the brake
pedal down, your vehicle may move unexpectedly and injure someone.
P (Park)
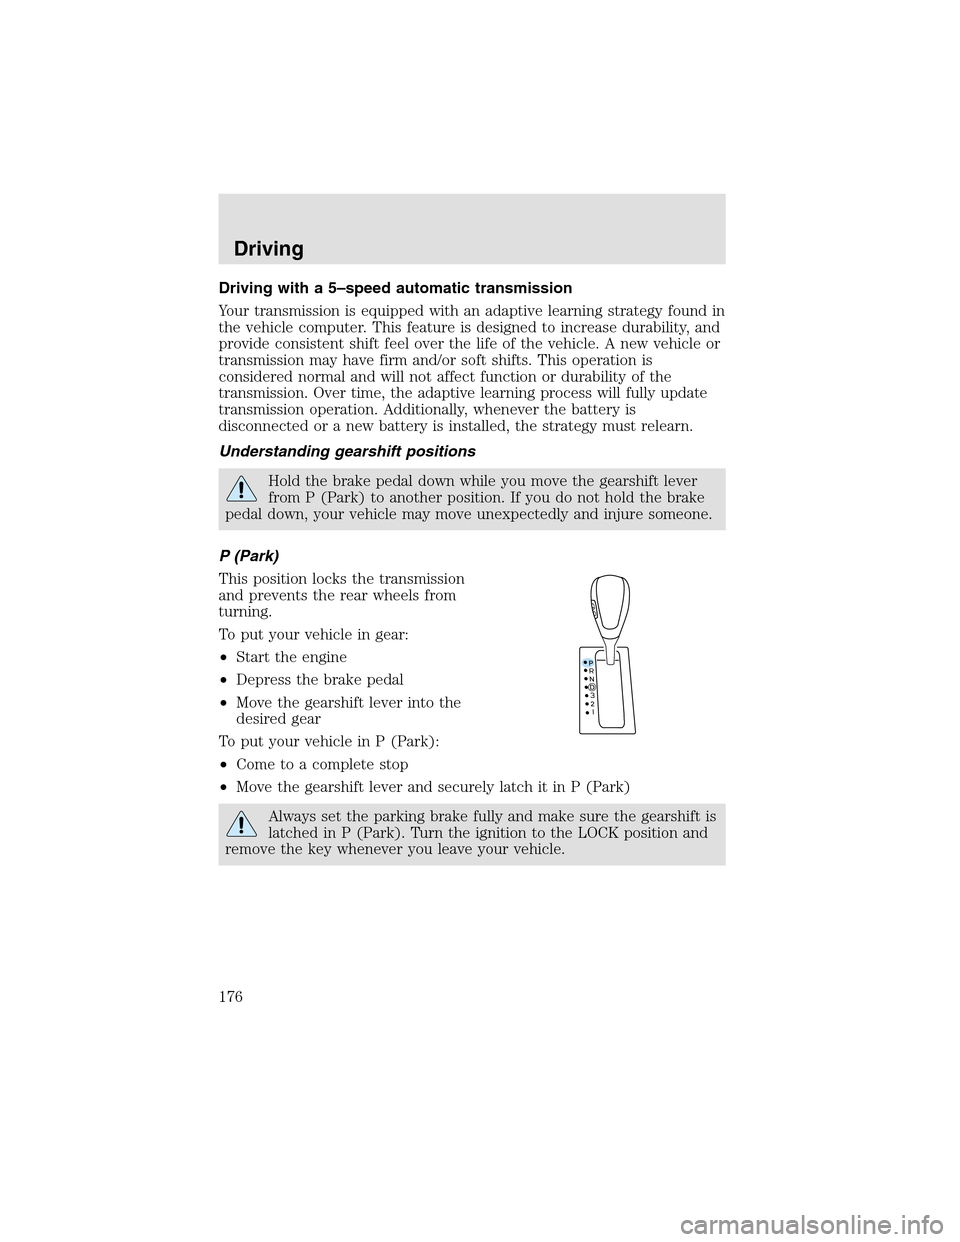
This position locks the transmission
and prevents the rear wheels from
turning.
To put your vehicle in gear:
•Start the engine
•Depress the brake pedal
•Move the gearshift lever into the
desired gear
To put your vehicle in P (Park):
•Come to a complete stop
•Move the gearshift lever and securely latch it in P (Park)
Always set the parking brake fully and make sure the gearshift is
latched in P (Park). Turn the ignition to the LOCK position and
remove the key whenever you leave your vehicle.
Driving
176
Page 204 of 288
The fuses are coded as follows:
Fuse/Relay
LocationFuse Amp
RatingPassenger Compartment Fuse
Panel Description
1 30A Moonroof, Driver seat switch
2 10A VAPS module, Memory seat
module, Body security module
3 20A Radio, Navigation, Telematics
4 5A Front wiper module
5 15A Flasher relay (turn/hazards)
6 5A Power antenna, Radio, Moonroof
motor, Driver window motor,
Navigation
7 15A Heated mirrors, DEATC module
8 5A Daytime Running Lamps (DRL)
module
9 10A Back-uplamps (DTRS)
Roadside Emergencies
204
Page 205 of 288

Fuse/Relay
LocationFuse Amp
RatingPassenger Compartment Fuse
Panel Description
10 10A Heated backlight relay coil,
Climate seat modules, Auxiliary
A/C temperature blend/mode
actuator, A/C clutch relay contact
11 20A Not used (spare)
12 15A Restraints module
13 10A Brake shift interlock
14 5A Cornering lamps
15 5A Instrument cluster, Rear wiper
module, Telematics
16 15A Cigar lighter, OBD II, Liftgate
release relay coil and contacts
17 15A Delayed accessory relay coil,
Battery saver relay coil and
contacts
18 5A Not used (spare)
19 15A Washer pump
20 5A Shifter, Clock, Power mirror
switch, DVD
21 10A Brake pressure switch (ABS), IVD
switch, Flasher relay
22 10A ABS module
23 5A Sunload/Autolampsensor
(SecuriLock�transceiver LED)
24 20A Subwoofer, Navigation
25 5A Puddle lamprelay coil, Trailer tow
battery charge relay coil
26 5A SecuriLock�transceiver
27 5A Rear park assist, VAPS module,
Telematics
28 5A Radio, Navigation
29 10A DTRS, Feed to Fuse 28
Roadside Emergencies
205
Page 212 of 288

The use of tire sealants is not recommended and may
compromise the integrity of your tires. The use of tire sealants
may also affect your tire pressure monitoring system (if equipped).
If your vehicle is equipped with a tire pressure monitoring
system, refer toTire Pressure Monitoring System (if
equipped)in theMaintenance and specificationssection for
important information. If the tire pressure monitor sensor becomes
damaged, it will no longer function.
Spare tire information
The spare tire can be used as a spare or a regular tire and is identical to
the other tires on your vehicle.
If your vehicle is equipped with AWD, a spare tire of a different
size than the road tires should not be used. Such a tire could
make the vehicle difficult to control as well as result in damage to
driveline components.
Stopping and securing the vehicle
1. If you get a flat tire while driving,
do not apply the brake heavily;
instead, gradually decrease your
speed. Hold the steering wheel
firmly and slowly move to a safe
place on the side of the road.
2. Park on a level surface, activate
the hazard flashers and set the
parking brake.
3. Place gearshift lever in P (Park)
and turn engine OFF.
When one of the rear wheels is off the ground, the transmission
alone will not prevent the vehicle from moving or slipping off the
jack, even if the transmission is in P (Park).
Roadside Emergencies
212
Page 218 of 288
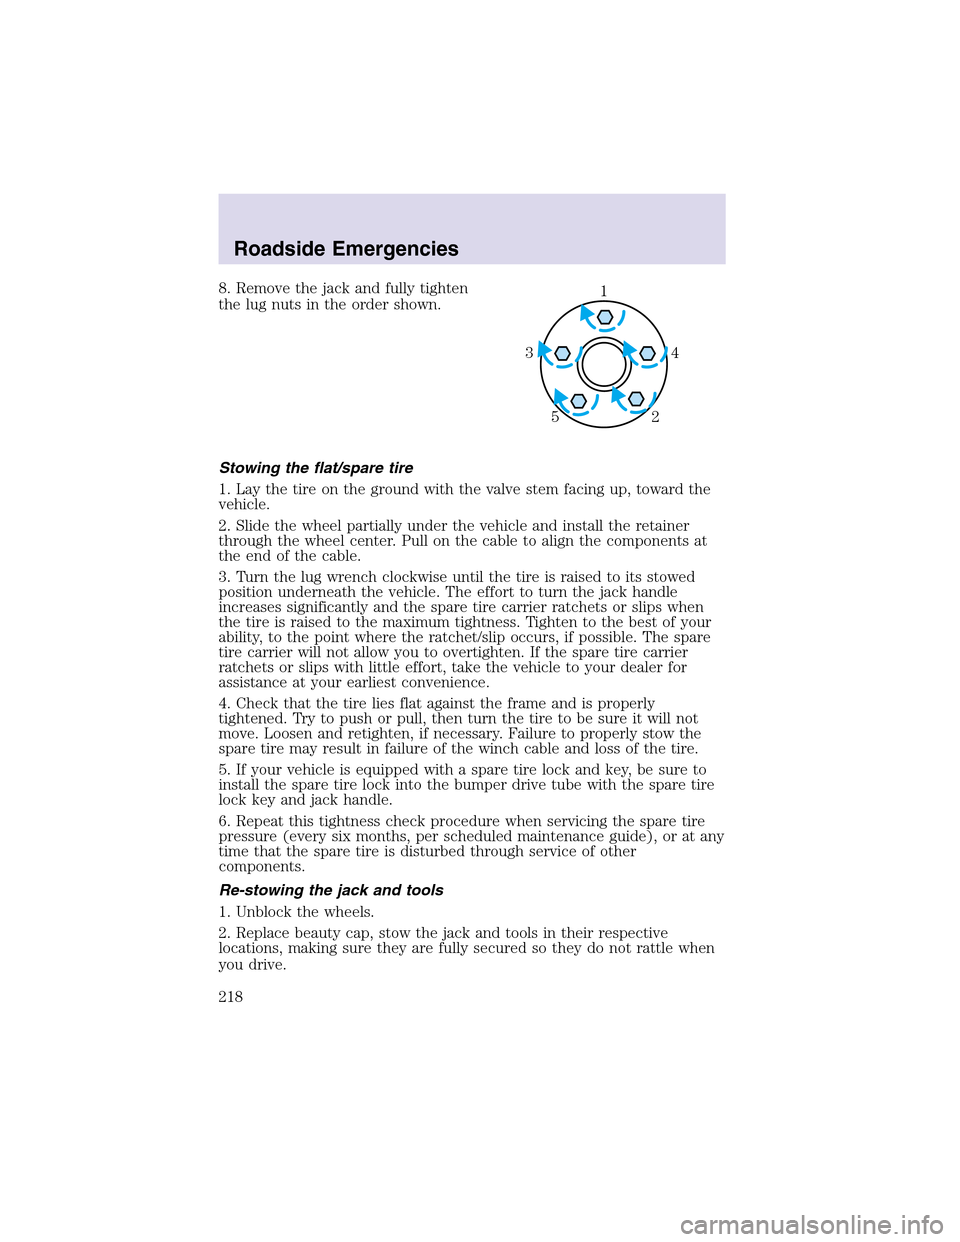
8. Remove the jack and fully tighten
the lug nuts in the order shown.
Stowing the flat/spare tire
1. Lay the tire on the ground with the valve stem facing up, toward the
vehicle.
2. Slide the wheel partially under the vehicle and install the retainer
through the wheel center. Pull on the cable to align the components at
the end of the cable.
3. Turn the lug wrench clockwise until the tire is raised to its stowed
position underneath the vehicle. The effort to turn the jack handle
increases significantly and the spare tire carrier ratchets or slips when
the tire is raised to the maximum tightness. Tighten to the best of your
ability, to the point where the ratchet/slip occurs, if possible. The spare
tire carrier will not allow you to overtighten. If the spare tire carrier
ratchets or slips with little effort, take the vehicle to your dealer for
assistance at your earliest convenience.
4. Check that the tire lies flat against the frame and is properly
tightened. Try to push or pull, then turn the tire to be sure it will not
move. Loosen and retighten, if necessary. Failure to properly stow the
spare tire may result in failure of the winch cable and loss of the tire.
5. If your vehicle is equipped with a spare tire lock and key, be sure to
install the spare tire lock into the bumper drive tube with the spare tire
lock key and jack handle.
6. Repeat this tightness check procedure when servicing the spare tire
pressure (every six months, per scheduled maintenance guide), or at any
time that the spare tire is disturbed through service of other
components.
Re-stowing the jack and tools
1. Unblock the wheels.
2. Replace beauty cap, stow the jack and tools in their respective
locations, making sure they are fully secured so they do not rattle when
you drive.1
4 3
2 5
Roadside Emergencies
218
Page 226 of 288
GETTING THE SERVICES YOU NEED
At home
Ford Motor Company and Ford of Canada have authorized dealerships to
service your vehicle. It is preferred that you return to the authorized
dealer where your vehicle was purchased when warranty repairs are
needed. However, you may also take your vehicle to another Ford Motor
Company or Ford of Canada dealership authorized for warranty repairs.
Certain warranty repairs require special training though, so not all
dealers are authorized to perform all warranty repairs. That means that
depending on the warranty repair needed, the vehicle may need to be
taken to another dealer. If a particular dealership cannot assist you, then
contact the Customer RelationshipCenter.
If you have questions or concerns, or are unsatisfied with the service you
are receiving, follow these steps:
1. Contact your Sales Representative or Service Advisor at your
selling/servicing dealership.
2. If your inquiry or concern remains unresolved, contact the Sales
Manager or Service Manager at the dealership.
3. If the inquiry or concern cannot be resolved at the dealershiplevel,
please contact the Ford Customer Relationship Center.
Away from home
If you own a Ford or Mercury vehicle and are away from home when
your vehicle needs service, or if you need more helpthan the dealership
could provide, after following the steps described above, contact the
Ford Customer RelationshipCenter to find an authorized dealershipto
helpyou.
In the United States:
Ford Motor Company
Customer RelationshipCenter
16800 Executive Plaza Drive
P.O. Box 6248
Dearborn, Michigan 48121
1-800-392-3673 (FORD)
(TDD for the hearing impaired: 1-800-232-5952)
www.ford.com
Customer Assistance
226