Page 9 of 22
CHECKING AND REPLACING THE
BLADE TYPE FUSES
64G006a
�Driver's side kick panel
64G017
�Passenger's side kick panel
64G005±2
�Engine compartment 1Spare fuses 2Pull±out tool
64G027
�Engine compartment
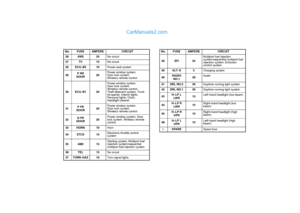
1. Turn the ignition switch off and open the fuse box lid.
Determine which fuse may be causing the problem. The lid of
the fuse box shows the name of the circuit for each fuse.
Page 10 of 22

64L013
2. Make sure the inoperative component is turned off. Pull
the suspected fuse straight out with the pull±out tool and
check it. If it has blown, push a new fuse into the clips.
64G008a
�Good�Blown
a. Look carefully at the fuse. If the thin wire is broken, the fuse
has blown. If you are not sure or if it is too dark to see, try
replacing the suspected fuse with one of the same value that
you know is good.
b. Install only a fuse with the amperage rating designated on
the fuse box lid.
If you do not have a spare fuse, in an emergency you can pull
out the ºCIGº, ºRAD NO.1º or ºOBDº fuse, which may be
dispensable for normal driving, and use it if its amperage rating
is the same.
If you cannot use one of the same amperage, use one lower
than, but as close as possible to, the amperage. If the
amperage is lower than that specified, the fuse might blow out
again but this does not indicate anything wrong. Be sure to get
the correct fuse as soon as possible and return the substitute
to its original clips.
Page 11 of 22
It is a good idea to purchase a set of spare fuses and keep them
in your vehicle for emergencies.
If the new fuse immediately blows out, there is a problem with
the electrical system. Have your Lexus dealer correct it as
soon as possible.
CAUTION
Never use a fuse with a higher amperage rating, or any
other object, in place of a fuse. This may cause
extensive damage and possibly a fire.
CHECKING THE CARTRIDGE TYPE
FUSES
64G019a
�Engine compartment
Page 12 of 22
64g104
�Good�Blown
If the headlights or other electrical components do not
work and the blade type fuses are O.K., check the
cartridge type fuses. If any of the cartridge type fuses are
blown, they must be replaced.
If there is an overload in the circuits from the battery, the fuses
are designed to blow before the entire wiring harness is
damaged.
CAUTION
Always use a genuine Lexus fuse or equivalent for
replacement. Never install an ordinary wire ± even for
a temporary fix. This may cause extensive damage and
possibly a fire.
NOTICE
Before replacing the fuses, have the cause of electrical
overload determined and repaired by your Lexus dealer.
Page 13 of 22

ADDING WASHER FLUID
64G009
If the washer tank becomes nearly empty, add washer
fluid.
You may use plain water as washer fluid. However, in cold
areas where temperatures range below the freezing point, use
washer fluid containing antifreeze. This product is available at
your Lexus dealer and most auto parts stores. Follow the
manufacturer's directions for how much to mix with water.
NOTICE
Do not use engine antifreeze or any other substitute
because it may damage your vehicle's paint.
CHECKING THE HEADLIGHT AIM
64G020d
� 1Beam angle gauge
(vertical movement for low beam)
2Beam angle gauge
(horizontal movement for low beam)
3Beam angle gauge
(vertical movement for high beam)
4Beam angle gauge
(horizontal movement for high beam)
Before checking the headlight aim:
1. Be sure that the body around the headlight is not deformed.
2. Park the vehicle on a level spot.
3. The driver gets into the driver's seat and puts the vehicle in
a state readying for a driving (with a full tank).
4. Bounce the vehicle several times.
Page 14 of 22
Adjusting the headlight aiming (low beam)
64g059a
� 1Adjusting bolt A
2Adjusting bolt B
64G021b
� 1Bubble 2Acceptable range
Vertical movement gauge: The bubble of the gauge should
not deviate from the center of the gauge by more than 2 marks
to either side of the gauge.
If the bubble is out of the acceptable range of the beam angle
gauge, adjust it using bolt A and B.
Page 15 of 22
64G079a
1. Turn the bolt A in either direction using a Phillips±head
screwdriver. At this time, keep the turning direction and
number of turns in mind.
64g078a
2. Turn the bolt B the same number of turns and in the same
direction as step 1 using a Phillips±head screwdriver.
Page 16 of 22
64G022a
� 1Mark 2Acceptable range
Horizontal movement gauge: The mark should not deviate
by more than one mark to either side of the gauge.
It the edge of the lens is out of the acceptable range of the
beam angle gauge, adjust it using bolt B.
If the error is over the value specified above, take the vehicle
to your Lexus dealer to adjust the headlight aim.
After adjusting the headlight in the vertical direction, check that
the light has been shifted from the adjusted position in the
horizontal direction.
Adjusting the headlight aiming (high beam)
64g080a
� 1Adjusting bolt A
2Adjusting bolt B