2003 JEEP GRAND CHEROKEE transfer case oil
[x] Cancel search: transfer case oilPage 1812 of 2199

INSPECTION
MAINSHAFT/SPROCKET/HUB
Inspect the splines on the hub and shaft and the
teeth on the sprocket. Minor nicks and scratches can
be smoothed with an oilstone. However, replace any
part that is damaged.
Check the contact surfaces in the sprocket bore
and on the mainshaft. Minor nicks and scratches can
be smoothed with 320-400 grit emery cloth but do not
try to salvage the shaft if nicks or wear is severe.
INPUT GEAR AND PLANETARY CARRIER
Check the teeth on the gear (Fig. 46). Minor nicks
can be dressed off with an oilstone but replace the
gear if any teeth are broken, cracked, or chipped. The
bearing surface on the gear can be smoothed with
300-400 grit emery cloth if necessary.
Examine the carrier body and pinion gears for
wear or damage. The carrier will have to be replaced
as an assembly if the body, pinion pins, or pinion
gears are damaged.
Check the lock ring and both thrust washers for
wear or cracks. Replace them if necessary. Also
replace the lock retaining ring if bent, distorted, or
broken.
Fig. 46 Input Gear And Carrier Components
1 - PLANETARY CARRIER 4 - CARRIER LOCK RING
2 - REAR THRUST WASHER 5 - CARRIER LOCK RETAINING RING
3 - FRONT THRUST WASHER 6 - INPUT GEAR
Fig. 45 Mainshaft And Sprocket Gear Removal
1 - MAINSHAFT GEAR
2 - SPROCKET GEAR
3 - BOTTOM CASE
WJTRANSFER CASE - NV242 21 - 293
TRANSFER CASE - NV242 (Continued)
Page 1814 of 2199

REAR OUTPUT SHAFT/YOKE/DRIVE CHAIN
Check condition of the seal contact surfaces of the
yoke slinger (Fig. 49). This surface must be clean and
smooth to ensure proper seal life. Replace the yoke
nut and seal washer as neither part should be
reused.
Inspect the shaft threads, sprocket teeth, and bear-
ing surfaces. Minor nicks on the teeth can be
smoothed with an oilstone. Use 320-400 grit emery to
smooth minor scratches on the shaft bearing sur-
faces. Rough threads on the shaft can be chased if
necessary. Replace the shaft if the threads are dam-
aged, bearing surfaces are scored, or if any sprocket
teeth are cracked or broken.
Examine the drive chain and shaft bearings.
Replace the chain and both sprockets if the chain is
stretched, distorted, or if any of the links bind.
Replace the bearings if rough, or noisy.
LOW RANGE ANNULUS GEAR
Inspect annulus gear condition carefully. The gear
is only serviced as part of the front case. If the gear
is damaged, it will be necessary to replace the gear
and front case as an assembly. Do not attempt to
remove the gear (Fig. 50)
FRONT-REAR CASES AND FRONT RETAINER
Inspect the cases and retainer for wear and dam-
age. Clean the sealing surfaces with a scraper and
3M all purpose cleaner. This will ensure proper
sealer adhesion at assembly. Replace the input
retainer seal; do not reuse it.Check case condition. If leaks were a problem, look
for gouges and severe scoring of case sealing sur-
faces. Also make sure the front case mounting studs
are in good condition.
Check the front case mounting studs and vent
tube. The tube can be secured with LoctiteŸ 271 or
680 if loose. The stud threads can be cleaned up with
a die if necessary. Also check condition of the fill/
drain plug threads in the rear case. The threads can
be repaired with a thread chaser or tap if necessary.
Or the threads can be repaired with HelicoilŸ stain-
less steel inserts if required.
OIL PUMP/OIL PICKUP
Examine the oil pump pickup parts. Replace the
pump if any part appears to be worn or damaged. Do
not disassemble the pump as individual parts are not
available. The pump is only available as a complete
assembly. The pickup screen, hose, and tube are the
only serviceable parts and are available separately.
ASSEMBLY
Lubricate transfer case components with automatic
transmission fluid or petroleum jelly (where indi-
cated) during assembly.
CAUTION: The bearing bores in various transfer
case components contain oil feed holes. Make sure
replacement bearings do not block the holes.
Fig. 49 Seal Contact Surface Of Yoke Slinger
1 - FRONT SLINGER (PART OF YOKE)
2 - SEAL CONTACT SURFACE MUST BE CLEAN AND SMOOTH
Fig. 50 Low Range Annulus Gear
1 - FRONT CASE
2 - LOW RANGE ANNULUS GEAR
WJTRANSFER CASE - NV242 21 - 295
TRANSFER CASE - NV242 (Continued)
Page 1815 of 2199

BEARING AND SEAL
(1) Remove snap-ring that retains front output
shaft front bearing in case (Fig. 51). Then remove
bearing. Use hammer handle, or hammer and brass
punch to tap bearing out of case.
(2) Install new front output shaft front bearing
with Tool Handle C-4171 and Installer 8033-A with
the tapered cone upward (Fig. 52).(3) Install front bearing snap-ring (Fig. 51).
(4) Remove front output shaft seal using an appro-
priate pry tool (Fig. 53) or slide-hammer mounted
screw.
(5) Install new front output shaft oil seal with
Installer 6952-A (Fig. 54).
Fig. 51 Front Output Shaft Front Bearing Snap-Ring
Removal
1 - FRONT BEARING SNAP-RING
Fig. 52 Front Output Shaft Front Bearing Installation
1 - SPECIAL TOOL C-4171
2 - SPECIAL TOOL 8033-A
Fig. 53 Remove Front Output Shaft Seal
1 - OUTPUT SHAFT SEAL
2 - PRYBAR
Fig. 54 Install Front Output Shaft Seal
1 - INSTALLER 6952-A
2 - TRANSFER CASE
21 - 296 TRANSFER CASE - NV242WJ
TRANSFER CASE - NV242 (Continued)
Page 1817 of 2199

(11) Install new seal in front bearing retainer with
Installer 7884 (Fig. 59).
(12) Remove output shaft rear bearing with the
screw and jaws from Remover L-4454 and Cup 8148
(Fig. 60).(13) Install new bearing with Tool Handle C-4171
and Installer 5066 (Fig. 61). Lubricate bearing after
installation.
(14) Install new seal in oil pump feed housing with
Special Tool 7888 (Fig. 62).
Fig. 59 Front Bearing Retainer Seal Installation
1 - FRONT BEARING RETAINER
2 - SPECIAL TOOL 7884
Fig. 60 Remove Front Output Shaft Rear Bearing
1 - REAR CASE
2 - SPECIAL TOOL L-4454-1 AND L-4454-3
3 - SPECIAL TOOL 8148
Fig. 61 Install Front Output Shaft Rear Bearing
1 - HANDLE C-4171
2 - OUTPUT SHAFT INNER BEARING
3 - INSTALLER 5066
Fig. 62 Oil Pump Seal Installation
1 - HOUSING SEAL
2 - SPECIAL TOOL 7888
3 - OIL PUMP FEED HOUSING
21 - 298 TRANSFER CASE - NV242WJ
TRANSFER CASE - NV242 (Continued)
Page 1818 of 2199

(15) Install new pickup tube O-ring in oil pump
(Fig. 63).
(16) Remove rear retainer bearing with Installer
8128 and Handle C-4171, NV242HD only.
(17) Install rear bearing in retainer with Handle
C-4171 and Installer 5064 (Fig. 64), NV242HD only.
DIFFERENTIAL
(1) Lubricate differential components with auto-
matic transmission fluid.
(2) Install sprocket gear in differential bottom case
(Fig. 65).(3) Install differential planet gears and new thrust
washers (Fig. 66).Be sure thrust washers are
installed at top and bottom of each planet gear.
(4) Install differential mainshaft gear (Fig. 66).
Fig. 63 Pickup Tube O-Ring Installation
1 - PICKUP TUBE O-RING
Fig. 64 Installing Rear Bearing In Retainer
1 - SPECIAL TOOL C-4171
2 - SPECIAL TOOL 5064
3 - REAR RETAINER
Fig. 65 Installing Differential Sprocket Gear
1 - SPROCKET GEAR
2 - BOTTOM CASE
Fig. 66 Installing Mainshaft And Planet Gears
1 - MAINSHAFT GEAR
2 - THRUST WASHERS (12)
3 - PLANET GEARS (6)
WJTRANSFER CASE - NV242 21 - 299
TRANSFER CASE - NV242 (Continued)
Page 1824 of 2199

FRONT OUTPUT SHAFT AND DRIVE CHAIN
(1) Install front output shaft (Fig. 84).
(2) Install drive chain (Fig. 84). Engage chain with
front output shaft sprocket teeth.
(3) Install drive sprocket (Fig. 84). Engage drive
sprocket teeth with chain. Then engage sprocket
splines with mainshaft splines.
(4) Install drive sprocket snap-ring (Fig. 85).
OIL PUMP AND REAR CASE
(1) Insert oil pickup tube in oil pump and attach
oil screen and connector hose to pickup tube. Then
install assembled pump, tube and screen in rear case
(Fig. 86). Be sure screen is seated in case slot as
shown.
(2) Install magnet in front case pocket (Fig. 87).
(3) Apply 3 mm (1/8 in.) wide bead of Mopartgas-
ket maker or silicone adhesive sealer to seal surface
of front case.
(4) Align and install rear case on front case. Be
sure case locating dowels are in place and that main-
shaft splines are engaged in oil pump inner gear.
(5) Install and tighten front case-to-rear case bolts
to 41 N´m (30 ft. lbs.) torque.Be sure to install a
washer under each bolt used at case dowel
locations.
Fig. 84 Drive Chain And Sprocket Installation
1 - DRIVE SPROCKET
2 - DRIVE CHAIN
Fig. 85 Drive Sprocket Snap-Ring Installation
1 - DRIVE SPROCKET
2 - DRIVE SPROCKET SNAP-RING
Fig. 86 Oil Screen And Pickup Tube Installation
1 - OIL PUMP
2 - OIL SCREEN
3 - CONNECTOR
4 - PICKUP TUBE
WJTRANSFER CASE - NV242 21 - 305
TRANSFER CASE - NV242 (Continued)
Page 1827 of 2199

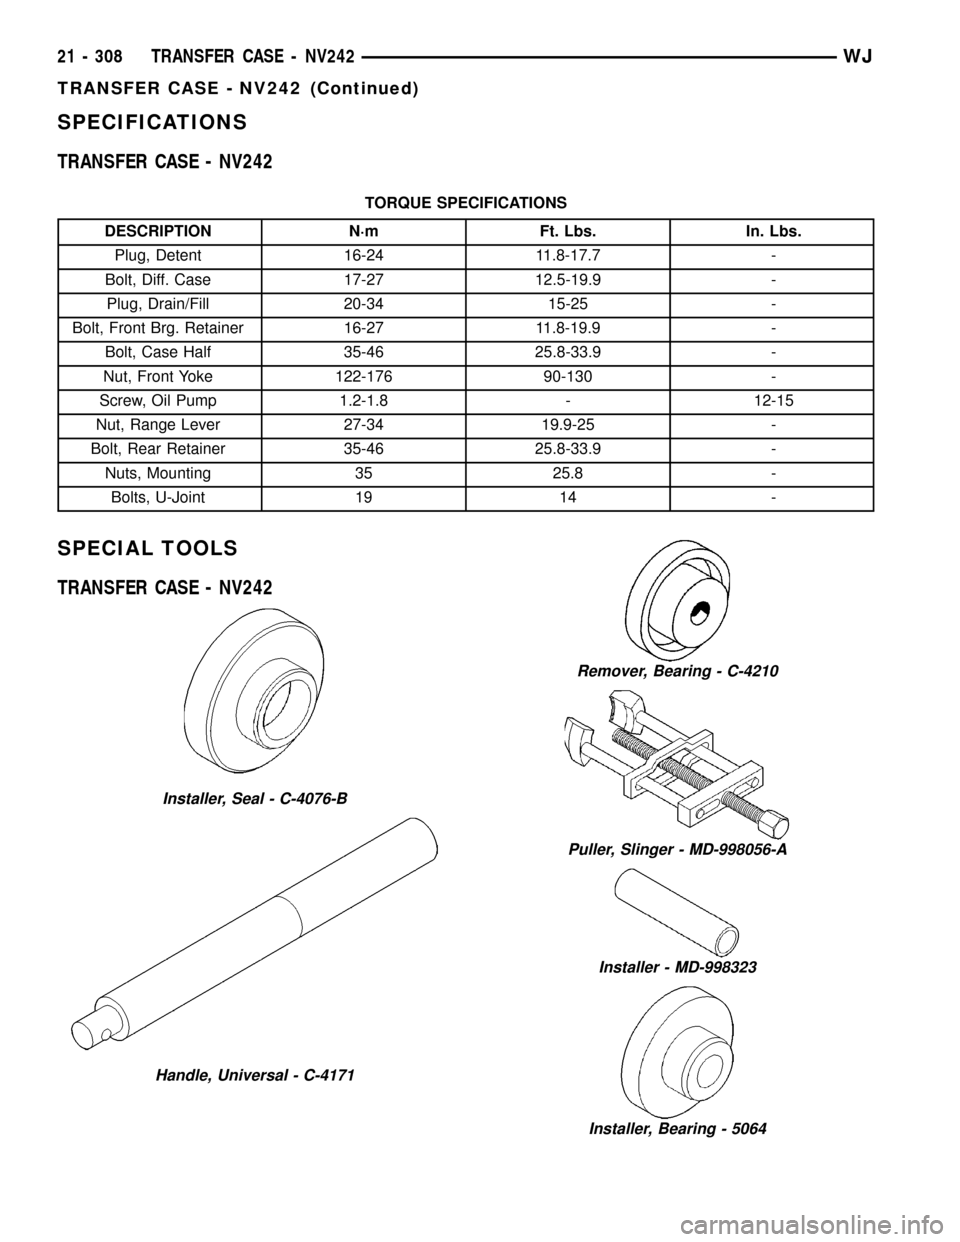
SPECIFICATIONS
TRANSFER CASE - NV242
TORQUE SPECIFICATIONS
DESCRIPTION N´m Ft. Lbs. In. Lbs.
Plug, Detent 16-24 11.8-17.7 -
Bolt, Diff. Case 17-27 12.5-19.9 -
Plug, Drain/Fill 20-34 15-25 -
Bolt, Front Brg. Retainer 16-27 11.8-19.9 -
Bolt, Case Half 35-46 25.8-33.9 -
Nut, Front Yoke 122-176 90-130 -
Screw, Oil Pump 1.2-1.8 - 12-15
Nut, Range Lever 27-34 19.9-25 -
Bolt, Rear Retainer 35-46 25.8-33.9 -
Nuts, Mounting 35 25.8 -
Bolts, U-Joint 19 14 -
SPECIAL TOOLS
TRANSFER CASE - NV242
Installer, Seal - C-4076-B
Handle, Universal - C-4171
Remover, Bearing - C-4210
Puller, Slinger - MD-998056-A
Installer - MD-998323
Installer, Bearing - 5064
21 - 308 TRANSFER CASE - NV242WJ
TRANSFER CASE - NV242 (Continued)
Page 1835 of 2199

OPERATION
Under normal driving conditions, the system oper-
ates conventionally, and the majority of available
torque is applied to the rear wheels. However, when
front-to-rear wheel speed variations exist, the pro-
gressive differential transfers torque to the axle with
the better traction, thus minimizing wheel spin and
maximizing control.
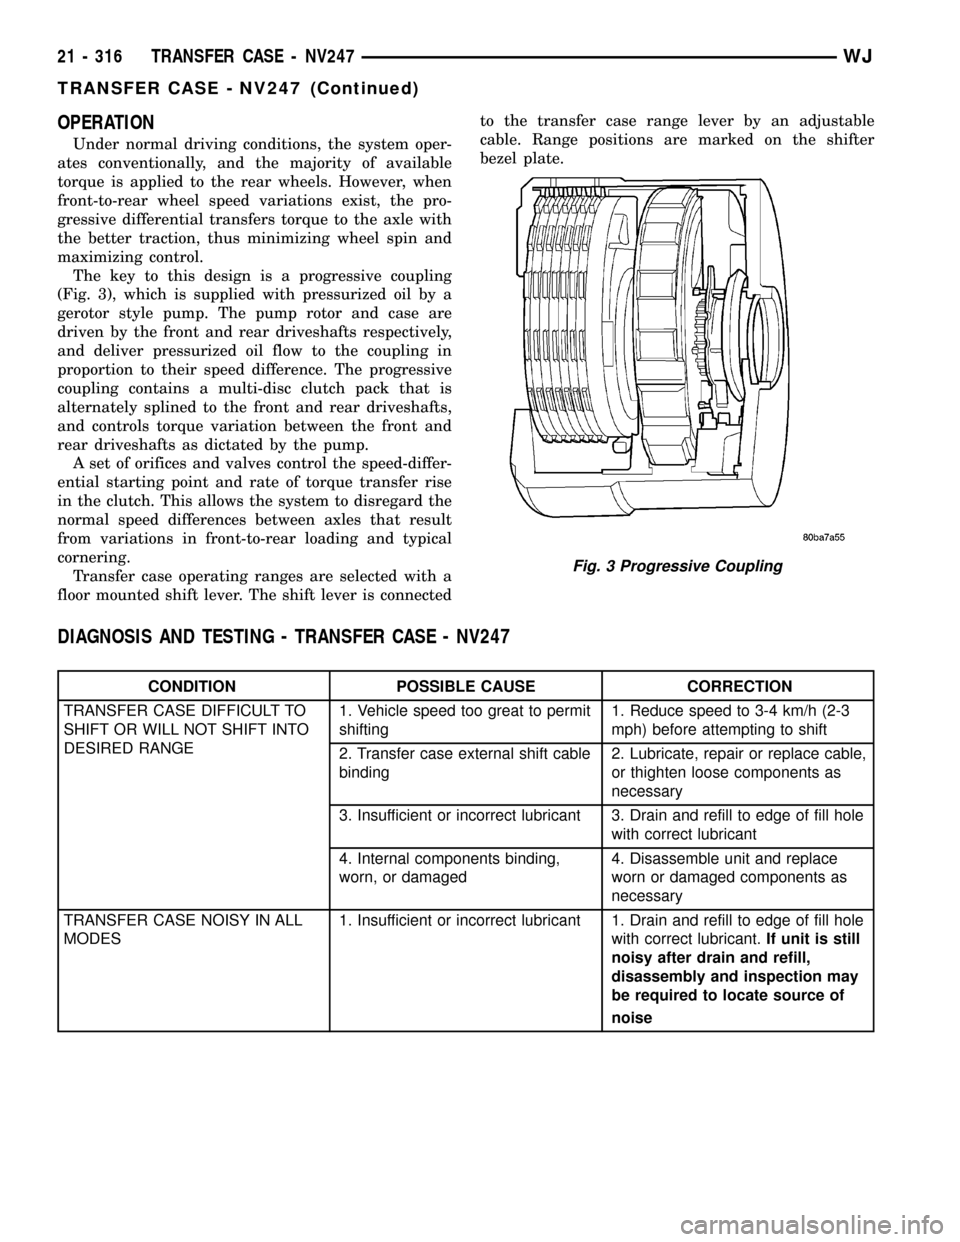
The key to this design is a progressive coupling
(Fig. 3), which is supplied with pressurized oil by a
gerotor style pump. The pump rotor and case are
driven by the front and rear driveshafts respectively,
and deliver pressurized oil flow to the coupling in
proportion to their speed difference. The progressive
coupling contains a multi-disc clutch pack that is
alternately splined to the front and rear driveshafts,
and controls torque variation between the front and
rear driveshafts as dictated by the pump.
A set of orifices and valves control the speed-differ-
ential starting point and rate of torque transfer rise
in the clutch. This allows the system to disregard the
normal speed differences between axles that result
from variations in front-to-rear loading and typical
cornering.
Transfer case operating ranges are selected with a
floor mounted shift lever. The shift lever is connectedto the transfer case range lever by an adjustable
cable. Range positions are marked on the shifter
bezel plate.
DIAGNOSIS AND TESTING - TRANSFER CASE - NV247
CONDITION POSSIBLE CAUSE CORRECTION
TRANSFER CASE DIFFICULT TO
SHIFT OR WILL NOT SHIFT INTO
DESIRED RANGE1. Vehicle speed too great to permit
shifting1. Reduce speed to 3-4 km/h (2-3
mph) before attempting to shift
2. Transfer case external shift cable
binding2. Lubricate, repair or replace cable,
or thighten loose components as
necessary
3. Insufficient or incorrect lubricant 3. Drain and refill to edge of fill hole
with correct lubricant
4. Internal components binding,
worn, or damaged4. Disassemble unit and replace
worn or damaged components as
necessary
TRANSFER CASE NOISY IN ALL
MODES1. Insufficient or incorrect lubricant 1. Drain and refill to edge of fill hole
with correct lubricant.If unit is still
noisy after drain and refill,
disassembly and inspection may
be required to locate source of
noise
Fig. 3 Progressive Coupling
21 - 316 TRANSFER CASE - NV247WJ
TRANSFER CASE - NV247 (Continued)