2003 JEEP GRAND CHEROKEE rings
[x] Cancel search: ringsPage 1797 of 2199
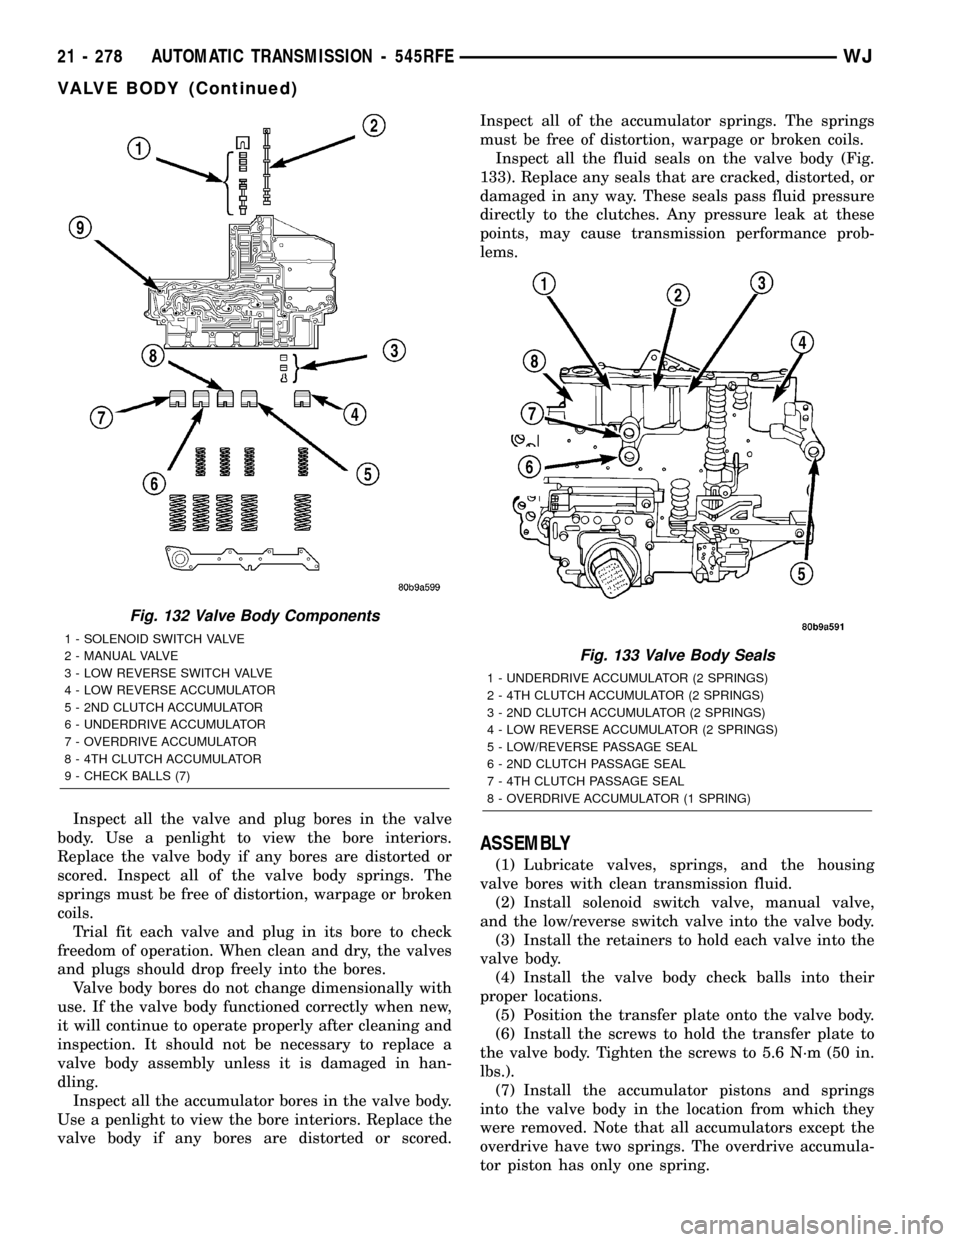
Inspect all the valve and plug bores in the valve
body. Use a penlight to view the bore interiors.
Replace the valve body if any bores are distorted or
scored. Inspect all of the valve body springs. The
springs must be free of distortion, warpage or broken
coils.
Trial fit each valve and plug in its bore to check
freedom of operation. When clean and dry, the valves
and plugs should drop freely into the bores.
Valve body bores do not change dimensionally with
use. If the valve body functioned correctly when new,
it will continue to operate properly after cleaning and
inspection. It should not be necessary to replace a
valve body assembly unless it is damaged in han-
dling.
Inspect all the accumulator bores in the valve body.
Use a penlight to view the bore interiors. Replace the
valve body if any bores are distorted or scored.Inspect all of the accumulator springs. The springs
must be free of distortion, warpage or broken coils.
Inspect all the fluid seals on the valve body (Fig.
133). Replace any seals that are cracked, distorted, or
damaged in any way. These seals pass fluid pressure
directly to the clutches. Any pressure leak at these
points, may cause transmission performance prob-
lems.
ASSEMBLY
(1) Lubricate valves, springs, and the housing
valve bores with clean transmission fluid.
(2) Install solenoid switch valve, manual valve,
and the low/reverse switch valve into the valve body.
(3) Install the retainers to hold each valve into the
valve body.
(4) Install the valve body check balls into their
proper locations.
(5) Position the transfer plate onto the valve body.
(6) Install the screws to hold the transfer plate to
the valve body. Tighten the screws to 5.6 N´m (50 in.
lbs.).
(7) Install the accumulator pistons and springs
into the valve body in the location from which they
were removed. Note that all accumulators except the
overdrive have two springs. The overdrive accumula-
tor piston has only one spring.
Fig. 132 Valve Body Components
1 - SOLENOID SWITCH VALVE
2 - MANUAL VALVE
3 - LOW REVERSE SWITCH VALVE
4 - LOW REVERSE ACCUMULATOR
5 - 2ND CLUTCH ACCUMULATOR
6 - UNDERDRIVE ACCUMULATOR
7 - OVERDRIVE ACCUMULATOR
8 - 4TH CLUTCH ACCUMULATOR
9 - CHECK BALLS (7)
Fig. 133 Valve Body Seals
1 - UNDERDRIVE ACCUMULATOR (2 SPRINGS)
2 - 4TH CLUTCH ACCUMULATOR (2 SPRINGS)
3 - 2ND CLUTCH ACCUMULATOR (2 SPRINGS)
4 - LOW REVERSE ACCUMULATOR (2 SPRINGS)
5 - LOW/REVERSE PASSAGE SEAL
6 - 2ND CLUTCH PASSAGE SEAL
7 - 4TH CLUTCH PASSAGE SEAL
8 - OVERDRIVE ACCUMULATOR (1 SPRING)
21 - 278 AUTOMATIC TRANSMISSION - 545RFEWJ
VALVE BODY (Continued)
Page 1799 of 2199
TRANSFER CASE - NV242
TABLE OF CONTENTS
page page
TRANSFER CASE - NV242
DESCRIPTION........................280
OPERATION..........................281
DIAGNOSIS AND TESTING - TRANSFER
CASE - NV242.......................281
REMOVAL............................282
DISASSEMBLY........................282
CLEANING...........................292
INSPECTION.........................293
ASSEMBLY...........................295
INSTALLATION........................307
SPECIFICATIONS
TRANSFER CASE - NV242.............308
SPECIAL TOOLS
TRANSFER CASE - NV242.............308
FLUID
STANDARD PROCEDURE - FLUID DRAIN/
REFILL............................310FRONT OUTPUT SHAFT SEAL
REMOVAL............................310
INSTALLATION........................310
POSITION SENSOR
DESCRIPTION........................311
OPERATION..........................311
REMOVAL............................312
INSTALLATION........................312
REAR RETAINER BUSHING AND SEAL -
NV242HD
REMOVAL............................312
INSTALLATION........................312
SHIFT CABLE
REMOVAL............................313
INSTALLATION........................313
TRANSFER CASE - NV242
DESCRIPTION
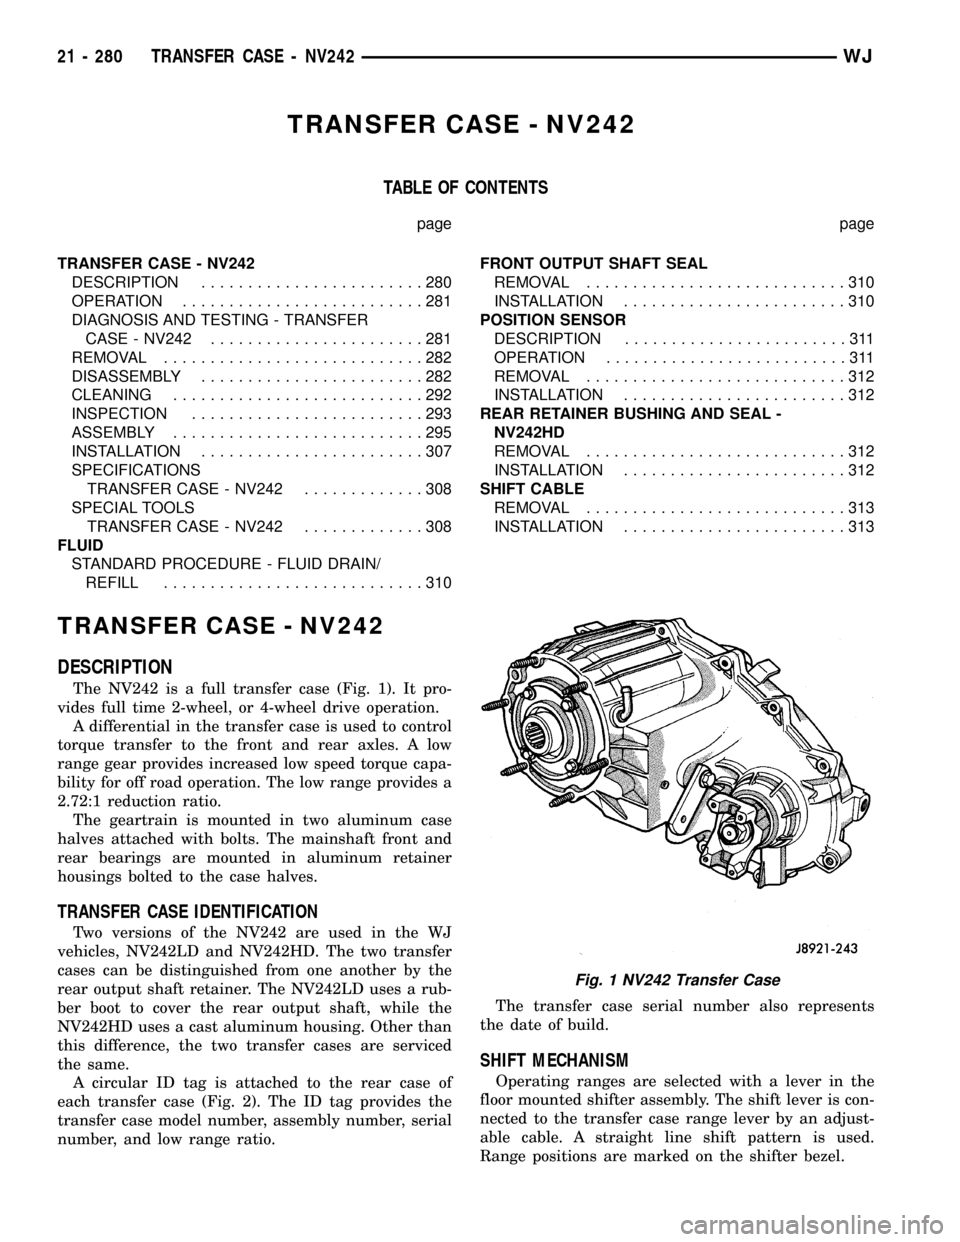
The NV242 is a full transfer case (Fig. 1). It pro-
vides full time 2-wheel, or 4-wheel drive operation.
A differential in the transfer case is used to control
torque transfer to the front and rear axles. A low
range gear provides increased low speed torque capa-
bility for off road operation. The low range provides a
2.72:1 reduction ratio.
The geartrain is mounted in two aluminum case
halves attached with bolts. The mainshaft front and
rear bearings are mounted in aluminum retainer
housings bolted to the case halves.
TRANSFER CASE IDENTIFICATION
Two versions of the NV242 are used in the WJ
vehicles, NV242LD and NV242HD. The two transfer
cases can be distinguished from one another by the
rear output shaft retainer. The NV242LD uses a rub-
ber boot to cover the rear output shaft, while the
NV242HD uses a cast aluminum housing. Other than
this difference, the two transfer cases are serviced
the same.
A circular ID tag is attached to the rear case of
each transfer case (Fig. 2). The ID tag provides the
transfer case model number, assembly number, serial
number, and low range ratio.The transfer case serial number also represents
the date of build.
SHIFT MECHANISM
Operating ranges are selected with a lever in the
floor mounted shifter assembly. The shift lever is con-
nected to the transfer case range lever by an adjust-
able cable. A straight line shift pattern is used.
Range positions are marked on the shifter bezel.
Fig. 1 NV242 Transfer Case
21 - 280 TRANSFER CASE - NV242WJ
Page 1808 of 2199
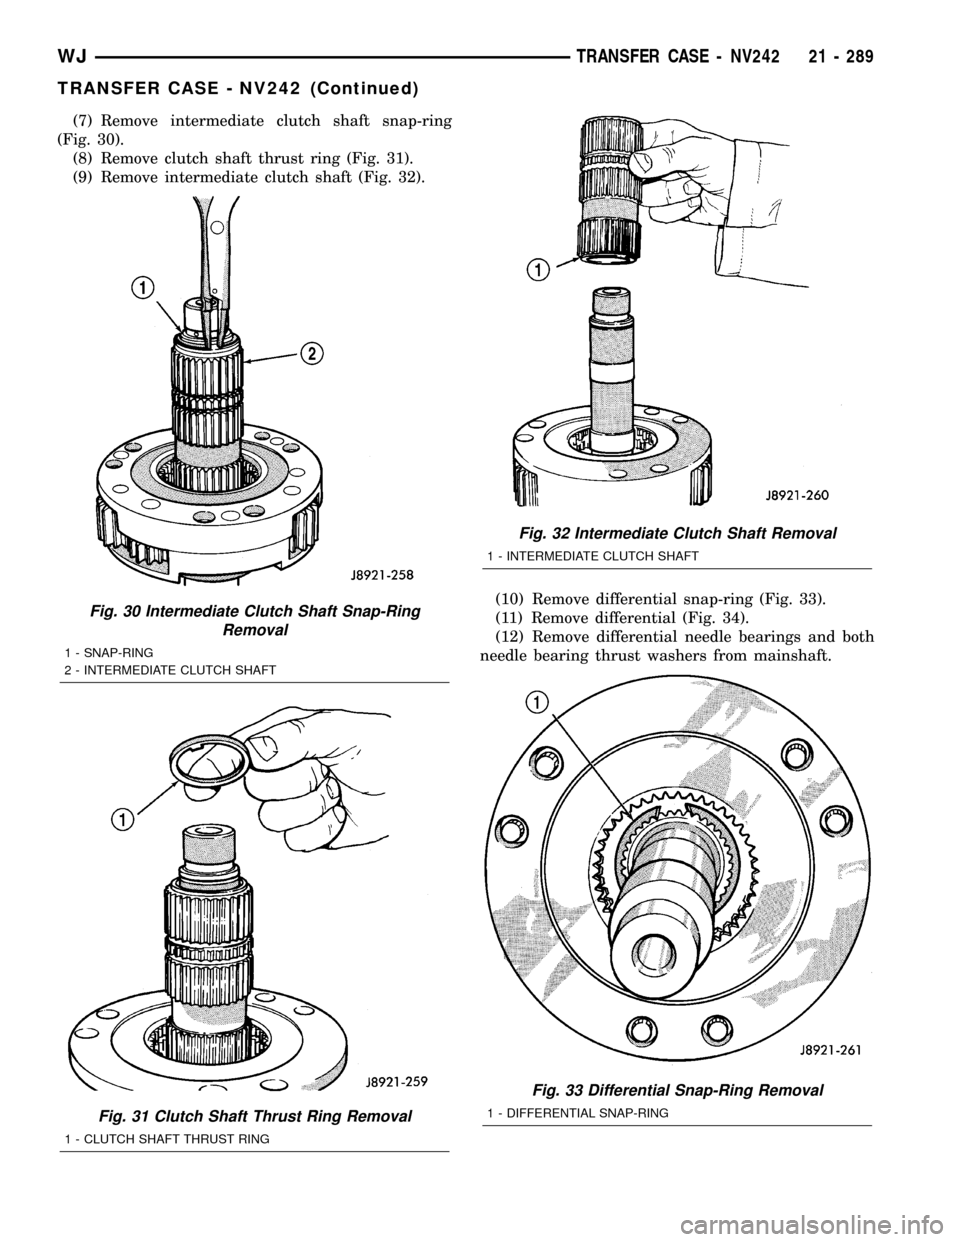
(7) Remove intermediate clutch shaft snap-ring
(Fig. 30).
(8) Remove clutch shaft thrust ring (Fig. 31).
(9) Remove intermediate clutch shaft (Fig. 32).
(10) Remove differential snap-ring (Fig. 33).
(11) Remove differential (Fig. 34).
(12) Remove differential needle bearings and both
needle bearing thrust washers from mainshaft.
Fig. 30 Intermediate Clutch Shaft Snap-Ring
Removal
1 - SNAP-RING
2 - INTERMEDIATE CLUTCH SHAFT
Fig. 31 Clutch Shaft Thrust Ring Removal
1 - CLUTCH SHAFT THRUST RING
Fig. 32 Intermediate Clutch Shaft Removal
1 - INTERMEDIATE CLUTCH SHAFT
Fig. 33 Differential Snap-Ring Removal
1 - DIFFERENTIAL SNAP-RING
WJTRANSFER CASE - NV242 21 - 289
TRANSFER CASE - NV242 (Continued)
Page 1814 of 2199
REAR OUTPUT SHAFT/YOKE/DRIVE CHAIN
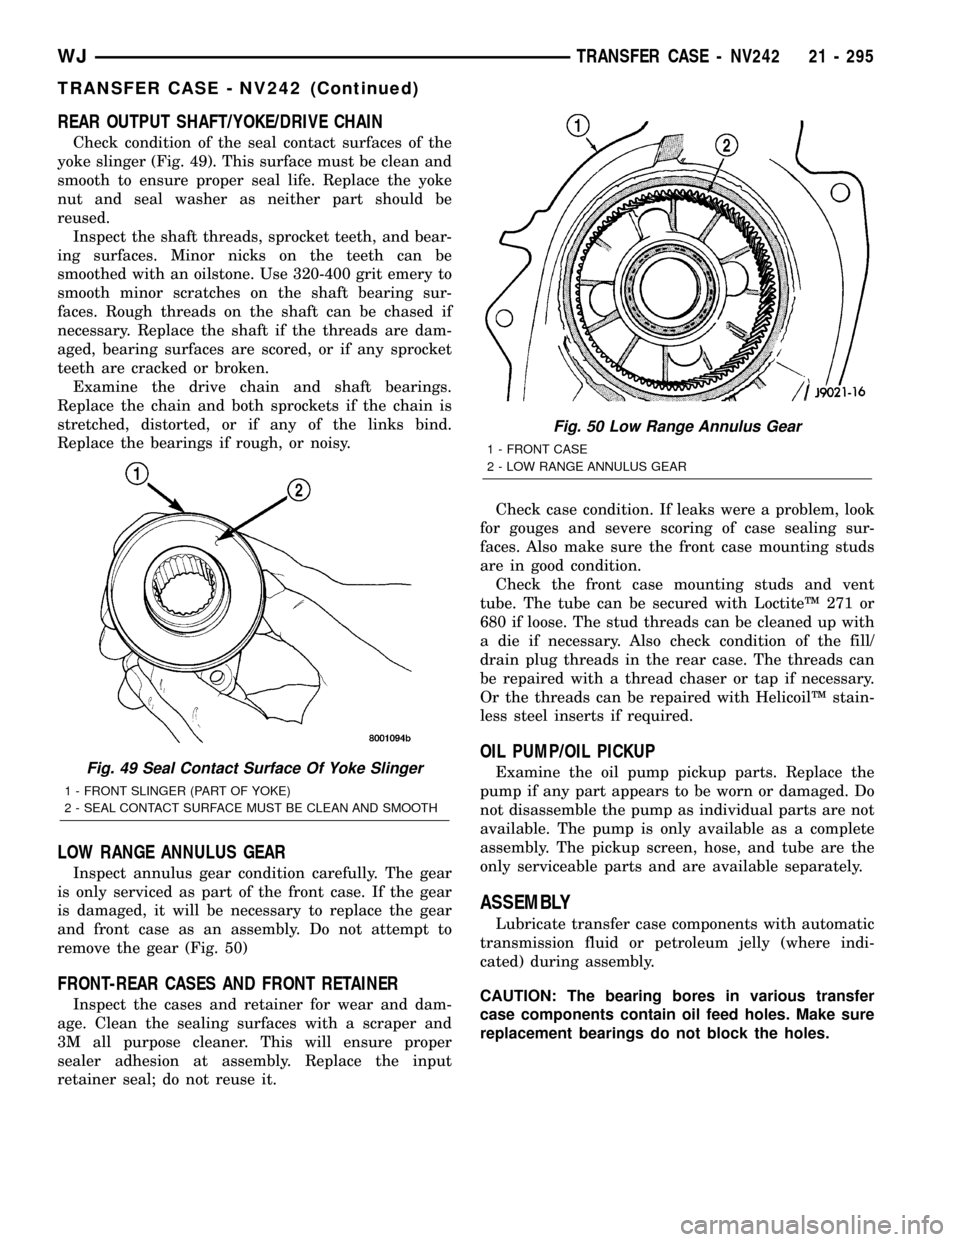
Check condition of the seal contact surfaces of the
yoke slinger (Fig. 49). This surface must be clean and
smooth to ensure proper seal life. Replace the yoke
nut and seal washer as neither part should be
reused.
Inspect the shaft threads, sprocket teeth, and bear-
ing surfaces. Minor nicks on the teeth can be
smoothed with an oilstone. Use 320-400 grit emery to
smooth minor scratches on the shaft bearing sur-
faces. Rough threads on the shaft can be chased if
necessary. Replace the shaft if the threads are dam-
aged, bearing surfaces are scored, or if any sprocket
teeth are cracked or broken.
Examine the drive chain and shaft bearings.
Replace the chain and both sprockets if the chain is
stretched, distorted, or if any of the links bind.
Replace the bearings if rough, or noisy.
LOW RANGE ANNULUS GEAR
Inspect annulus gear condition carefully. The gear
is only serviced as part of the front case. If the gear
is damaged, it will be necessary to replace the gear
and front case as an assembly. Do not attempt to
remove the gear (Fig. 50)
FRONT-REAR CASES AND FRONT RETAINER
Inspect the cases and retainer for wear and dam-
age. Clean the sealing surfaces with a scraper and
3M all purpose cleaner. This will ensure proper
sealer adhesion at assembly. Replace the input
retainer seal; do not reuse it.Check case condition. If leaks were a problem, look
for gouges and severe scoring of case sealing sur-
faces. Also make sure the front case mounting studs
are in good condition.
Check the front case mounting studs and vent
tube. The tube can be secured with LoctiteŸ 271 or
680 if loose. The stud threads can be cleaned up with
a die if necessary. Also check condition of the fill/
drain plug threads in the rear case. The threads can
be repaired with a thread chaser or tap if necessary.
Or the threads can be repaired with HelicoilŸ stain-
less steel inserts if required.
OIL PUMP/OIL PICKUP
Examine the oil pump pickup parts. Replace the
pump if any part appears to be worn or damaged. Do
not disassemble the pump as individual parts are not
available. The pump is only available as a complete
assembly. The pickup screen, hose, and tube are the
only serviceable parts and are available separately.
ASSEMBLY
Lubricate transfer case components with automatic
transmission fluid or petroleum jelly (where indi-
cated) during assembly.
CAUTION: The bearing bores in various transfer
case components contain oil feed holes. Make sure
replacement bearings do not block the holes.
Fig. 49 Seal Contact Surface Of Yoke Slinger
1 - FRONT SLINGER (PART OF YOKE)
2 - SEAL CONTACT SURFACE MUST BE CLEAN AND SMOOTH
Fig. 50 Low Range Annulus Gear
1 - FRONT CASE
2 - LOW RANGE ANNULUS GEAR
WJTRANSFER CASE - NV242 21 - 295
TRANSFER CASE - NV242 (Continued)
Page 1820 of 2199
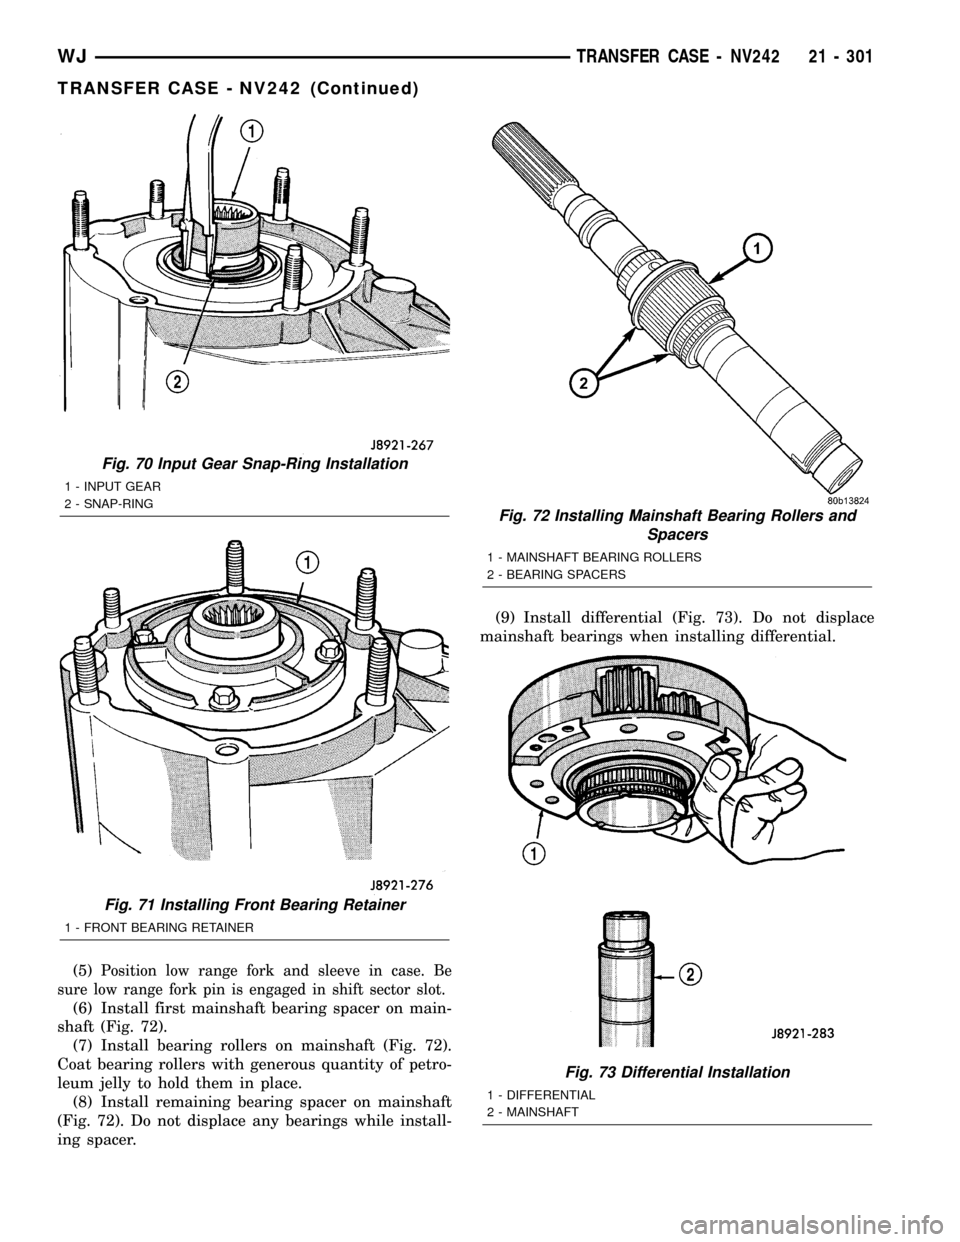
(5)Position low range fork and sleeve in case. Be
sure low range fork pin is engaged in shift sector slot.
(6) Install first mainshaft bearing spacer on main-
shaft (Fig. 72).
(7) Install bearing rollers on mainshaft (Fig. 72).
Coat bearing rollers with generous quantity of petro-
leum jelly to hold them in place.
(8) Install remaining bearing spacer on mainshaft
(Fig. 72). Do not displace any bearings while install-
ing spacer.(9) Install differential (Fig. 73). Do not displace
mainshaft bearings when installing differential.
Fig. 70 Input Gear Snap-Ring Installation
1 - INPUT GEAR
2 - SNAP-RING
Fig. 71 Installing Front Bearing Retainer
1 - FRONT BEARING RETAINER
Fig. 72 Installing Mainshaft Bearing Rollers and
Spacers
1 - MAINSHAFT BEARING ROLLERS
2 - BEARING SPACERS
Fig. 73 Differential Installation
1 - DIFFERENTIAL
2 - MAINSHAFT
WJTRANSFER CASE - NV242 21 - 301
TRANSFER CASE - NV242 (Continued)
Page 1821 of 2199
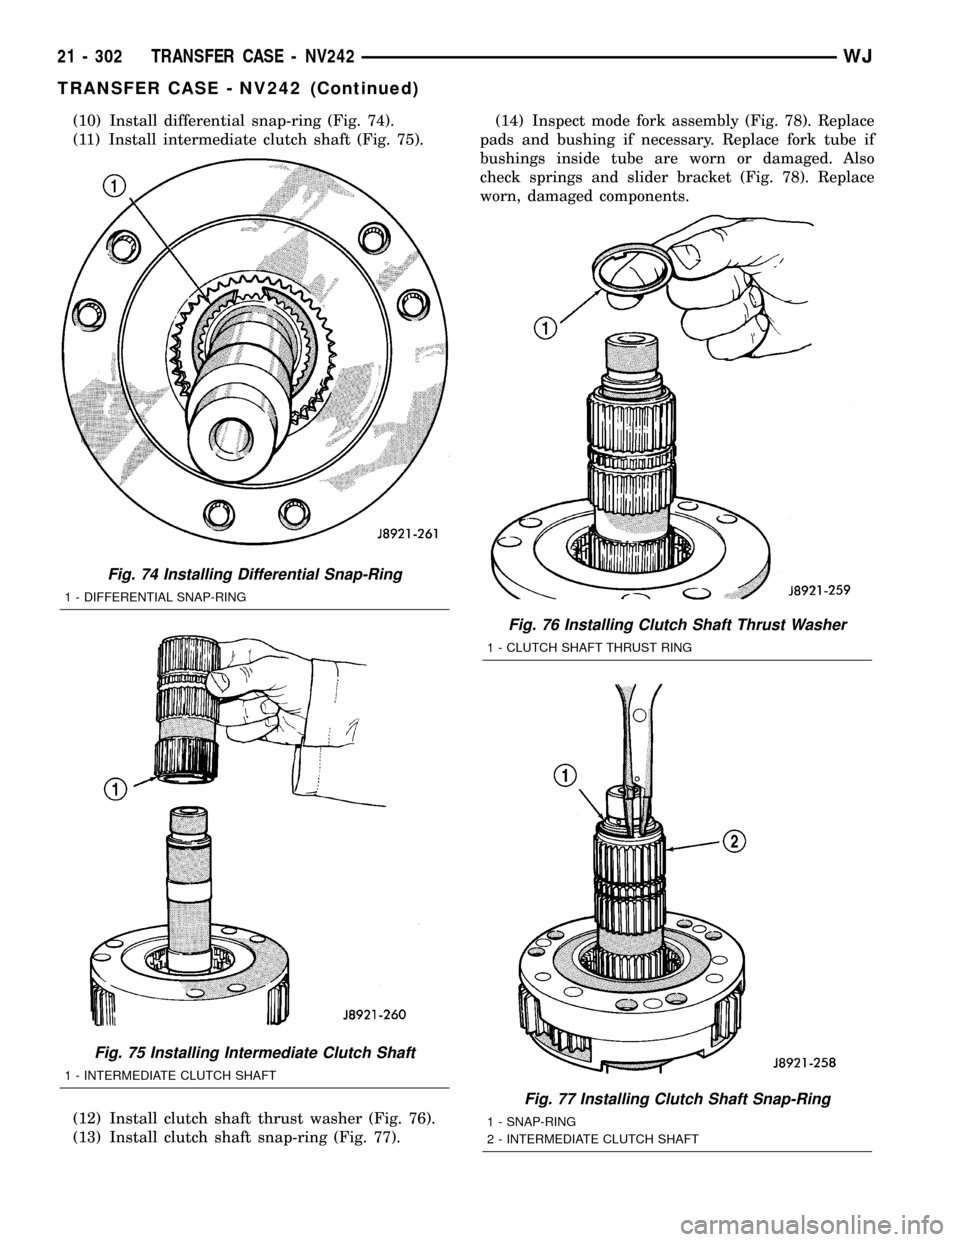
(10) Install differential snap-ring (Fig. 74).
(11) Install intermediate clutch shaft (Fig. 75).
(12) Install clutch shaft thrust washer (Fig. 76).
(13) Install clutch shaft snap-ring (Fig. 77).(14) Inspect mode fork assembly (Fig. 78). Replace
pads and bushing if necessary. Replace fork tube if
bushings inside tube are worn or damaged. Also
check springs and slider bracket (Fig. 78). Replace
worn, damaged components.
Fig. 74 Installing Differential Snap-Ring
1 - DIFFERENTIAL SNAP-RING
Fig. 75 Installing Intermediate Clutch Shaft
1 - INTERMEDIATE CLUTCH SHAFT
Fig. 76 Installing Clutch Shaft Thrust Washer
1 - CLUTCH SHAFT THRUST RING
Fig. 77 Installing Clutch Shaft Snap-Ring
1 - SNAP-RING
2 - INTERMEDIATE CLUTCH SHAFT
21 - 302 TRANSFER CASE - NV242WJ
TRANSFER CASE - NV242 (Continued)
Page 1840 of 2199
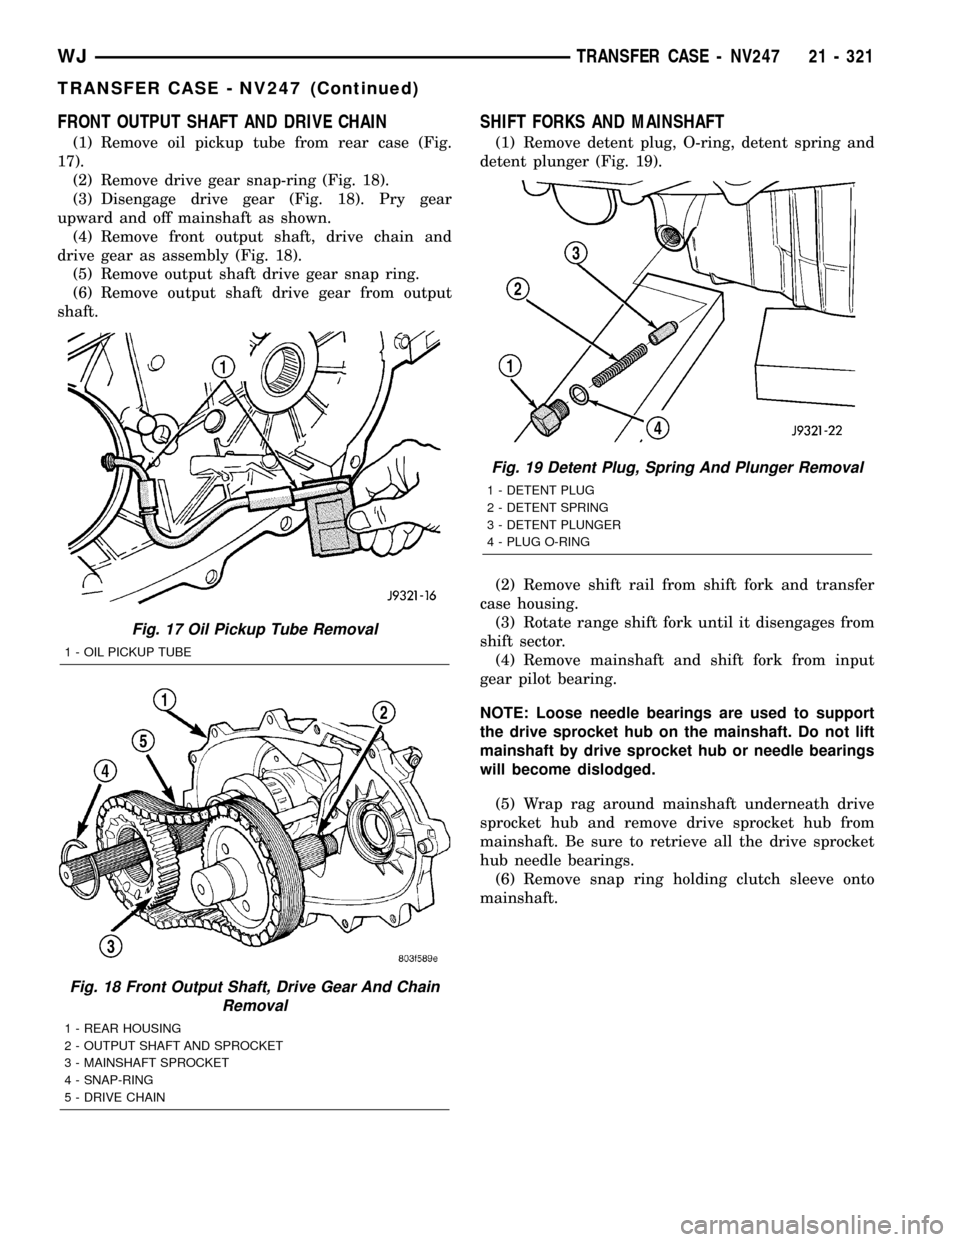
FRONT OUTPUT SHAFT AND DRIVE CHAIN
(1) Remove oil pickup tube from rear case (Fig.
17).
(2) Remove drive gear snap-ring (Fig. 18).
(3) Disengage drive gear (Fig. 18). Pry gear
upward and off mainshaft as shown.
(4) Remove front output shaft, drive chain and
drive gear as assembly (Fig. 18).
(5) Remove output shaft drive gear snap ring.
(6) Remove output shaft drive gear from output
shaft.
SHIFT FORKS AND MAINSHAFT
(1) Remove detent plug, O-ring, detent spring and
detent plunger (Fig. 19).
(2) Remove shift rail from shift fork and transfer
case housing.
(3) Rotate range shift fork until it disengages from
shift sector.
(4) Remove mainshaft and shift fork from input
gear pilot bearing.
NOTE: Loose needle bearings are used to support
the drive sprocket hub on the mainshaft. Do not lift
mainshaft by drive sprocket hub or needle bearings
will become dislodged.
(5) Wrap rag around mainshaft underneath drive
sprocket hub and remove drive sprocket hub from
mainshaft. Be sure to retrieve all the drive sprocket
hub needle bearings.
(6) Remove snap ring holding clutch sleeve onto
mainshaft.
Fig. 17 Oil Pickup Tube Removal
1 - OIL PICKUP TUBE
Fig. 18 Front Output Shaft, Drive Gear And Chain
Removal
1 - REAR HOUSING
2 - OUTPUT SHAFT AND SPROCKET
3 - MAINSHAFT SPROCKET
4 - SNAP-RING
5 - DRIVE CHAIN
Fig. 19 Detent Plug, Spring And Plunger Removal
1 - DETENT PLUG
2 - DETENT SPRING
3 - DETENT PLUNGER
4 - PLUG O-RING
WJTRANSFER CASE - NV247 21 - 321
TRANSFER CASE - NV247 (Continued)
Page 1843 of 2199
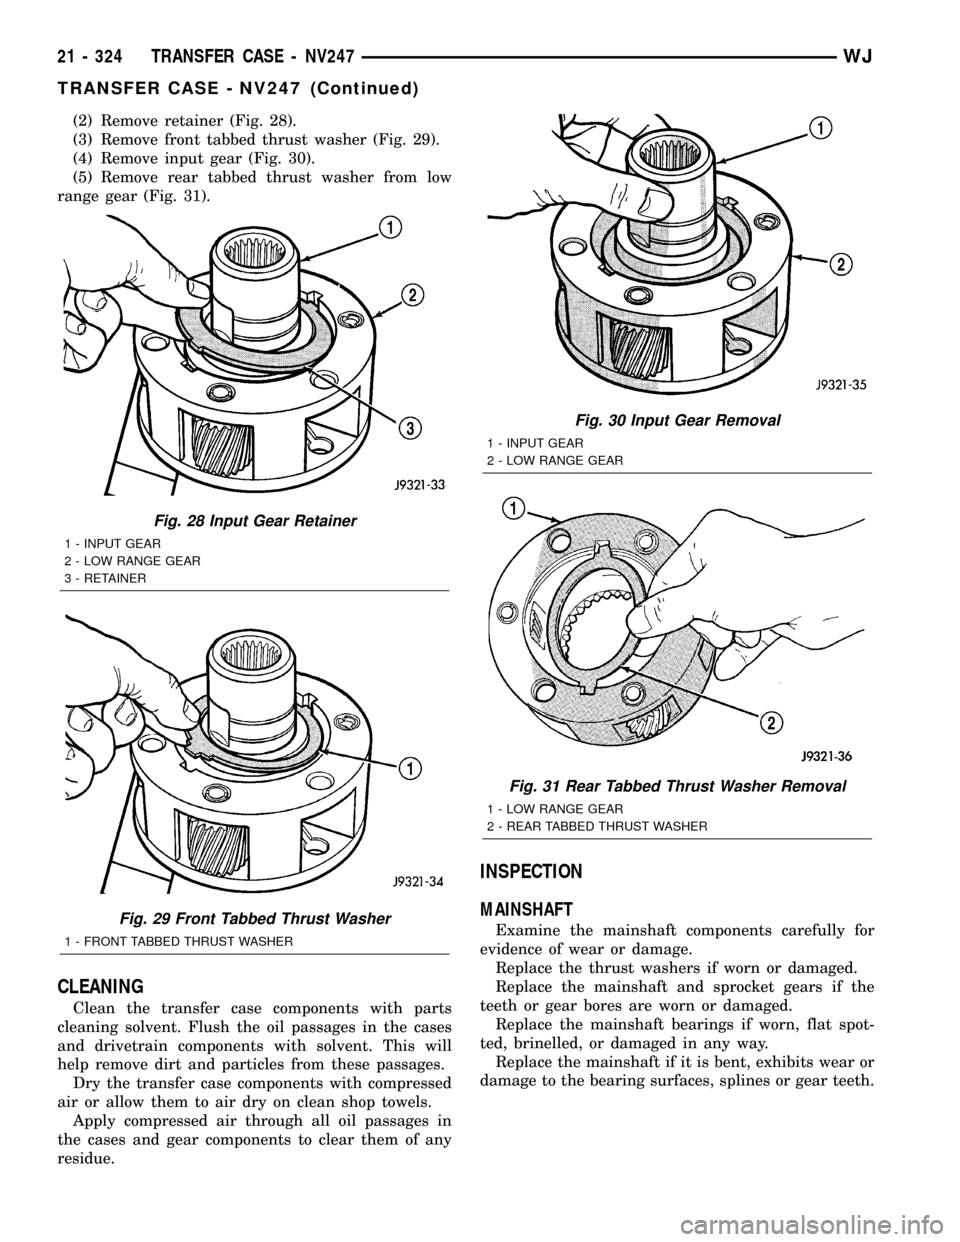
(2) Remove retainer (Fig. 28).
(3) Remove front tabbed thrust washer (Fig. 29).
(4) Remove input gear (Fig. 30).
(5) Remove rear tabbed thrust washer from low
range gear (Fig. 31).
CLEANING
Clean the transfer case components with parts
cleaning solvent. Flush the oil passages in the cases
and drivetrain components with solvent. This will
help remove dirt and particles from these passages.
Dry the transfer case components with compressed
air or allow them to air dry on clean shop towels.
Apply compressed air through all oil passages in
the cases and gear components to clear them of any
residue.
INSPECTION
MAINSHAFT
Examine the mainshaft components carefully for
evidence of wear or damage.
Replace the thrust washers if worn or damaged.
Replace the mainshaft and sprocket gears if the
teeth or gear bores are worn or damaged.
Replace the mainshaft bearings if worn, flat spot-
ted, brinelled, or damaged in any way.
Replace the mainshaft if it is bent, exhibits wear or
damage to the bearing surfaces, splines or gear teeth.
Fig. 28 Input Gear Retainer
1 - INPUT GEAR
2 - LOW RANGE GEAR
3 - RETAINER
Fig. 29 Front Tabbed Thrust Washer
1 - FRONT TABBED THRUST WASHER
Fig. 30 Input Gear Removal
1 - INPUT GEAR
2 - LOW RANGE GEAR
Fig. 31 Rear Tabbed Thrust Washer Removal
1 - LOW RANGE GEAR
2 - REAR TABBED THRUST WASHER
21 - 324 TRANSFER CASE - NV247WJ
TRANSFER CASE - NV247 (Continued)