2003 INFINITI G35 warning lights
[x] Cancel search: warning lightsPage 102 of 256

Continue to press the UNLOCK button for 3
seconds. All the door windows will be lowered.
Continue to press the UNLOCK button until
windows are fully open.
To stop lowering the windows, release the
UNLOCK button.
To start lowering the windows, press the UN-
LOCK button again for more than 3 seconds.
The rear door windows will operate 0.5 sec-
onds after the front windows' operation (if so
equipped).
Releasing the trunk lid 1. Push the TRUNK button on the keyfob for
longer than 0.5 seconds with the key re-
moved from the ignition key cylinder.
2. The trunk lid opens.
Using the panic alarm If you are near your vehicle and feel threat-
ened, you may activate the alarm to call atten-
tion as follows:
1. Push the PANIC button on the keyfob for
longer than 0.5 seconds with the key
removed from the ignition key cylinder.
2. The theft warning alarm and headlights will
stay on for 30 seconds. 3. The panic alarm stops when:
O It has run for 30 seconds, or
O The LOCK or the UNLOCK button is
pressed, or
O The PANIC or the TRUNK button is pushed
on the keyfob for longer than 0.5 seconds.
BATTERY REPLACEMENT Replace the battery as follows:
1. Open the lid using a suitable tool.
2. Replace the battery with a new one. SPA1374
3-8 Pre-driving checks and adjustments
Z 02.11.1/V35-D/V5.0
X
Page 111 of 256

CAUTIONStore the main sun visor after storing
the extension sun visor.
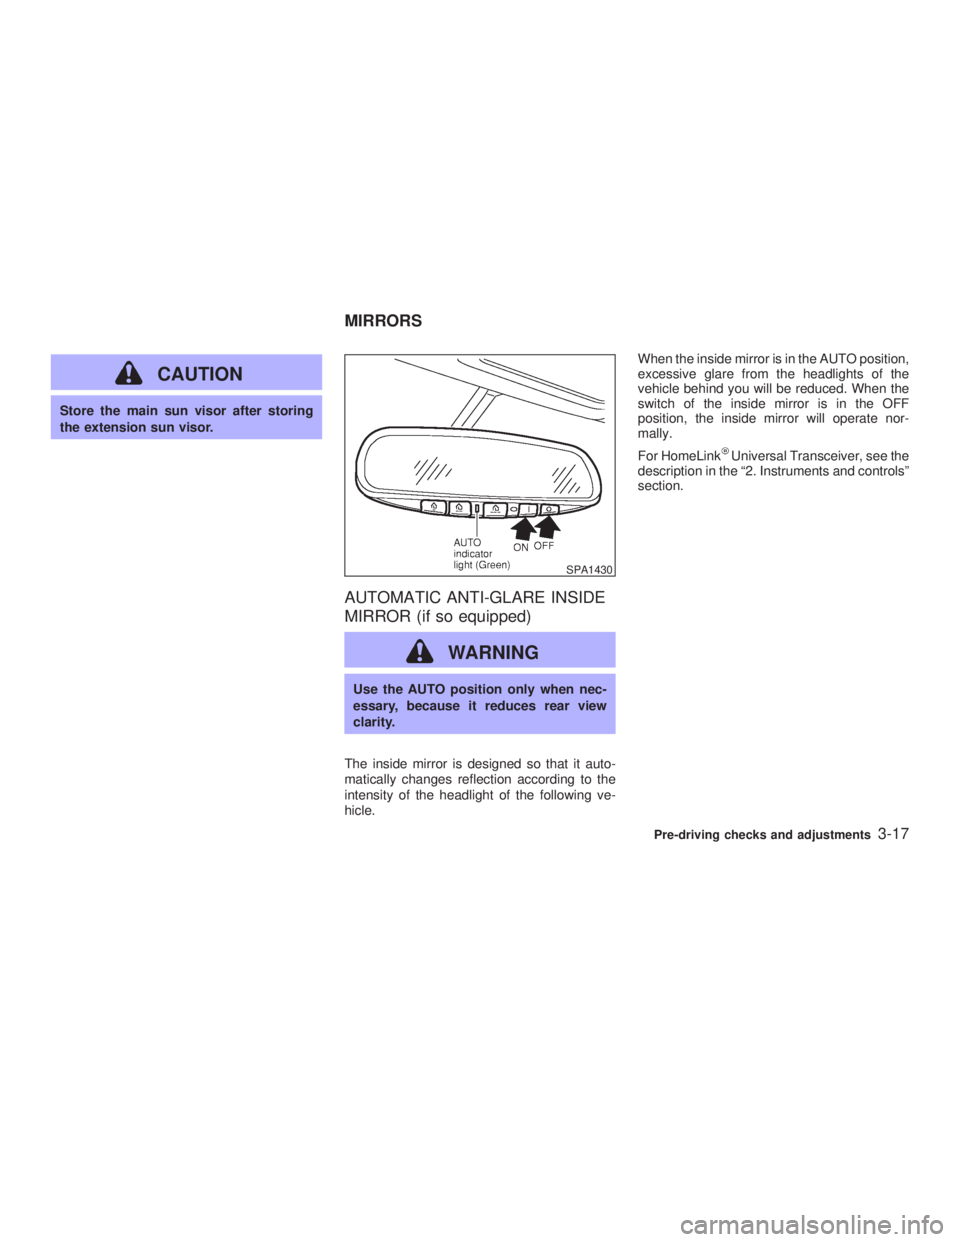
AUTOMATIC ANTI-GLARE INSIDE
MIRROR (if so equipped)
WARNING Use the AUTO position only when nec-
essary, because it reduces rear view
clarity.
The inside mirror is designed so that it auto-
matically changes reflection according to the
intensity of the headlight of the following ve-
hicle. When the inside mirror is in the AUTO position,
excessive glare from the headlights of the
vehicle behind you will be reduced. When the
switch of the inside mirror is in the OFF
position, the inside mirror will operate nor-
mally.
For HomeLink Universal Transceiver, see the
description in the ª2. Instruments and controlsº
section. SPA1430
MIRRORS
Pre-driving checks and adjustments
3-17
Z 02.7.29/V35-D/V5.0
X
Page 141 of 256

O Make sure the area around the vehicle is
clear.
O Maintenance items should be checked pe-
riodically, e.g., each time you check engine
oil.
O Check that all windows and lights are clean.
O Visually inspect tires for their appearance
and condition. Also, check tires for proper
inflation.
O Lock all doors.
O Position seat and adjust head restraints.
O Adjust inside and outside mirrors.
O Fasten seat belts and ask all passengers to
do likewise.
O Check the operation of warning lights when
key is turned to the ON (3) position. 1. Apply the parking brake.
2. Automatic transmission:
Move the selector lever to P (Park) or N
(Neutral). (P preferred.)
The starter is designed not to operate if the
selector lever is in one of the driving posi-
tions.
Manual transmission:
Move the shift lever to N (Neutral) position,
and depress the clutch pedal to the floor
while cranking the engine.
The starter is designed not to operate un-
less the clutch pedal is fully depressed.
3. Crank the engine with your foot off the
accelerator pedal by turning the ignition
key to START. Release the key when the
engine starts. If the engine starts, but fails
to run, repeat the above procedure.
O If the engine is very hard to start in ex-
tremely cold weather or when restarting,
depress the accelerator pedal a little (ap-
proximately 1/5 to the floor) and hold it then
crank the engine. Release the key and the
accelerator pedal when the engine starts.
O If the engine is very hard to start because it
is flooded, depress the accelerator pedal all the way to the floor and hold it. Crank the
engine for 5 to 6 seconds. After cranking
the engine, release the accelerator pedal.
Crank the engine with your foot off the
accelerator pedal by turning the ignition
key to START. Release the key when the
engine starts. If the engine starts, but fails
to run, repeat the above procedure.
CAUTION Do not operate the starter for more than
15 seconds at a time. If the engine does
not start, turn the key off and wait 10
seconds before cranking again, other-
wise the starter could be damaged.
4. Warm-up
Allow the engine to idle for at least 30
seconds after starting. Drive at moderate
speed for a short distance first, especially in
cold weather.BEFORE STARTING THE ENGINE STARTING THE ENGINE
Starting and driving
5-7
Z 02.7.29/V35-D/V5.0
X
Page 155 of 256

cidents resulting from careless or dan-
gerous driving techniques. It can help
maintain vehicle control during braking
on slippery surfaces, but remember that
the stopping distance on slippery sur-
faces will be longer than on normal
surfaces, even with the anti-lock sys-
tem. Stopping distances may also be
longer on rough, gravel or snow covered
roads, or if you are using tire chains.
Always maintain a safe distance from
the vehicle in front of you. Ultimately,
the responsibility for safety of yourself
and others rests in the hands of the
driver.
Tire type and condition of tires may also
affect braking effectiveness.
O When replacing tires, install the
specified size of tires on all four
wheels.
O When installing a spare tire, make
sure it is the proper size and type as
specified on the tire placard. See ªVe-
hicle identificationº in the ª10. Tech-
nical and consumer informationº sec- tion for tire placard location. When driving on slippery surfaces or suddenly
avoiding obstacles on roads, the vehicle might
swerve or slip. With the vehicle dynamics
control (VDC) system, sensors detect these
movements and control the braking and en-
gine output to help improve vehicle stability
while driving.
O When the vehicle dynamics control system
is operating, the slip indicator in the instru-
ment panel blinks.
O When only the traction control system por-
tion of the vehicle dynamics control system
is operating, the slip indicator will also blink.
O If the slip indicator blinks, the vehicle is
under slippery conditions. Be sure to drive
carefully. See ªSlip indicator lightº, and ªVe-
hicle dynamics control off indicator lightº in
the ª2. Instruments and controlsº section.
O Indicator light
If a malfunction occurs in the system, the
SLIP and indicator lights come on in
the meter panel.
As long as these warning lights are on, the
traction control function is canceled.
The VDC system uses a Brake Limited Slip
Differential (LSD) system to improve vehicle
traction. The brake LSD system works when
one of the driving wheels is spinning on aVEHICLE DYNAMICS CONTROL
(VDC) SYSTEM
Starting and driving
5-21
Z 02.7.29/V35-D/V5.0
X
Page 203 of 256

HEADLIGHTS
Replacing If replacement is required, see an authorized
INFINITI retailer.
Xenon headlight bulb:
WARNING HIGH VOLTAGE
When xenon headlights are on, they
produce a high voltage. To prevent an
electric shock, never attempt to modify
or disassemble the headlight assembly.
Always have your xenon headlights re-
placed at an authorized INFINITI retailer.
For additional information, see ªHead-
light and turn signal switchº in the ª2.
Instruments and controlsº section.
Halogen headlight bulb:
A bulb can be replaced from under the engine
compartment without removing the headlight
assembly. CAUTION O High pressure halogen gas is sealed
inside the halogen bulb. The bulb
may break if the glass envelope is
scratched or the bulb is dropped.
O When handling the bulb, do not touch
the glass envelope.
O Do not touch the bulb.
O Use the same number and wattage as
originally installed:
Bulb no. H1 (55W) - Low-beam
HB2 (60/55W) - High-beam/
Fog light
O Do not leave the bulb out of the head-
light reflector for a long period of time
as dust, moisture, and smoke may
enter the headlight body and affect
the performance of the headlight.
Do-it-yourself
8-25
Z 02.7.29/V35-D/V5.0
X
Page 215 of 256

EXPLANATION OF MAINTENANCE
ITEMS Additional information on the following
items with ª*º is found in the ª8. Do-it-
yourselfº section.
Outside the vehicle The maintenance items listed here should be
performed from time to time, unless otherwise
specified.
Tires*: Check the pressure with a gauge at
least once a month and always prior to long
distance trips. If necessary, adjust the pres-
sure in all tires, including the spare, to the
specified pressure. Check carefully for dam-
age, cuts or excessive wear.
Wheel nuts*: When checking the tires, make
sure no nuts are missing, and check for any
loose nuts. Tighten if necessary.
Tire rotation*: Tires should be rotated every
7,500 miles (12,000 km) (Sedan).
Tires cannot be rotated (Coupe).
Wheel alignment and balance: If the vehicle
pulls to either side while driving on a straight
and level road, or if you detect uneven or
abnormal tire wear, there may be a need for
wheel alignment. If the steering wheel or seat vibrates at normal
highway speeds, wheel balancing may be
needed.
For additional information regarding tires, refer
to ªImportant Tire Safety Informationº (US) or
ªTire Safety Informationº (Canada) in the
INFINITI Warranty Information booklet.
Windshield: Clean the windshield on a regu-
lar basis. Check the windshield at least every
six months for cracks or other damage. Have a
damaged windshield repaired by a qualified
repair facility.
Windshield wiper blades*: Check for cracks
or wear if they do not wipe properly.
Doors and engine hood: Check that all doors
and the engine hood, operate properly. Also
ensure that all latches lock securely. Lubricate
hinges and latches if necessary. Make sure
that the secondary latch keeps the hood from
opening when the primary latch is released.
When driving in areas using road salt or other
corrosive materials, check lubrication fre-
quently.
Inside the vehicle The maintenance items listed here should be
checked on a regular basis, such as when performing periodic maintenance, cleaning the
vehicle, etc.
Lights*: Clean the headlights on a regular
basis. Make sure that the headlights, stop
lights, tail lights, turn signal lights, and other
lights are all operating properly and installed
securely. Also check headlight aim.
Warning lights and chimes: Make sure that
all warning lights and chimes are operating
properly.
Windshield wiper and washer*: Check that
the wipers and washer operate properly and
that the wipers do not streak.
Windshield defroster: Check that the air
comes out of the defroster outlets properly and
in sufficient quantity when operating the heater
or air conditioner.
Steering wheel: Check for changes in the
steering conditions, such as excessive free
play, hard steering or strange noises.
Seats: Check seat position controls such as
seat adjusters, seatback recliner, etc. to en-
sure they operate smoothly and that all latches
lock securely in every position. Check that the
head restraints move up and down smoothly
and that the locks (if so equipped) hold se-
curely in all latched positions. Maintenance
9-3
Z 02.7.29/V35-D/V5.0
X
Page 239 of 256

TOWING LOAD/SPECIFICATION CHART
Unit: lb (kg)
MAXIMUM
TOWING LOAD 1,000 (454)
MAXIMUM
TONGUE LOAD 110 (49)
TOWING SAFETY
Trailer hitch Choose a proper hitch for your vehicle and
trailer. Make sure the trailer hitch is securely
attached to the vehicle, to help avoid personal
injury or property damage due to sway caused
by crosswinds, rough road surfaces or passing
trucks.
CAUTIONO Do not use axle-mounted hitches.
O The hitch should not be attached to
or affect the operation of the impact-
absorbing bumper.
O Do not modify the vehicle exhaust
system, brake system, etc. to install a
trailer hitch. O To reduce the possibility of additional
damage if your vehicle is struck from
the rear, where practical, remove the
hitch and/or receiver when not in use.
After the hitch is removed, seal the
bolt holes to prevent exhaust fumes,
water or dust from entering the pas-
senger compartment.
O Regularly check that all hitch mount-
ing bolts are securely mounted.
Tire pressures O When towing a trailer, inflate the vehicle
tires to the recommended cold tire pressure
indicated on the tire placard (located on the
inside of the rear left door opening (Sedan),
the driver side center pillar (Coupe).
O Trailer tire condition, size, load rating and
proper inflation pressure should be in ac-
cordance with the trailer and tire manufac-
turers' specifications.
Safety chain Always use a suitable chain between your
vehicle and the trailer. The chain should be
crossed and should be attached to the hitch, not to the vehicle bumper or axle. Be sure to
leave enough slack in the chain to permit
turning corners.
Trailer lights Trailer lights should comply with federal and/or
local regulations. When wiring the vehicle for
towing, connect the stop and tail light pickup
into the vehicle electrical circuit at a point
between the sensor and stop light or light
switch.
Trailer brakes If your trailer is equipped with a braking sys-
tem, make sure it conforms to federal and/or
local regulations and that it is properly in-
stalled.
WARNING Never connect a trailer brake system
directly to the vehicle brake system.
Pre-towing tips O Be certain your vehicle maintains a level
position when a loaded and/or unloaded
trailer is hitched. Do not drive the vehicle if
it has an abnormal nose-up or nose-down Technical and consumer information
10-17
Z 02.7.29/V35-D/V5.0
X
Page 249 of 256

Fuel
Capacities and recommended fuel/lubricants/
fluids .......................................................... 10-2
filler cap ..................................................... 3-14
filler lid ....................................................... 3-14
Fuel economy ............................................ 5-17
Fuel octane rating ..................................... 10-3
Fuel recommendation................................ 10-3
Gauge .......................................................... 2-5
Fuses .............................................................. 8-20
Fusible links .................................................... 8-20
G
Garage door opener, HomeLink Universal
Transceiver ..................................................... 2-37
Gas cap .......................................................... 3-14
Gauge ............................................................... 2-3
Engine coolant temperature gauge ............. 2-5
Fuel gauge .................................................. 2-5
Odometer..................................................... 2-4
Speedometer ............................................... 2-4
Tachometer ................................................. 2-4
General maintenance ....................................... 9-2
Glasses case .................................................. 2-26
Glove box........................................................ 2-27
Glove box lock ................................................ 2-27
H
Hazard warning flasher switch........................ 2-20
Head restraints ................................................. 1-9 Headlights
Bulb replacement ...................................... 8-25
Headlight switch ........................................ 2-17
Xenon headlights ..................................... 2-17
Heated seats................................................... 2-21
Heater
Engine coolant heater ............................... 5-24
Heater and air conditioner (automatic) ....... 4-3
HomeLink Universal Transceiver .................. 2-37
Hood, release ................................................. 3-10
Horn ................................................................ 2-21
How to stop alarm, Vehicle security ............... 2-14
I
Ignition switch ................................................... 5-4
Automatic transmission models ........... 5-4, 5-8
Key positions ............................................... 5-6
Manual transmission models ............. 5-5, 5-12
Immobilizer system ......................................... 2-14
In-cabin microfilter ............................................ 4-5
Indicator lights................................................. 2-11
Infiniti Vehicle Immobilizer System, Engine
start ................................................................... 5-6
Inside Automatic anti-glare mirror................... 3-17
Inspection/maintenance (I/M) test................. 10-21
Installing front bumper cover ........................ 10-12
Instrument panel ............................................... 2-2
Instrument pocket ........................................... 2-25
Interior light ..................................................... 2-35
Interior light replacement ................................ 8-26
Interior trunk lid release .................................. 3-12
ISOFIX child restraint ..................................... 1-40 J
Jump starting .................................................... 6-7
K
Keyless entry (See remote keyless entry
system) ............................................................. 3-5
Keys .................................................................. 3-2
L
Label, Air conditioner specification label ...... 10-12
Label, Emission control information label ..... 10-11
Label, F.M.V.S.S. certification label.............. 10-10
Labels
Air bag warning labels............................... 1-23
Engine serial number .............................. 10-10
Vehicle identification number (VIN)........... 10-9
LATCH system................................................ 1-40
License plate, Installing front license plate... 10-13
Light
Air bag warning light ................................. 1-23
Bulb replacement ...................................... 8-23
Flashing signal .......................................... 2-19
Fog light switch ......................................... 2-20
Headlight switch ........................................ 2-17
Headlights Bulb replacement .................... 8-25
Interior light................................................ 2-35
Map light .................................................... 2-35
Rear personal light .................................... 2-36
Replacement ............................................. 8-23
Trunk light.................................................. 2-37
11-3
Z 02.7.29/V35-D/V5.0
X